
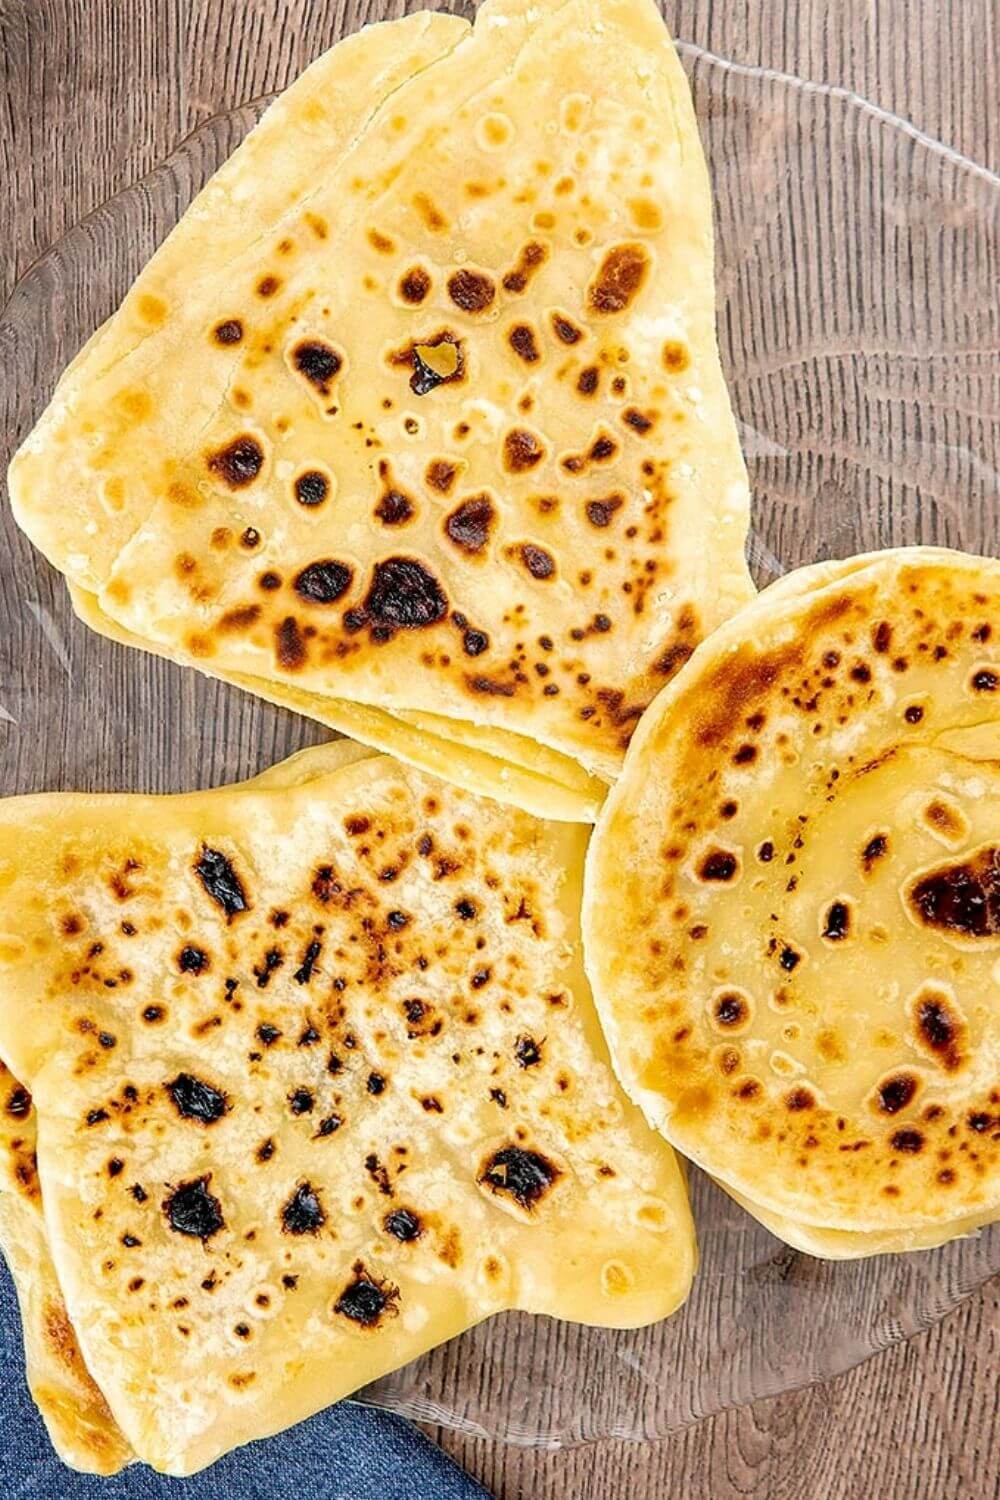
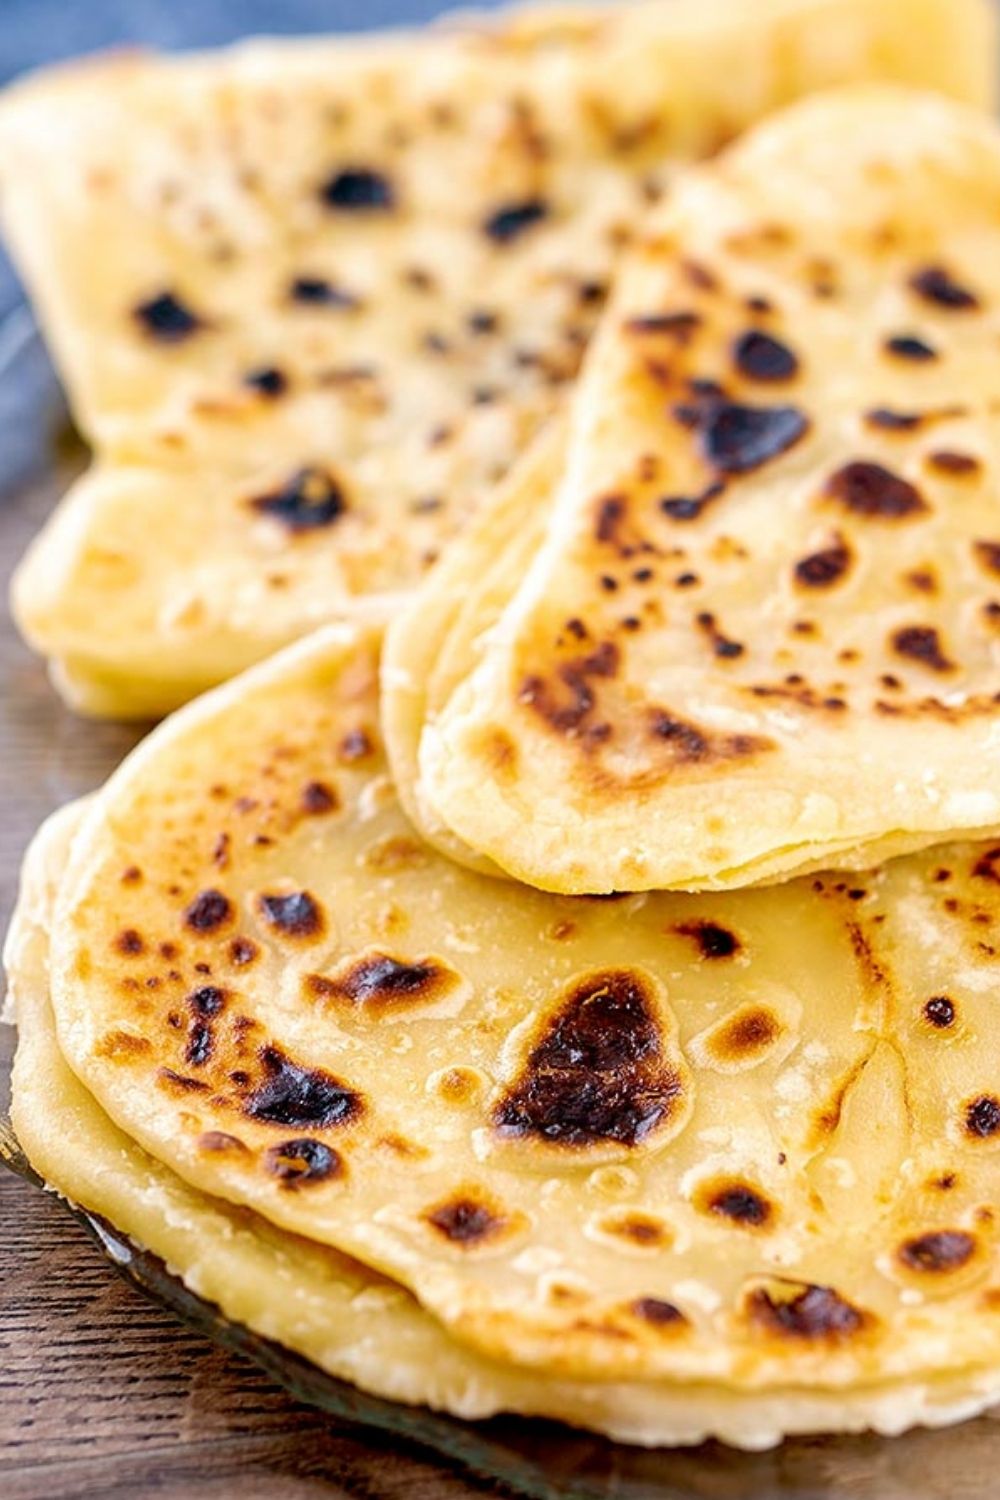
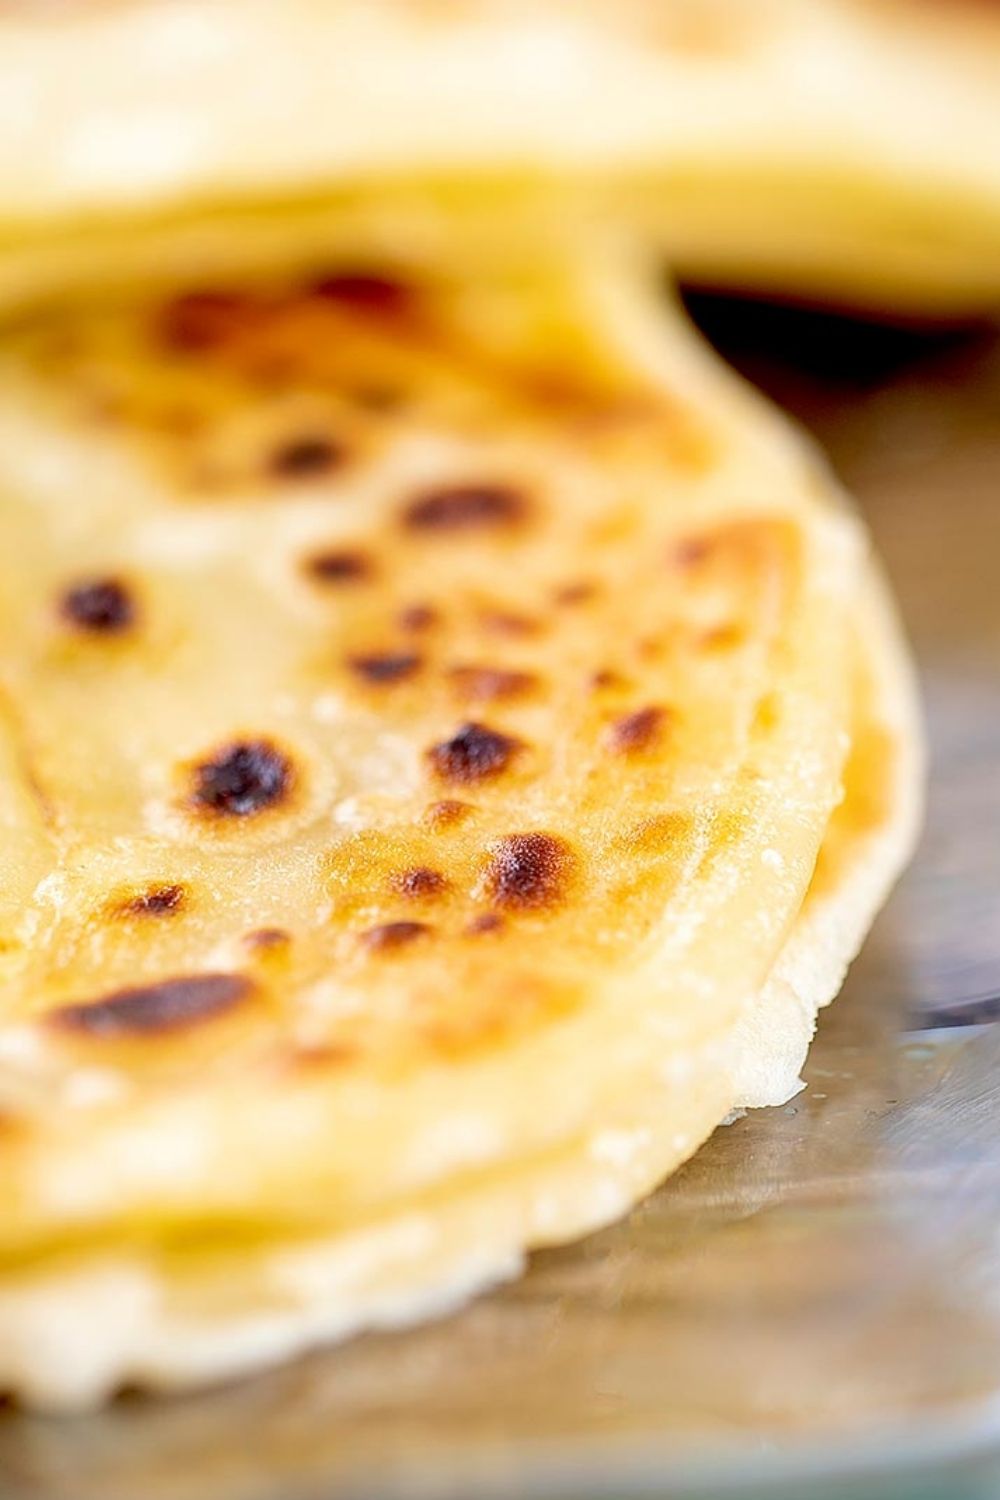
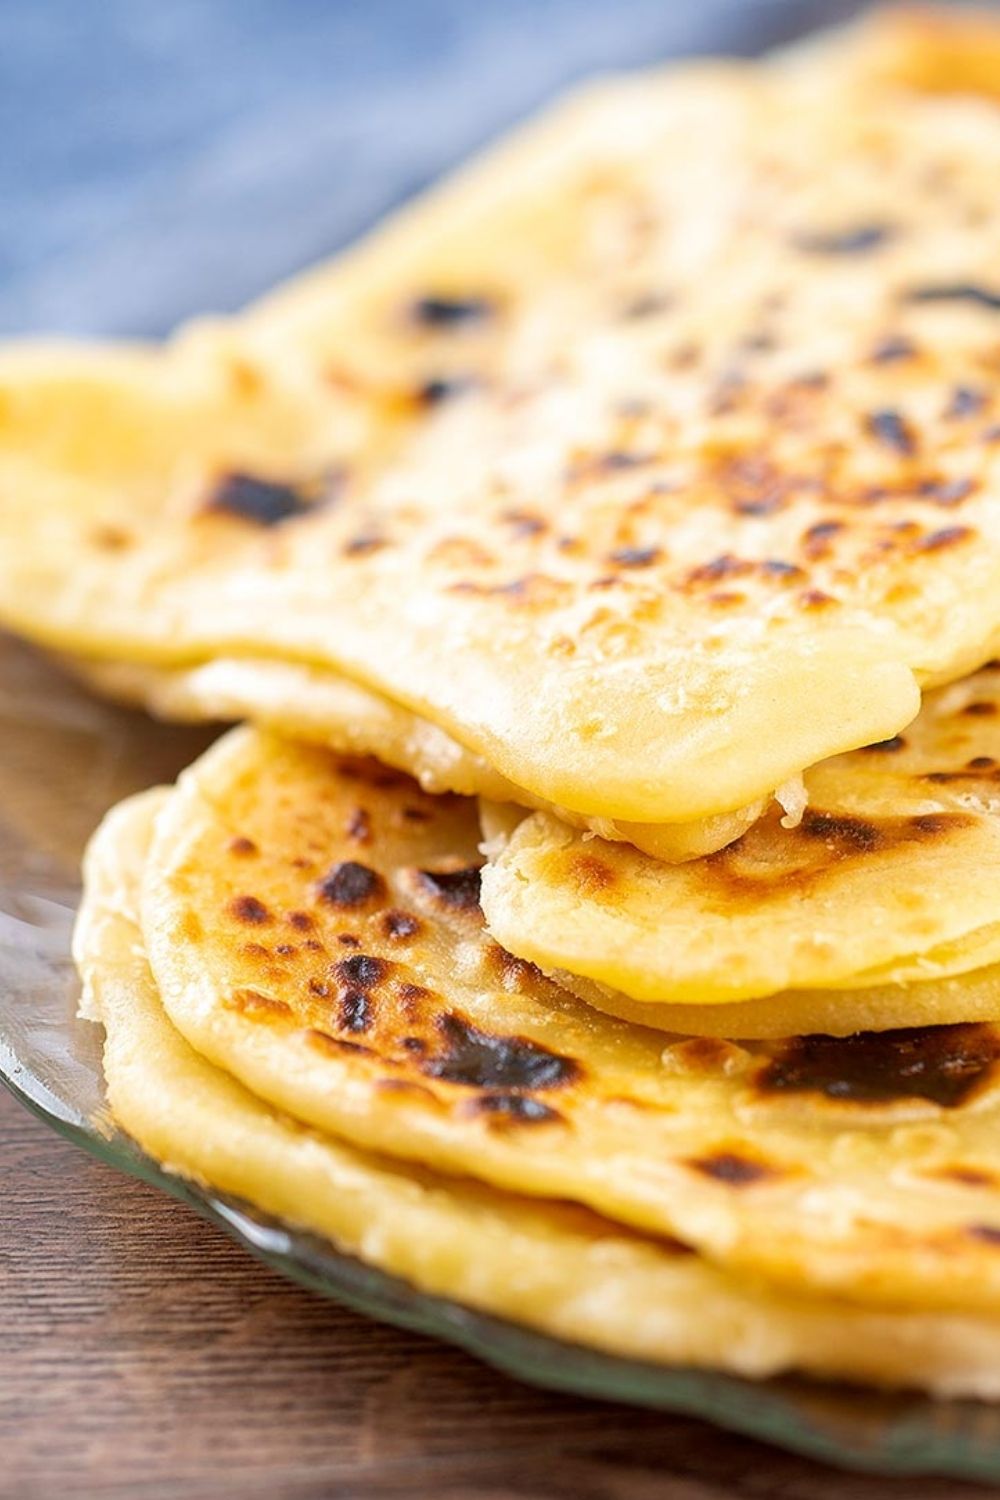
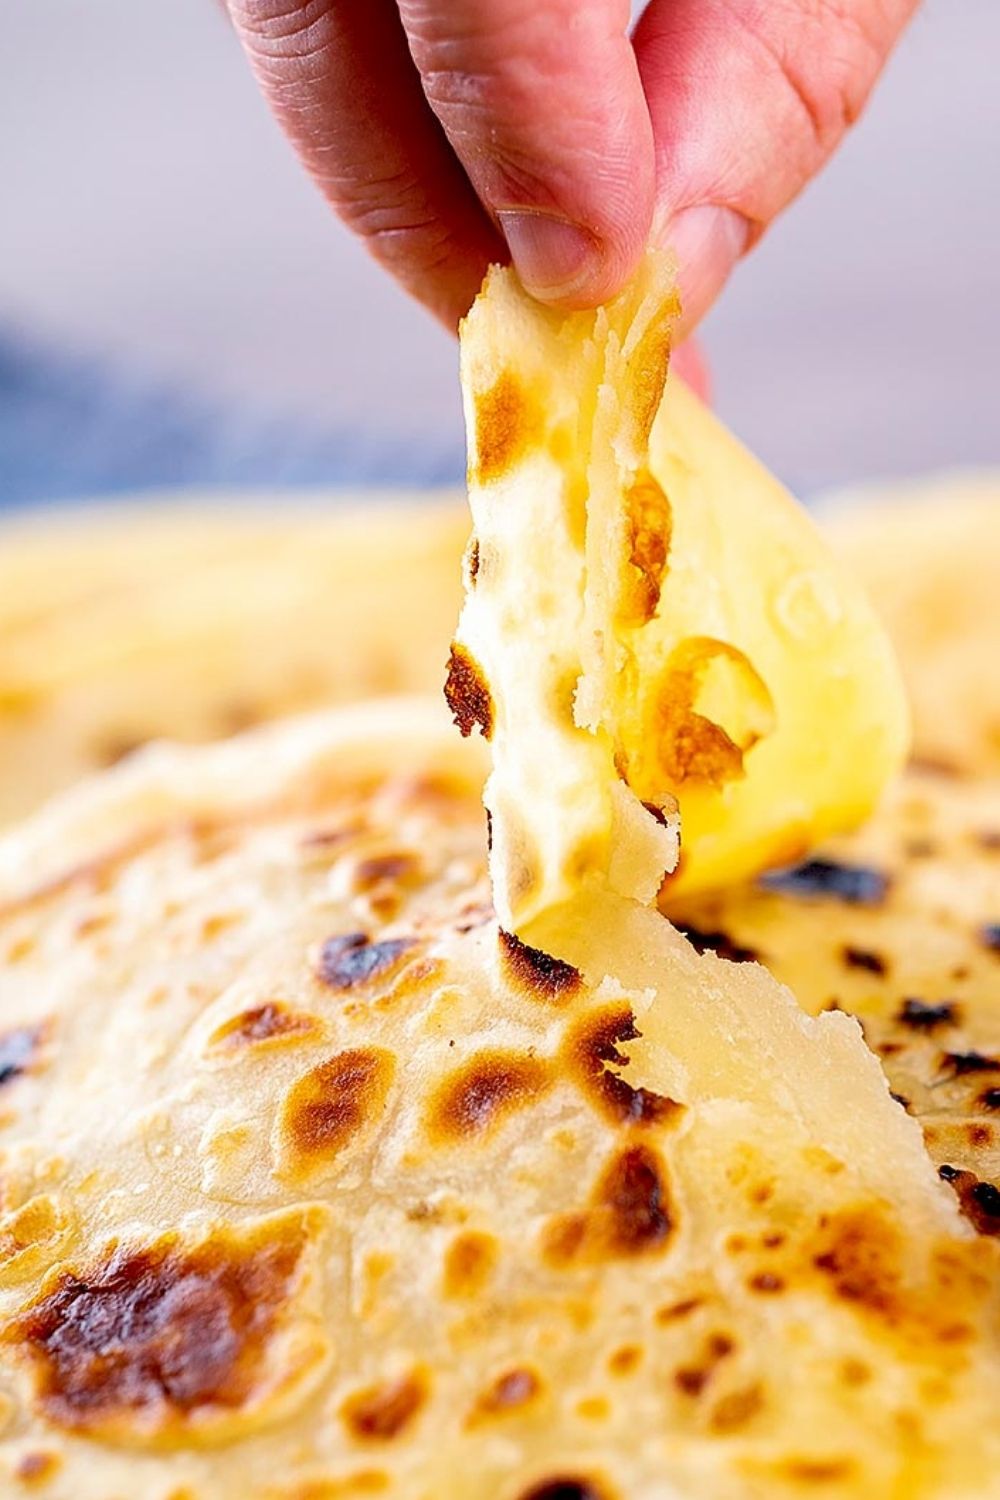
Paratha is a flaky, soft flatbread found throughout India. The bread goes perfectly with nearly any dish where you need to soak up some extra sauce or gravy. It is also perfect for scooping up rice, lentils, beans, or other food you might normally eat with a spoon. Full of flaky layers, this flatbread is a tender treat.
More of our recipes live on Instagram @thebellyrulesthemind.official and Pinterest @Bellyrulesdmind .

Jump to:
What is Paratha?
Paratha is a traditional Indian flatbread recipe that is similar to naan and roti. The name translates into layers of cooked dough.
If you visit India, you can find paratha in nearly every part of the country.
Our paratha recipe is soft and flaky and the perfect companion to just about any dish. Easy to make and delicious, it is one our favorite side breads to serve with some of our favorite recipes.
What is the difference between Paratha, Naan and Roti
Paratha, naan, and roti are all slightly different versions of Indian flatbread. They each have similar ingredients and all are easy to make.
Naan is slightly different from roti and paratha. It uses a small amount of yeast to provide a bit of rise to the dough. Roti and paratha rely on the heat of the cooking surface to provide a bit of rise to the dough.
Roti is a bit thinner and chewier than both naan and paratha. Paratha is the most flaky of the three variations of flat bread.
Why you will love this Paratha
Paratha is a flaky, soft bread that is perfect to serve with your favorite Indian entrée. It has a neutral flavor, which means it pairs well with nearly anything.
It is also a great side dish or appetizer. You can use it to dip it into your favorite chutney, like this Green chutney, or other favorite dips.
Paratha Ingredients
You really don't need much to make this flaky flatbread at home. Here's what you need for the dough:
- Whole Wheat flour
- Water
- Salt
- Oil - olive oil or canola oil work well
When you are ready to roll the paratha, you'll need to have a little extra whole wheat flour and ghee or oil ready to go.
How to make soft flaky Plain Parathas
When you are ready to make these soft pieces of flatbread, here's what you need to do.
Making the dough
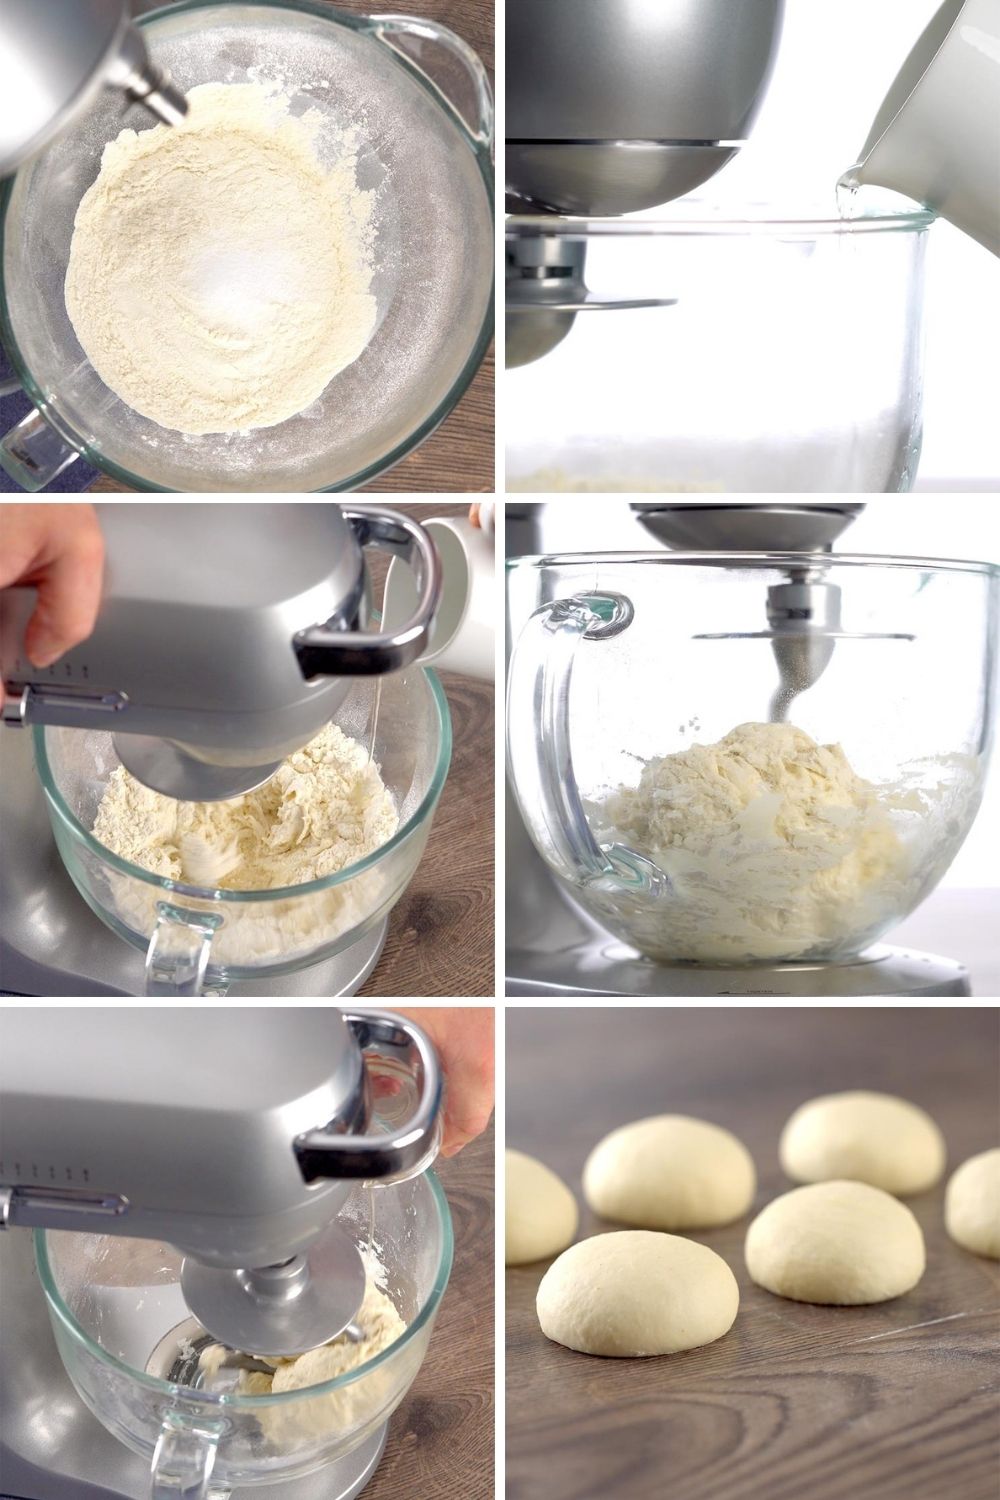
- To start, you'll need to make the dough. First, place the whole wheat flour and salt in the bowl of your stand mixer.
- Next, use your dough hook attachment to start mixing the flour and salt on speed 2 if using a Kitchen Aid or a low speed if using another mixer.
- As the dough hook turns, carefully and slowly pour all the water into the bowl. Once the dough starts to form, switch to a medium speed or speed 4 on the Kitchen Aide.
- Once the dough has completely come together, mix on the lowest speed setting for 1 minute. After a minute, turn off the mixer and remove the dough from the bowl. Next, divide the dough into six equal parts and then roll into balls.
- Finally, cover the dough with a cloth and allow it to rest for about 10 minutes. Once it has rested, you are ready to cook the paratha.
Cooking the Paratha
Once your dough is ready, follow the steps below to fold into square, circle, or triangular shapes. When they are all folded, follow these steps to cook the dough.
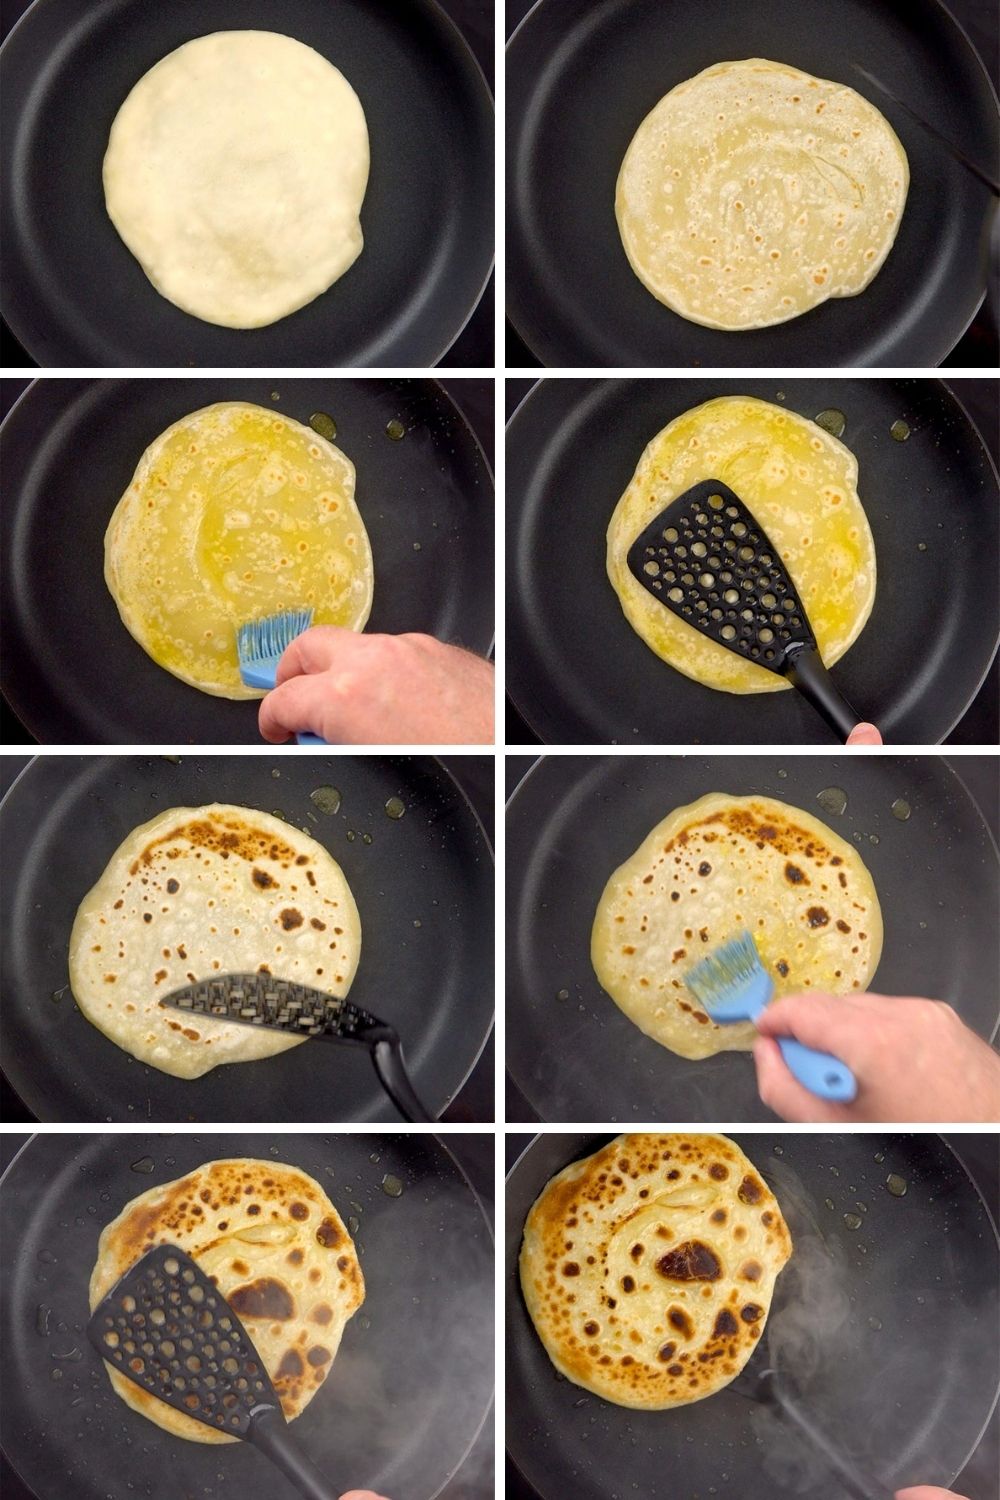
- First, heat your griddle over medium high flame. Once it is hot, place the dough on the griddle.
- The paratha will start to puff up from the base in some place. Next, use a spatula to help flip the dough over. Carefully spread a small amount of ghee or oil over the top dough.
- When the second side is about halfway cooked, flip with a spatula and then gently press down on the top of the dough. Pressing it down gently will help keep it flaky and soft and also promote even cooking.
- Next, spread some ghee or oil on top of the parathas. If the dough was evenly rolled, it should start to puff up.
- Finally, flip the dough a few more times until you see several brown spots appear on the outside of the dough. It should look evenly cooked.
- You will need to repeat these steps with the remaining parathas.
- Flip again a couple of times till you see more brown spots and the paratha is cooked evenly. Repeat with the remaining dough pieces.
Pro tips and tricks
When you are ready to make the parathas, follow these pro tips and tricks for best results:
- make sure the dough is not too sticky and does not crumble by adding more oil, water, or flour
- knead the dough well
- cook over high heat to avoid hardening the dough
- add about a tablespoon of yogurt to help keep it soft for longer
- allow the dough to rest so the flour can soak in the water and oil
- store with paper towels or cloth to help keep the bread soft and flaky
- use oil instead of ghee if not eating right away
Can I make Paratha Vegan
Yes! You can easily make this recipe vegan. To do this, use oil instead of ghee. Ghee adds a buttery flavor to the paratha, so we highly recommend it if you do not follow a vegan diet.
Paratha Shapes
We make paratha into three different shapes. The traditional shapes include circles, squares, and triangles. Of course, if you prefer, you can make your own shapes, but these shapes are easy to make if you follow the following instructions.
To make triangular shapes
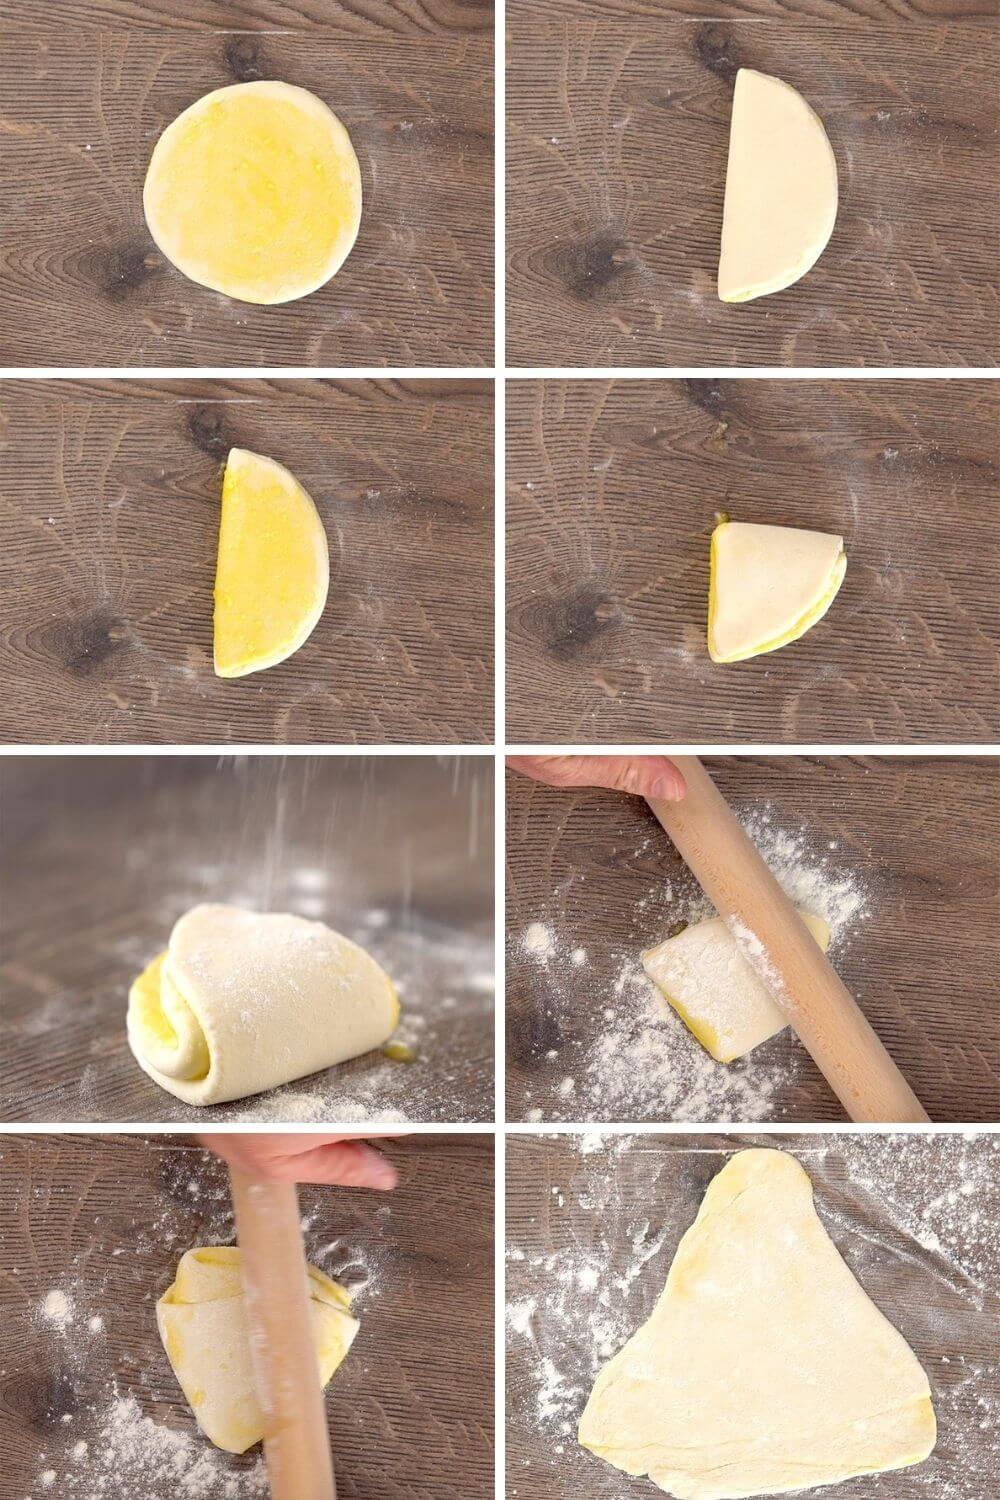
If you want to make triangle shapes, follow these simple steps:
- Place one dough ball on a floured surface and use a rolling pin to roll the ball into a circle that is about 4 inches in diameter.
- Next, spread some ghee or oil on the dough circle and then fold in a half to form a semicircle.
- Top the semicircle with additional ghee or oil and then fold in half again to form a triangle.
- Finally, dust some flour on the folded triangle and roll it out to get a folded triangle of about 6 to 7 inch sides.
To make square shapes
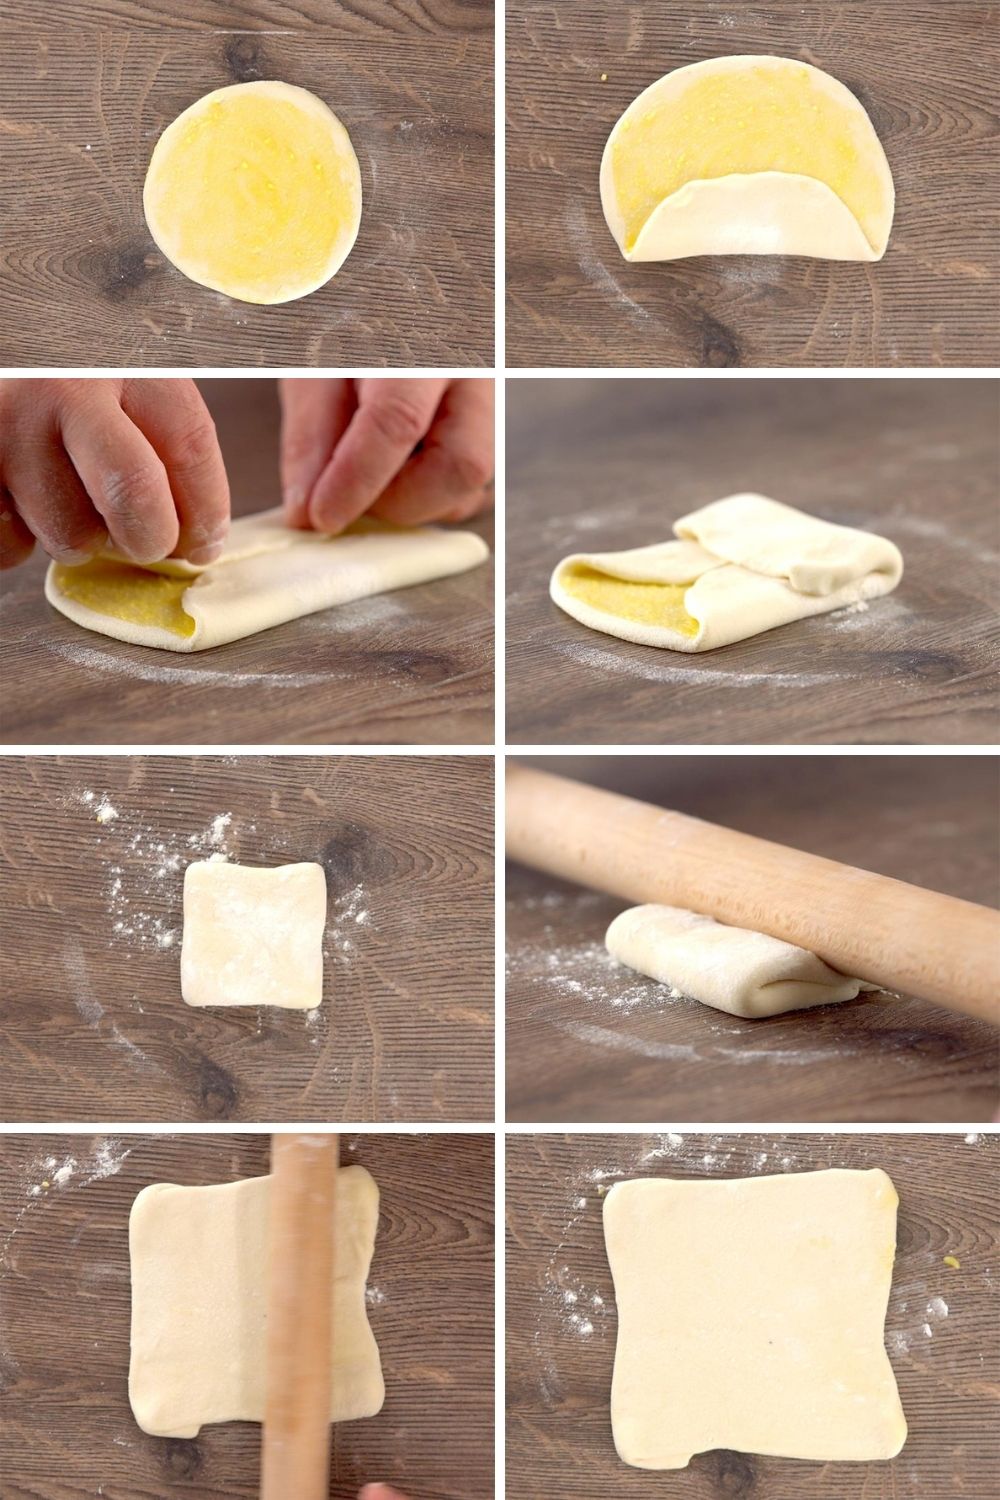
If you like square shapes, you can follow these instructions to make perfect squares when cooking the paratha:
- Start by rolling a medium sized dough ball on a lightly floured surface to form a roughly 4 inch circle.
- Next, evenly spread a little ghee or oil on the rolled dough.
- Once oiled, fold one side halfway, then fold the other side over to overlap the first side. Next, do the same with the remaining two sides: fold one halfway in towards the center and then fold the other side in to overlap the first side.
- Finally, pat the square with dry flour and roll out again. You can maintain the square shape by turning the dough over as you roll. Check out our video and step by step pictures for more details on how to roll the dough into a square shape.
To make round (circle) shapes
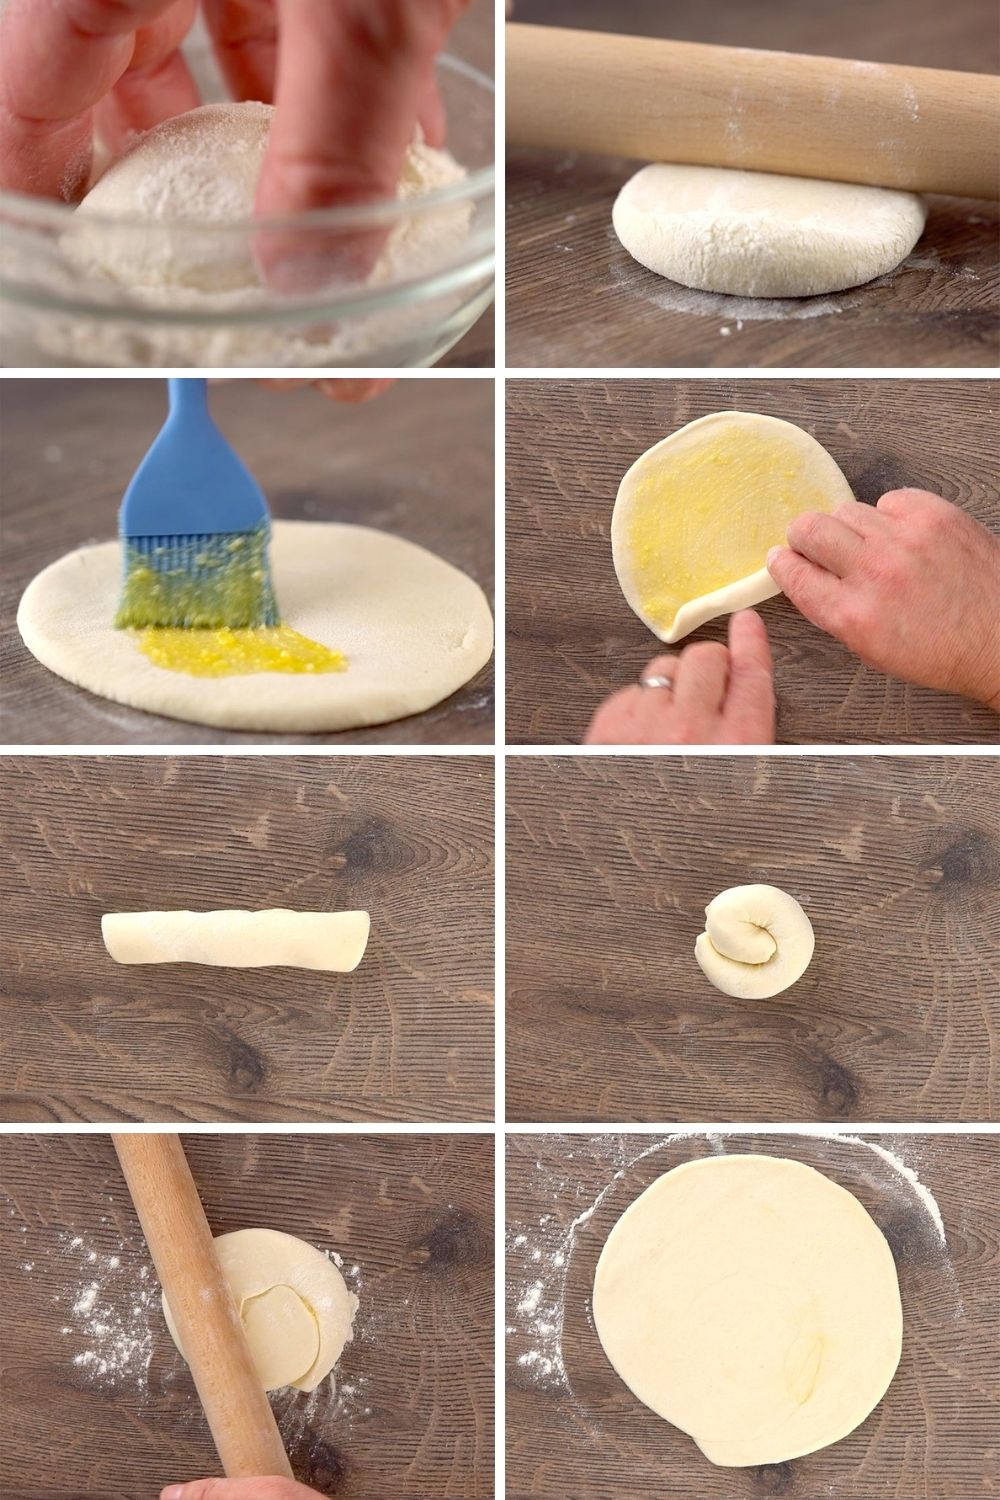
The circle shape is one of the easier shapes to make. If you are new to making paratha, you may want to start with a circle shape. Here's what you need to do:
- Start by rolling a dough ball into a roughly 4 inch circle.
- Next, spread a little ghee or oil evenly on the rolled dough.
- Once covered, roll the dough to form a cylinder shape and then fold it back on itself.
- Next, roll the folded dough to form another cylinder shape and then fold it back on itself to form a circular dough.
- Finally, dust it with some flour and roll the folded dough into a circle about 6 inches round.
How to store cooked parathas
Once cooled, you can easily store parathas for later use. You can do this a few different ways.
You could place the parathas in an airtight container with paper towels or cloth placed between each piece, or you could also wrap them tightly in plastic wrap. When stored like this, they should last about 4 to 5 days. If you prefer, you could place them in an air tight container and store in the fridge. They should last about 5 to 7 days in the fridge.
Finally, if you like, you could place them in a freezer safe container and freeze them for up to 6 months. If freezing, we recommend placing a paper towel or parchment paper between each piece.
When you are ready to serve, allow frozen paratha to come up to room temperature. You can gently heat them in a warm oven or over a low flame on the stove top.
How to store paratha dough
If you want to make paratha dough ahead of time, you can. To do this, follow the instructions up to the point of forming balls with the dough. You can then place the dough in an airtight container or a freezer safe container. They should last for about 4 to 5 days in the fridge or about 6 months in the freezer.
Before cooking, allow them to thaw in the fridge overnight. Allow the dough to come up to room temperature before folding them into their final shapes.
Flavor variations
You can add a bit of flavor to the paratha if you like. These are plain paratha, so they compliment a wide variety of recipes. But if you like, you could add flavors such as:
- crushed spinach
- cooked and crushed mixed vegetables and seasonings such as garam masala or chili powder
- coriander, chili powder, and garam masala
- garlic
Serving Suggestions
Parathas pair well with a lot of recipes. It is great for scooping up gravies and sauces. Some our favorite recipes to serve with parathas include:
- Navratan korma - an awesome curry that is loaded with layers of flavors in a creamy curry your family will love
- Malai kofta - This popular Indian recipe creates delicious dumplings, perfect for soaking up all the velvety sauce
- Dal Tadka - a delicious lentils dish perfect for cold nights
- Lauki KI Sabzi - a savory bottle gourd curry recipe sure to please the whole family
- Restaurant Style Dal Makhani - Indian comfort food at its finest and perfect for everyone in the family to enjoy
- Green Moong Dal Instant Pot & Stove Top - a creamy and easy dinner perfect for any night of the week
Tips to make soft flaky parathas
When making paratha, it is important to follow these tips to make soft and flaky flat bread:
- make sure to knead the dough well
- make sure to use the proper ratio of water and oil to flour - they should not be sticky or crumbly
- cook over high heat to avoid hardening the dough
- add about a tablespoon of yogurt to help keep it soft
- allow the dough to rest awhile so the flour absorbs the water and oil
- use oil instead of ghee if not eating right away
Made it, tag it!
Did you make this paratha recipe? Show us the pick of your spread on Instagram. Take a pic and tag us on Instagram @dbellyrulesdmind or Facebook @thebellyrulesthemind
Flaky Homemade Indian Paratha
Servings:
servingsCalories:
Ingredients
- Plain Paratha 3 shapes - Round, square, triangle
- Whole Wheat flour (6 paratha) -2 cups
- Water - 1 cup
- Salt - 1 tsp
- Oil - 1 tsp
- For Rolling
- Whole Wheat flour - ½ cup
- Ghee or Oil - 2-3 tbsp
Instructions
- For Making Paratha DoughIn the mixer bowl of your kitchen aid, add whole wheat flour and salt.
- Attach the dough hook attachment to the kitchen aid
- Lock the hook knob and start the mixer at speed 2
- Pour all the water slowly and keep alternating between speed 2 and speed 4 as the dough starts forming.
- Once the dough is formed, add oil to the dough and let it knead at speed 1 for one minute
- Once the dough is ready, divide the dough into 6 equal parts and roll to make dough balls.
- Cover it with a cloth and rest it for 10 minutes.
- Your Dough is ready to make paratha
- Rolling the Round parathaRoll a dough ball to a circle of about 4 inches in diameter.
- Spread a little ghee evenly on the rolled dough.
- Start rolling the dough from one side to form a cylinder shape
- Once Again roll one end of the cylinder shape to form a circular dough.
- Dust it in some flour and roll it into a circle 6 inch.
- Roll a dough ball to a circle of about 4 inches in diameter.
- Spread a little ghee evenly on the rolled dough.
- Start rolling the dough from one side to form a cylinder shape
- Once Again roll one end of the cylinder shape to form a circular dough.
- Dust it in some flour and roll it into a circle 6 inch.
- Cooking the ParathaHeat tava (griddle) on medium high flame. When hot, place the paratha on the tava.
- You will soon see the paratha puffing up from the base at some places.
- With a help of a Spatula flip the paratha. Spread some ghee evenly.
- Flip again when the second side is about ½ cooked. Gently press the paratha with the spatula to help the paratha cook evenly, press gently for a soft, flaky paratha.
- Spread some ghee on this side too. If you have rolled the dough evenly the paratha will puff up.
- Flip again a couple of times till you see more brown spots and the paratha is cooked evenly. Repeat with the remaining dough pieces.
- For making Triangular shaped ParathaTake one dough ball and roll it in the dry flour. Using a rolling pin , Roll into a circle of about 4 inches diameter.
- Spread some ghee on the dough circle. Fold in a half to form a semi circle
- Now spread some ghee on this half folded dough.
- Fold the semicircle in half again to get a folded triangle.
- Dust some flour on the folded triangle. Now begin to roll to get a folded triangle of about 6 to 7 inches side.
- For making Square shaped ParathaRoll a medium sized ball on a lightly dusted area to a circle of about 4 inches in diameter.
- Spread a little ghee on the rolled dough evenly.
- Fold one side halfway, then overlap the other side to the edge of the first side. Now do the same with the remaining two sides - fold first one halfway, then overlap the other side completely.
- You will have a perfect square once it's all folded. Pat with dry flour and roll out again but this time into a square shape by turning over as you maintain the square shape.
- Check the video and step by steps pictures for more details on the rolling.
Video
Nutrition
About Soniya
Hello, I am Soniya, the cofounder of The Belly Rules The Mind. Originally from Mumbai, India, I am settled in Virginia US with my husband.
 I am a mother of 2 energetic boys, referred to as R2 (15-year-old) and R3 (10-year-old) on the blog. In case you are wondering who is R1, well that is my husband.
My hubby and I were born in Mumbai, India, where we were spoiled by the wealth of food choices available to us. We could enjoy everything from yummy street food to multi-cuisine restaurants and we became very picky about what we like and what we don't. Come join us on our journey to have "The Belly Rule The Mind"

Dannii says
I always get this when we order an Indian takeaway. I am going to have to try making it myself!
Tracy says
Oh I LOVE homemade breads like this! This looks so good!
Jeanne @ Cooksister says
Oooh paratha is my favourite flatbread! So flaky and buttery, and I love watching them being made - mesmerising!
Beth says
Oh! There is nothing better than a fresh hot bread to soak up all of the flavorful juice! Thanks for the tips about shapes and such, I feel like I can make these by myself!
Amy says
Could i make these gluten free?
Soniya Saluja says
Hi Amy, yes you can make it with gf flour.