
I was born and brought up in Mumbai, spoiled in the best possible way when it came to food. Breakfasts and evening snacks in our house were never limited to one cuisine. One day it would be soft idlis and dosa, the next day Sindhi dal pakwan, Gujarati farsan, or Maharashtrian poha and sabudana vada. And somewhere between all of that… came khandvi.
If you've ever walked through the lanes of Andheri or Matunga in Mumbai, you know exactly what I'm talking about. The farsan shops with glass cases stacked high with golden khandvi rolls, dhokla squares, and crispy gathiya. As a kid growing up in Mumbai, I'd press my nose against those cases while my mom placed her order, mesmerized by how perfectly uniform each khandvi roll looked. The shop owners would pack them in those iconic pink paper boxes, and I'd sneak one (okay, maybe three) on the ride back home.
My Gujarati neighbor aunty in our building was legendary for her homemade Khandvi. Every few weeks, she'd send over a dabba of fresh rolls, still warm with that gorgeous tempering of mustard seeds and curry leaves glistening on top. Sometimes, I'd go over to her place to watch her make Khandvi, amazed at how she spread that hot batter across her steel thalis in one swift motion. When I asked her to teach me, she laughed and said, "Beta, this takes years of practice. Your hand has to know when the batter is ready." She wasn't wrong.
Come JOIN US on Instagram @thebellyrulesthemind.official and Pinterest @Bellyrulesdmind and be a part of our community and discuss various recipes, tips and tricks.
Jump to:
- Ingredients
- How to Make Khandvi in Instant Pot
- Gujarati Khandvi Video Recipe
- Common Mistakes to Avoid
- Is Khandvi Gluten Free?
- Is Khandvi vegan?
- Soniya's Top Tip
- How long can Khandvi be stored in a refrigerator?
- Best Tips for Perfect Khandvi
- How to Serve Khandvi
- Serve With
- Gujarati Khandvi Recipe
- Easy Instant pot Gujarati Khandvi Recipe
Fast forward to my life here in the US, and I desperately missed that taste of Mumbai's street farsan. The Indian grocery stores here carry frozen khandvi, but let's be honest, it's just not the same. I tried the traditional stovetop method countless times, standing over a hot pan stirring constantly, only to baby sit, get tired and not enjoy the process. That's when I discovered this Instant Pot Khandvi method, and it changed everything. The pressure cooker cooks the batter to the perfect consistency without all that constant stirring, giving you a fighting chance to actually spread and roll it properly.
Now when I make these khandvi rolls, they transport me right back to those Mumbai farsan shops. My kids, who've only visited India a handful of times, have fallen in love with these delicate spirals. My daughter even requested them for her birthday party instead of regular snacks. Coming from a teenager who usually wants pizza, I'd say these khandvi rolls have officially earned their place in our American home.
Ingredients
See recipe card for quantities.
For the Khandvi Batter
- Chickpea flour (besan): the base of the batter. Fresh besan works best because stale flour can turn bitter. I always give it a quick sniff before using, just like my mom taught me back in Mumbai.
- Yogurt: adds tanginess and helps create that smooth, silky texture. Homemade yogurt works beautifully, but store-bought plain yogurt is fine too. The slight sourness is what gives khandvi its signature flavor, reminiscent of the ones from those Matunga farsan shops.
- Water: thins out the batter to the perfect spreadable consistency. Too little and your khandvi will be thick and chewy. Too much and it won't set properly.
- Turmeric powder: gives khandvi that gorgeous golden yellow color. Don't skip this because it's what makes the rolls look so inviting.
- Salt: brings all the flavors together. Season to your taste, but don't be shy because the batter needs enough salt to balance the tanginess.
- Fresh ginger paste: adds warmth and a subtle bite. Fresh ginger paste works better than dried ginger here for that bright, zesty flavor.
- Thai green chili paste: provides the heat. You can adjust this based on your spice tolerance, but khandvi should have a gentle kick.
For the Tempering (Tadka)
- Oil: I use a neutral oil, but you can use ghee for a richer flavor.
- Mustard seeds (rai): these pop and release a nutty, slightly sharp flavor that's essential to the tempering. The sound of mustard seeds crackling in hot oil is pure music.
- Sesame seeds: add a lovely crunch and toasty flavor that complements the soft khandvi perfectly.
- Asafoetida (hing): optional but highly recommended because it adds depth and that authentic Gujarati taste.
- Curry leaves: optional but they make the tempering smell incredible. Takes me right back to my neighbor aunty's kitchen in Dadar.
- Fresh grated coconut: optional for garnish. It adds sweetness and texture to the finished dish.
How to Make Khandvi in Instant Pot
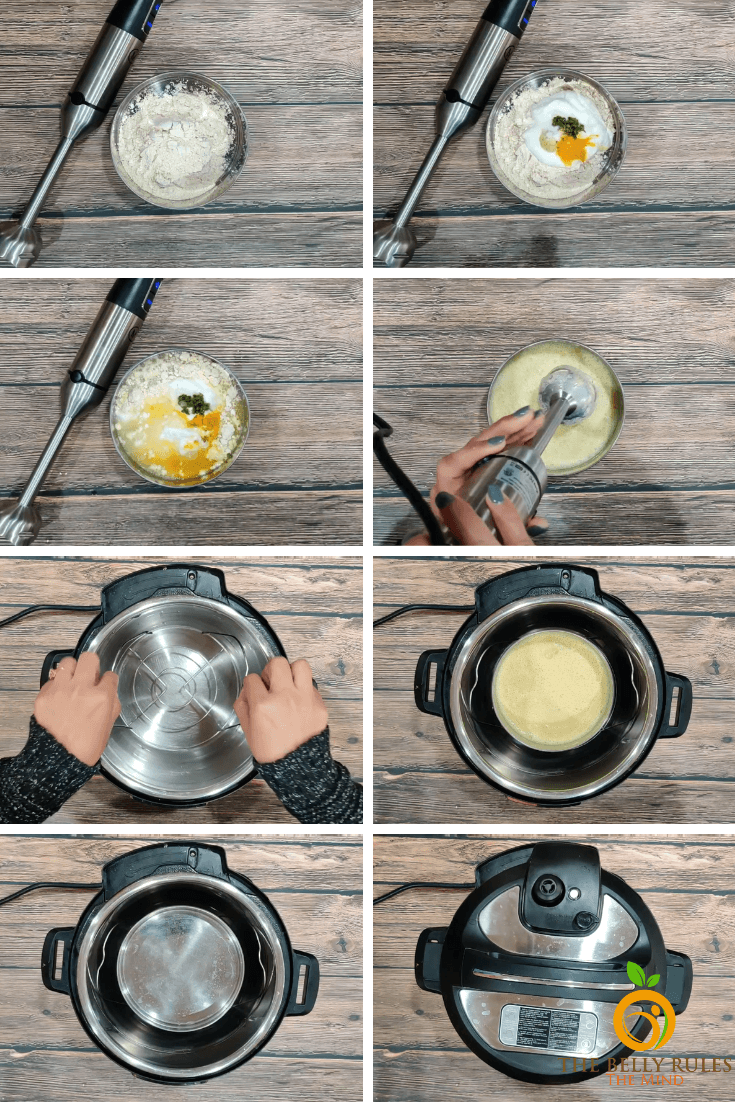
- Prepare the batter Grab a metal bowl that fits inside your Instant Pot and add the chickpea flour, yogurt, ginger paste, green chili paste, turmeric, salt, and water. Now here's my secret: use an immersion blender to mix everything together until you have a completely smooth batter with absolutely no lumps. This step is crucial because lumpy batter means lumpy khandvi. If you're mixing by hand, whisk vigorously and keep at it until you can't see a single lump. Trust me, take your time here. My Dadar neighbor aunty always said the batter should flow like silk.
- Set up the Instant Pot Pour 1 to 2 cups of water into the inner pot of your Instant Pot and place the trivet inside. Set your metal bowl with the batter on the trivet. Cover the bowl loosely with foil or a lid, but don't seal it tight because you want steam to escape.
- Pressure cook the batter Close the Instant Pot lid, seal the vent, and pressure cook on High Pressure for 12 minutes. When the timer goes off, do a quick release. Be careful when opening because the bowl will be extremely hot. Use silicone gloves or pot holders to remove the bowl. Give the batter a good stir with a spoon. It should be thick and cooked through, pulling away from the sides slightly. This is the moment that used to require 20 minutes of constant stirring on the stovetop!
- Prepare your spreading surface While the batter is cooking, this is the perfect time to get your workspace ready, just like those efficient farsan shop workers in Mumbai who have everything laid out before they start. Grease large plates, steel trays, or even your clean kitchen countertop with a light coating of oil. You'll also want to have a dough scraper, spatula, or even an old credit card handy for spreading. Speed is everything once that batter is ready.
- Prepare your spreading surface While the batter is cooking, this is the perfect time to get your workspace ready, just like those efficient farsan shop workers in Mumbai who have everything laid out before they start. Grease large plates, steel trays, or even your clean kitchen countertop with a light coating of oil. You'll also want to have a dough scraper, spatula, or even an old credit card handy for spreading. Speed is everything once that batter is ready.
- Spread the batter quickly As soon as you remove the batter from the Instant Pot, pour some onto your greased surface and spread it as thin and even as possible. Work quickly because the batter sets as it cools. The thinner you spread it, the softer your khandvi rolls will be. This is where practice helps. My first few batches looked nothing like those perfect rolls from the Girgaon shops, but I got better each time. Repeat with all the batter before you start cutting or rolling. Let the spread batter cool for about 5 minutes. You'll know it's ready when it peels away from the surface cleanly.
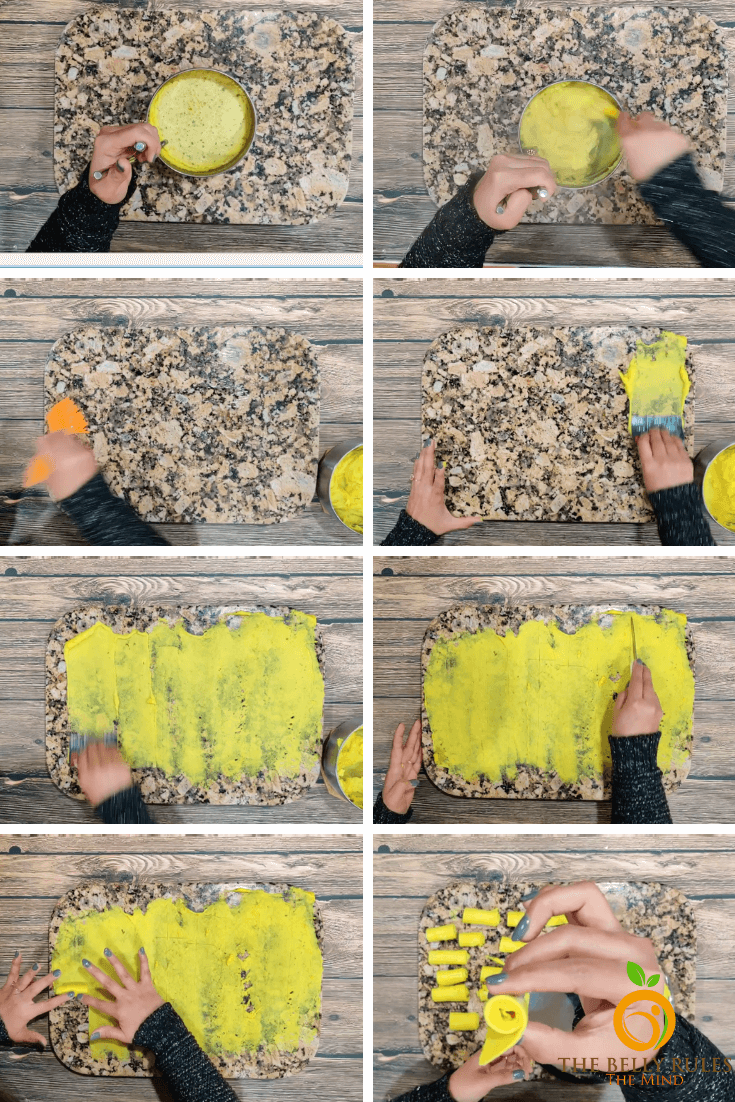
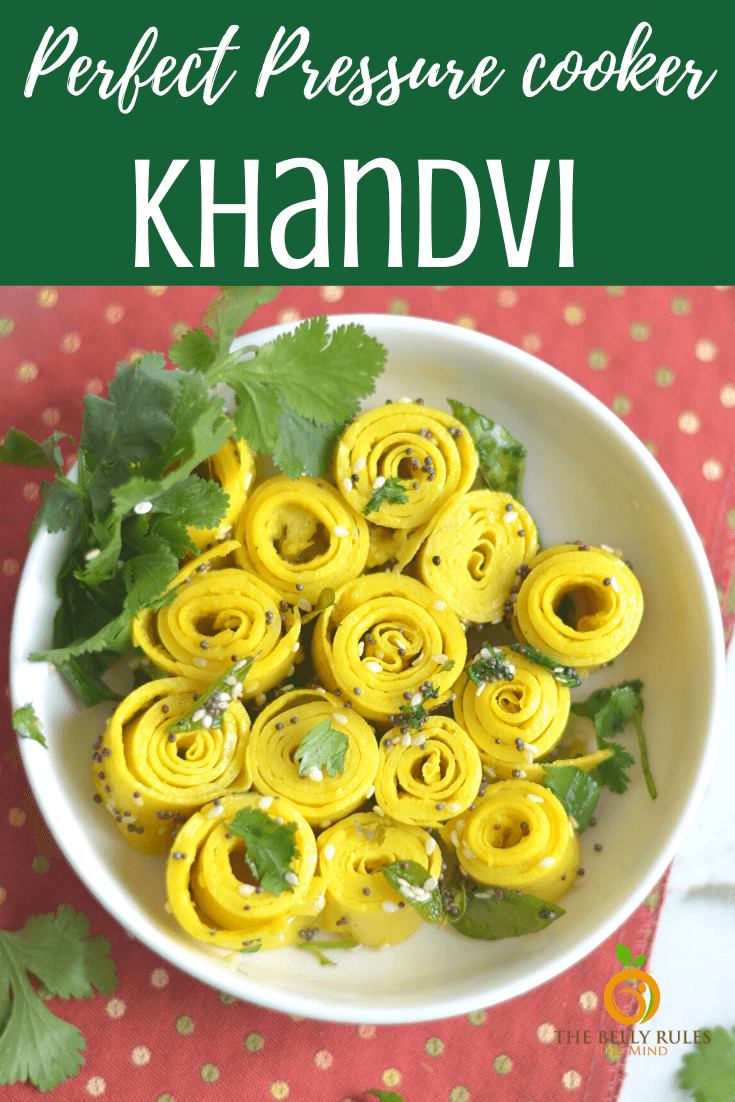
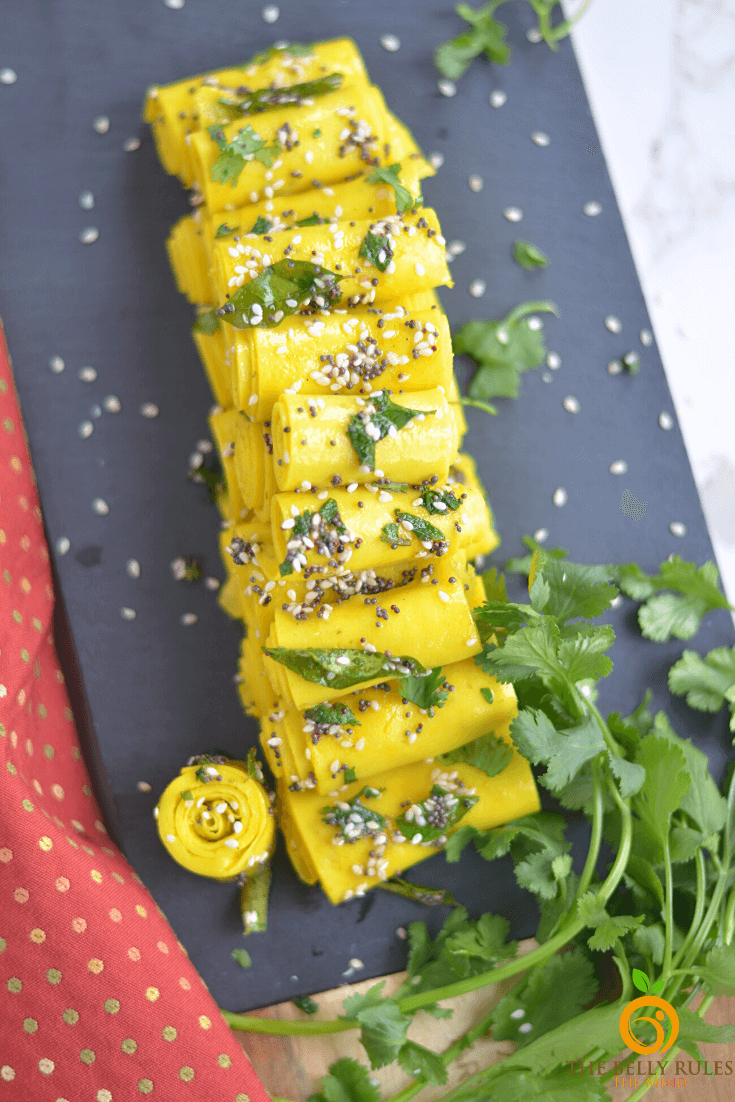
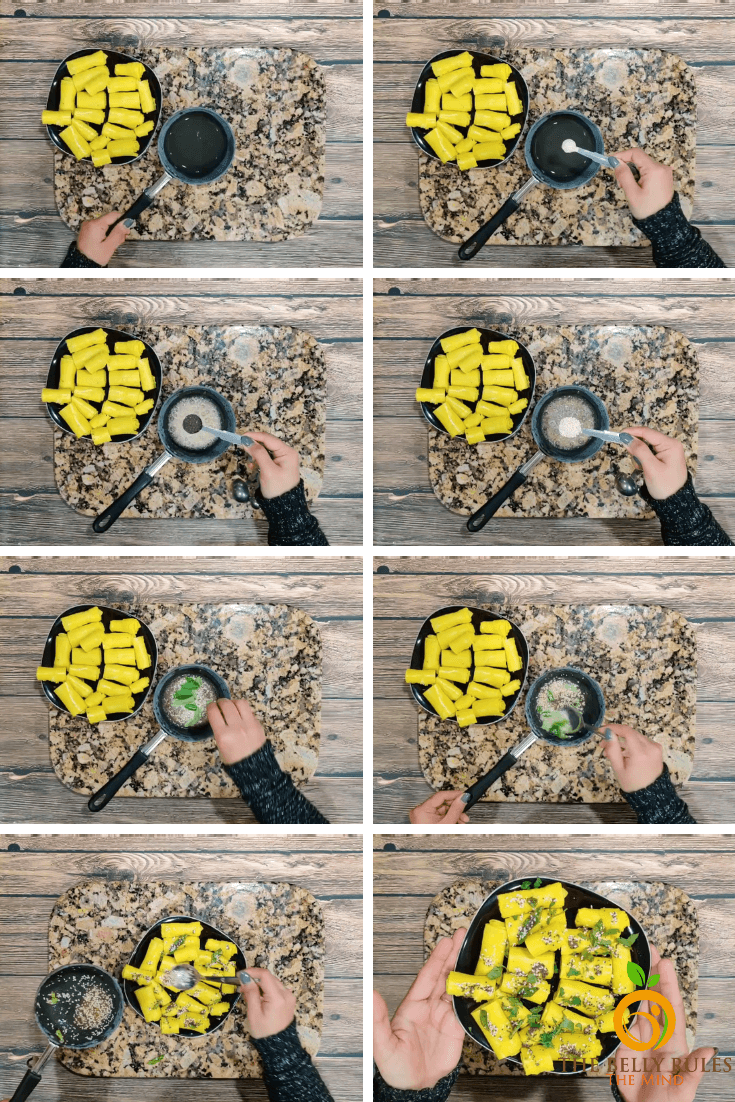
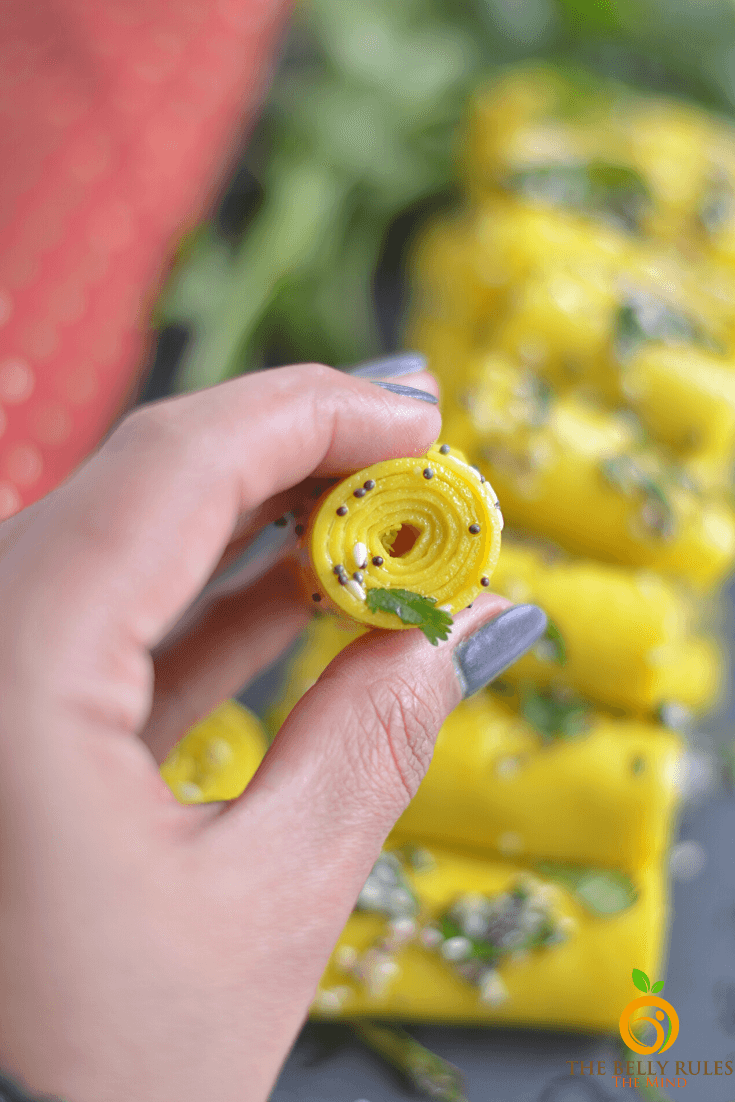
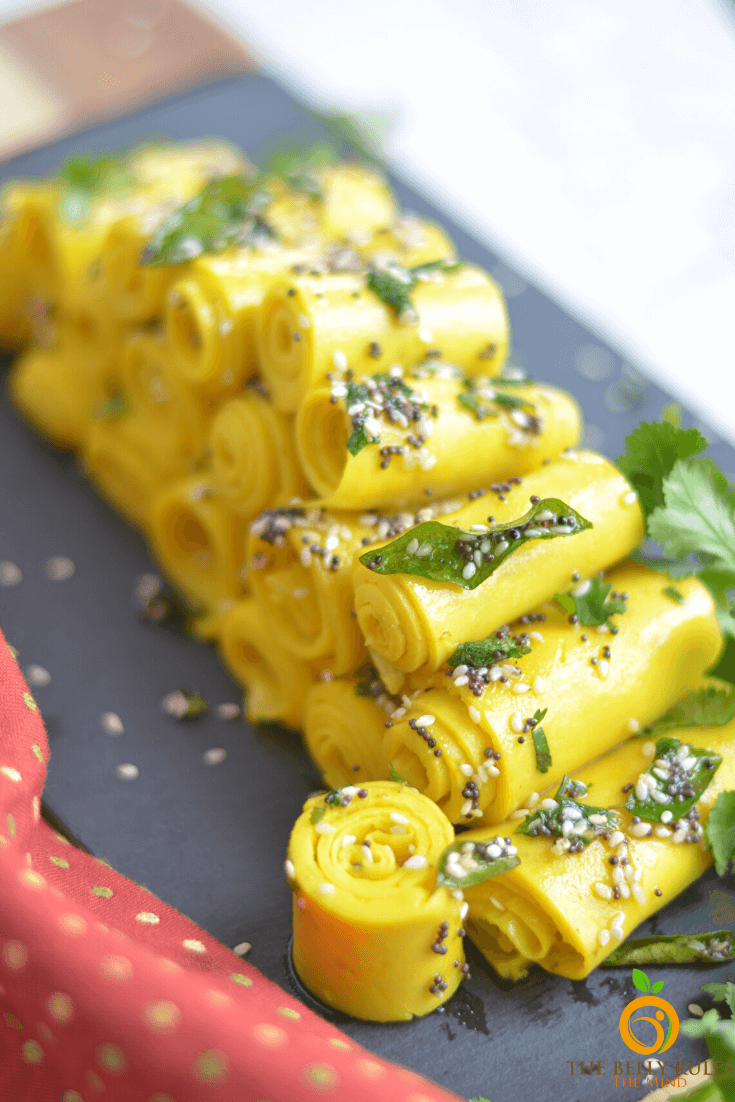
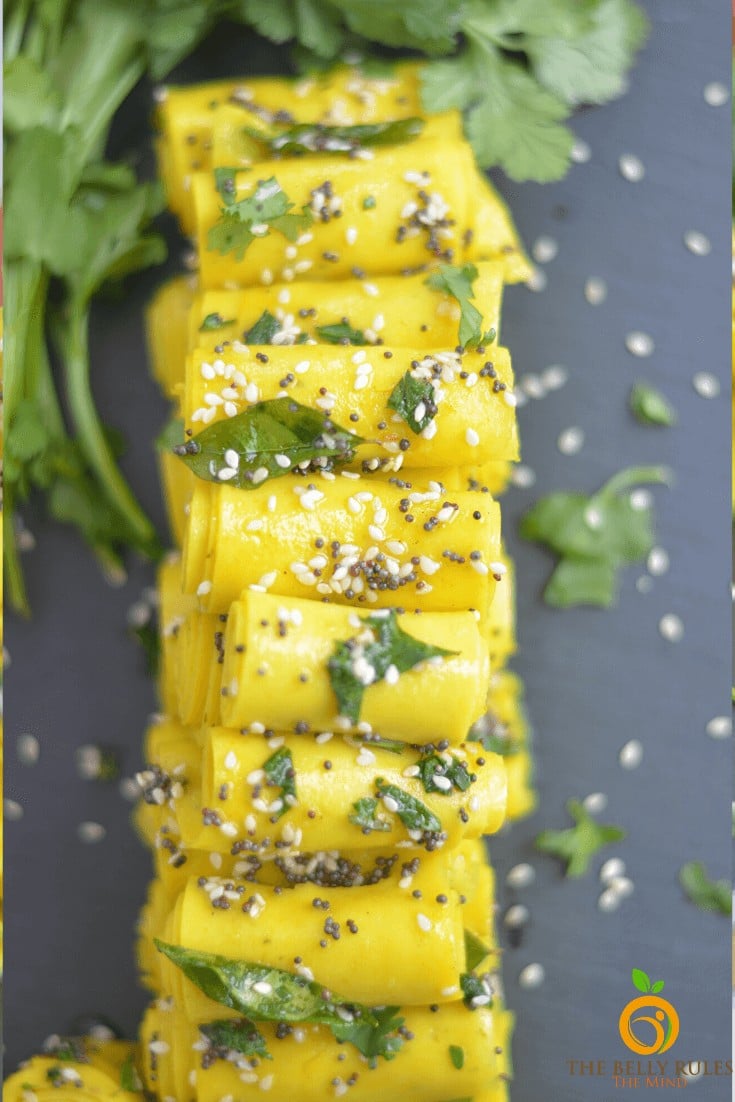
- Cut and roll the khandvi Once the batter has cooled, use a knife or scraper to cut it into strips about 2 inches wide. Starting from one end, gently roll each strip tightly into a spiral. If the edges crack slightly, that's okay, even the farsan shops have a few imperfect ones. Arrange the finished khandvi rolls neatly on a serving tray as you go.
- Make the tempering Heat oil in a small pan over medium heat. Add the mustard seeds and wait for them to splutter, dancing around in the hot oil. Then add the asafoetida, sesame seeds, a slit green chili if you want extra heat, and the curry leaves. The sizzle and aroma when the curry leaves hit the oil is absolutely amazing, it fills my kitchen with the same fragrance I remember from Mumbai kitchens. Pour this hot tempering evenly over your prepared khandvi rolls.
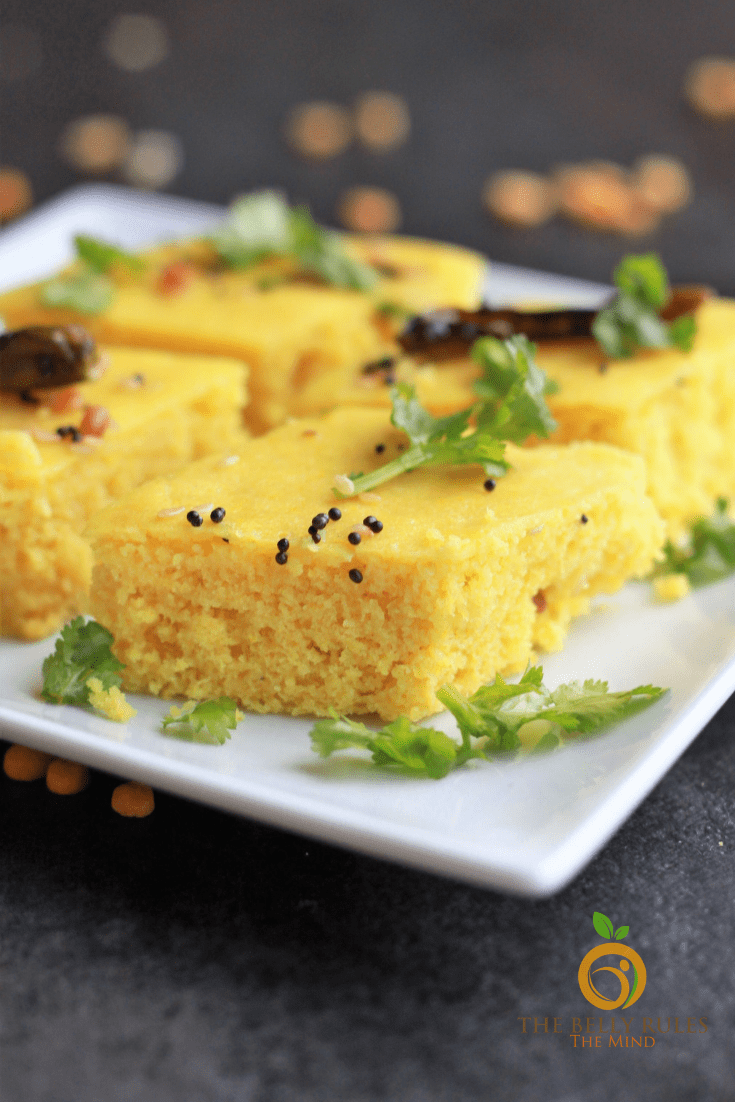
- Garnish and serve Sprinkle fresh grated coconut over the top if you're using it. Serve the khandvi at room temperature or slightly chilled. Savor the aroma and enjoy!
Gujarati Khandvi Video Recipe
Common Mistakes to Avoid
| Mistake | What Happens | How I Fix It |
| Not enough water in Instant Pot | Burn notice error | I always add at least 1 cup of water to the inner pot |
| Lumpy batter | Uneven texture, khandvi won't roll smoothly | I use an immersion blender and blend until completely smooth |
| Spreading too slowly | Batter sets before spreading, thick uneven layers | I prep all surfaces beforehand and work quickly |
| Over-greasing the surface | Batter slides around, hard to spread evenly | I use just a light coating of oil, wipe off excess |
Is Khandvi Gluten Free?
Yes. This recipe is made by using chickpea flour / Gram flour. Gluten is a protein found in wheat. Since khandvi does not use wheat flour, it is naturally gluten free.
Is Khandvi vegan?
Khandvi is not vegan. My recipe uses yogurt and other recipes may use buttermilk. But it is a good, healthy snack if you are a vegetarian that eats dairy products.

Soniya's Top Tip
Spread the batter as thin as possible while it's still hot. The thinner your layer, the more delicate and tender your khandvi rolls will be.
How long can Khandvi be stored in a refrigerator?
You can store khandvi in the refrigerator for 1 to 2 days. Before you store it, place the khandvi in an airtight container. Let them cool to room temperature before sealing them in to help avoid too much condensation.
When you serve the khandvi, you should warm the khandvi up a bit. You could use a microwave for only a few seconds or place in a warmed oven on a tray. Khandvi is best when served fresh, but as long as you don't reheat it for long, you can still enjoy it later.
Best Tips for Perfect Khandvi
- Use an immersion blender to ensure your batter is completely lump-free before cooking.
- Grease your spreading surface lightly, too much oil will make the batter slide around.
- Have all your tools ready before you remove the batter from the Instant Pot since speed is essential.
- If your batter starts to cool and thicken while spreading, you can add a tablespoon of hot water and mix quickly.
- Can you make khandvi ahead of time? Absolutely, just store without the tempering and add fresh tadka before serving.
How to Serve Khandvi
Khandvi is best served at room temperature or slightly chilled, making it perfect for warm days or as a refreshing snack, just like how they serve it in Mumbai's farsan shops. Arrange the rolls on a platter and serve them as a tea time snack, party appetizer, or light breakfast. They pair beautifully with green chutney for dipping. You can also serve them as part of a larger Gujarati thali or alongside other farsan snacks for a complete spread that would make any Mumbai aunty proud.
Serve With
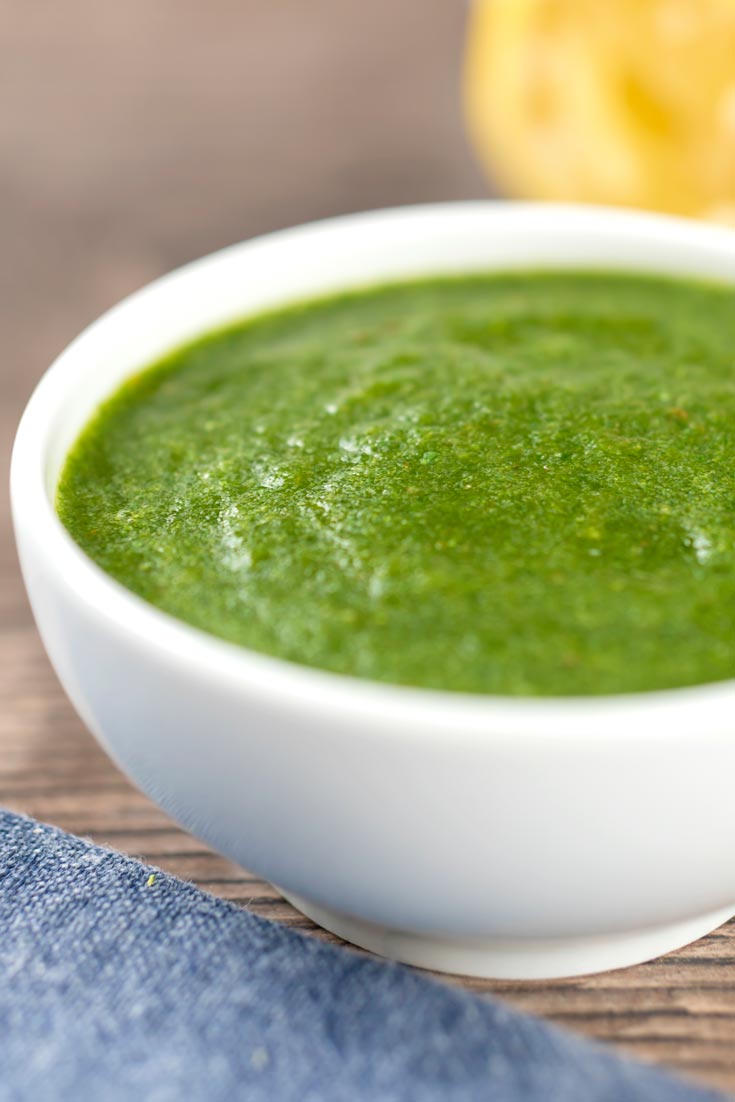
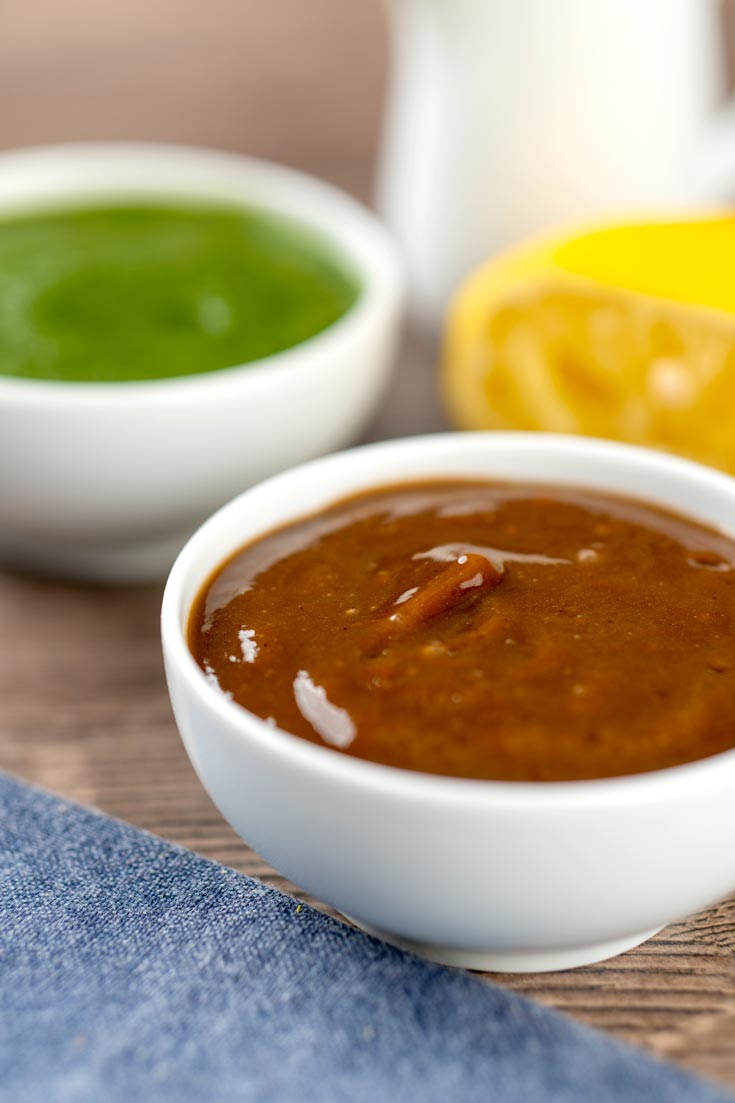
- Green Cilantro Mint Chutney - the classic tangy dip for khandvi
- Tamarind Chutney - adds a sweet and sour contrast
- Instant Khaman Dhokla - another Gujarati favorite for a complete snack platter
- Air Fryer Samosas - for a contrast in textures

If you make this khandvi recipe, don't forget to come back and leave your feedback and star rating . We would be THRILLED if you would take a pic and tag us on Instagram @dbellyrulesdmind or Facebook @thebellyrulesthemind
Gujarati Khandvi Recipe
Easy Instant pot Gujarati Khandvi Recipe
Servings:
-20 piecesCalories:
Equipment
- Mealthy Immersion Hand Blender: 500 Watt, 10 Speed Controls Plus Turbo, Includes 500mL Chopper and Whisk, and 600mL Smoothie Cup. Stainless Steel & BPA-free; Instant Access to Recipe App with Videos
Ingredients
For the batter
- Chickpea flour/Gram flour /besan - 1 cup
- Yogurt -½ cup
- Water - 1-½ cup
- Turmeric powder -½ tsp
- Salt to taste
- Fresh Ginger/ paste ½ tsp
- Thai Green chilies/ paste - 3
For Tempering
- Oil - 1 tbsp
- Mustard seeds /Rai - 1 tbsp
- Sesame seeds - 1 tbsp
- Pinch of asafoetida / optional
- Few curry leaves/ optional
- Scraped coconut /optional
Instructions
- In a metal Bowl add in the Chickpea flour, Yogurt (Homemade ), Ginger, Green Chili, Turmeric, Salt and water . Use an Immersion blender to get a smooth batter. (If using hand, whisk and keep on stirring and mixing till all the lumps are dissolved) .
- Add water in the inner pot of your instant pot and place a trivet. Place the Yogurt and chickpea mix on the trivet and place the lid on the metal bowl.
- Pressure cook for 12 minutes on high pressure. When done, do a quick release. Open the Instant pot carefully.
- Use silicone gloves or metal pot holders to remove the batter bowl carefully from the pot .Be careful since the batter will be very hot . With a help a spoon give it a good stir .
- Spread oil on plates or tray or on even on your kitchen counter-top.(Do this step when the batter is in the pressure cooker)
- Quickly spread onto the greased plates or counter tops before it cools down. You can use a credit card or dough scraper to spread it evenly. Spread as thin as possible .Spread all the batter before you start to roll. Allow the batter to cool on the plate for 5 minutes
- Let cool and then cut into 2″ wide strips.
- Cut into equal sized strips and then gently roll each strip tightly.Assemble them in a tray .
- For Tempering
- Heat oil in a small sauce pan , add mustard seeds , let splutter then add asafoetida , sesame seeds , green chilly and finally curry leaves.
- Sprinkle on the prepared khandvi and serve.
Video
Notes
- Make sure to spread the cooked khandvi batter out when it is still hot or warm
- Use a credit card or other flat, thin item to help evenly spread the cooked batter on a plate or counter-top
- Grease a couple of steel plate or baking trays or a marble counter while the khandvi batter is cooking in the instant pot .
- Make sure to measure the ingredients accurately to ensure the batter comes together properly
- Once spread, allow the khandvi batter to cool for about 10 minutes before cutting into strips and rolling
- Make sure you use enough oil to prevent sticking to your plates or counter
- Don't forget to stir the cooked batter before spreading it over the plates or counters
Beth says
These are perfect for my afternoon snack! I can't wait to give them a try!
sriya says
Is it okay to use sattu instead of besan?
Dannii says
I have never heard of this before, but it looks amazing. Always looking for new things to do in the instant pot too.
Erika says
These look so beautiful. Another IP recipe for me to try!
Shanika @ Orchids + Sweet Tea says
This recipe looks so good! I love anything in an Instant Pot and this definitely makes for a great appetizer!
Shannon says
This looks really tasty, would love to try this someday!
Archana Rajagopal says
This recipe is the bomb. First time making it, and it was super easy.?
Soniya Saluja says
Hi Archana, so glad to hear that <3 hope you try other recipes from the blog.
Nalin Patel says
When my wife went away to her parent's home for Rakshabandhan, I made it. Came out super delicious. It is so easy to make.
Soniya Saluja says
Hi Nalin, so glad to hear that... Hope you make it again when your wife comes home 🙂 do try other recipes from our blog !
NEHA JAIN says
Really easy and simple recipe
Turned out to be prefect
Thanks for sharing
Bhakti Mehta says
If I double every ingredient, what should be instant pot timings?
Same 12 min or more
Soniya Saluja says
Hi Bhakti, if you are doubling the recipe. All the ingredients double but the time remains the same.hope this helps.
sandy says
thanks for the receipe, but you should displayed the measurement and shown the minutes on the instant pot, while video is running, that would have been helpful
Nandini says
Soniya, this turned out beautifully! Thanks very much!