
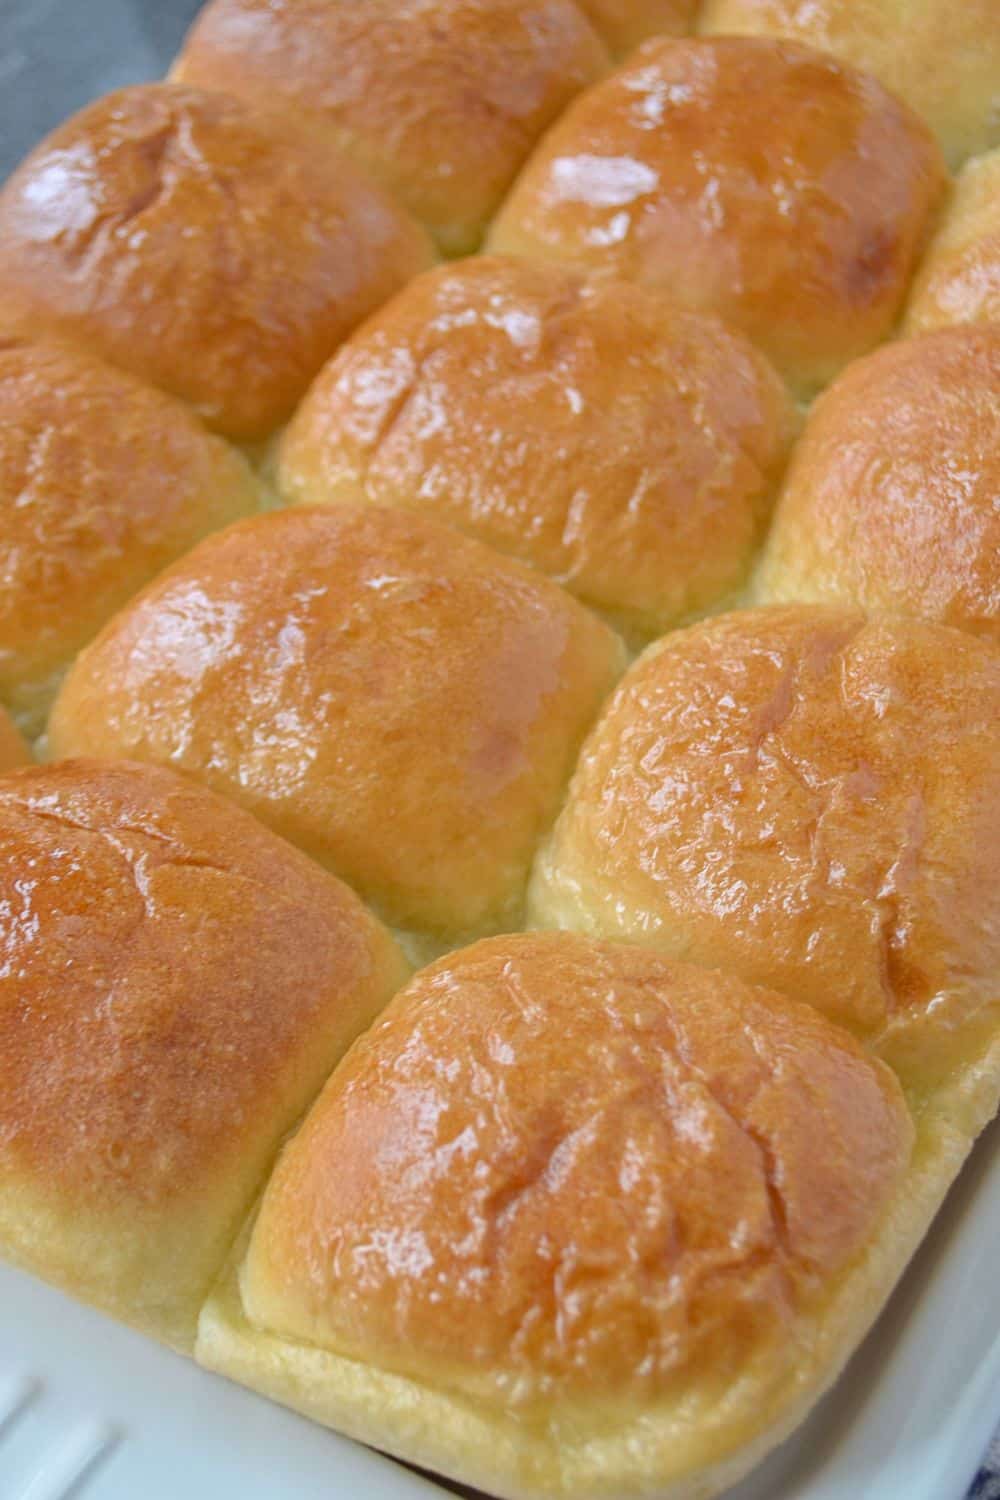
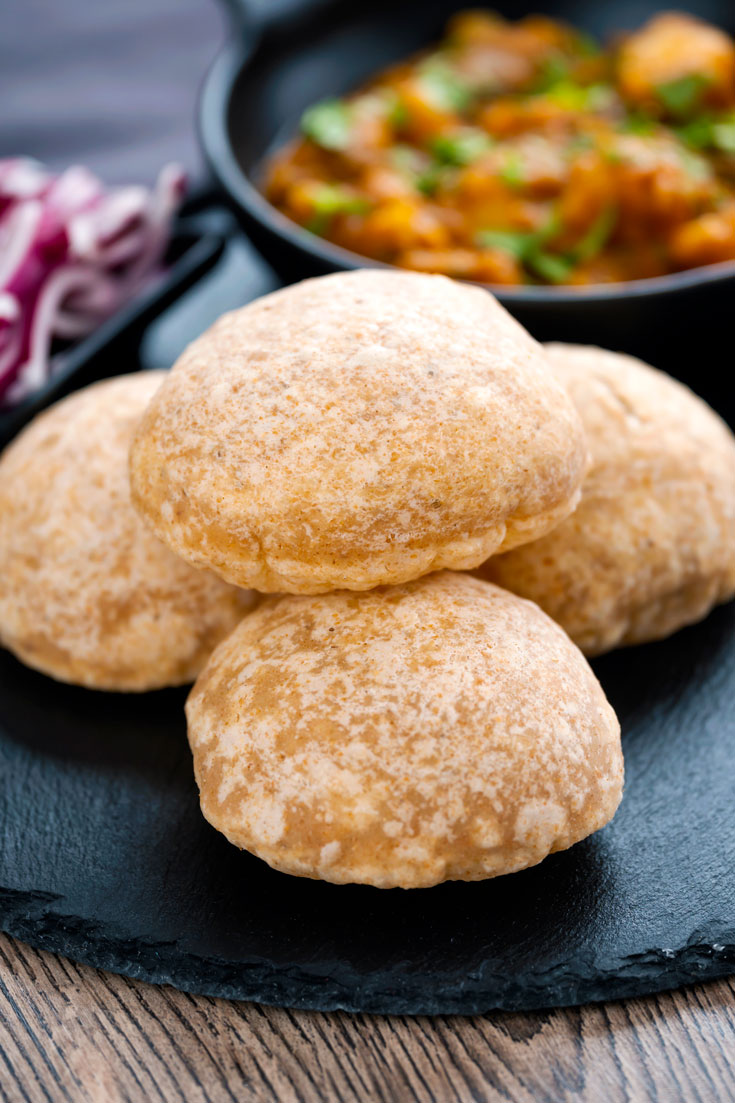
Growing up in India, Ladi Pav wasn't just bread. it was a whole experience. My mom would send me to the corner bakery, and the baker would wrap the warm fresh pav in newspaper sheets. The steam, the smell, and the heat coming through the paper was pure magical.
That childhood memory is exactly why I recreated this recipe. The soft, and fluffy pav that feels like home.
More of our recipes live on Instagram @thebellyrulesthemind.official and Pinterest @Bellyrulesdmind .
Jump to:
Why Is It Called "Ladi" Pav?
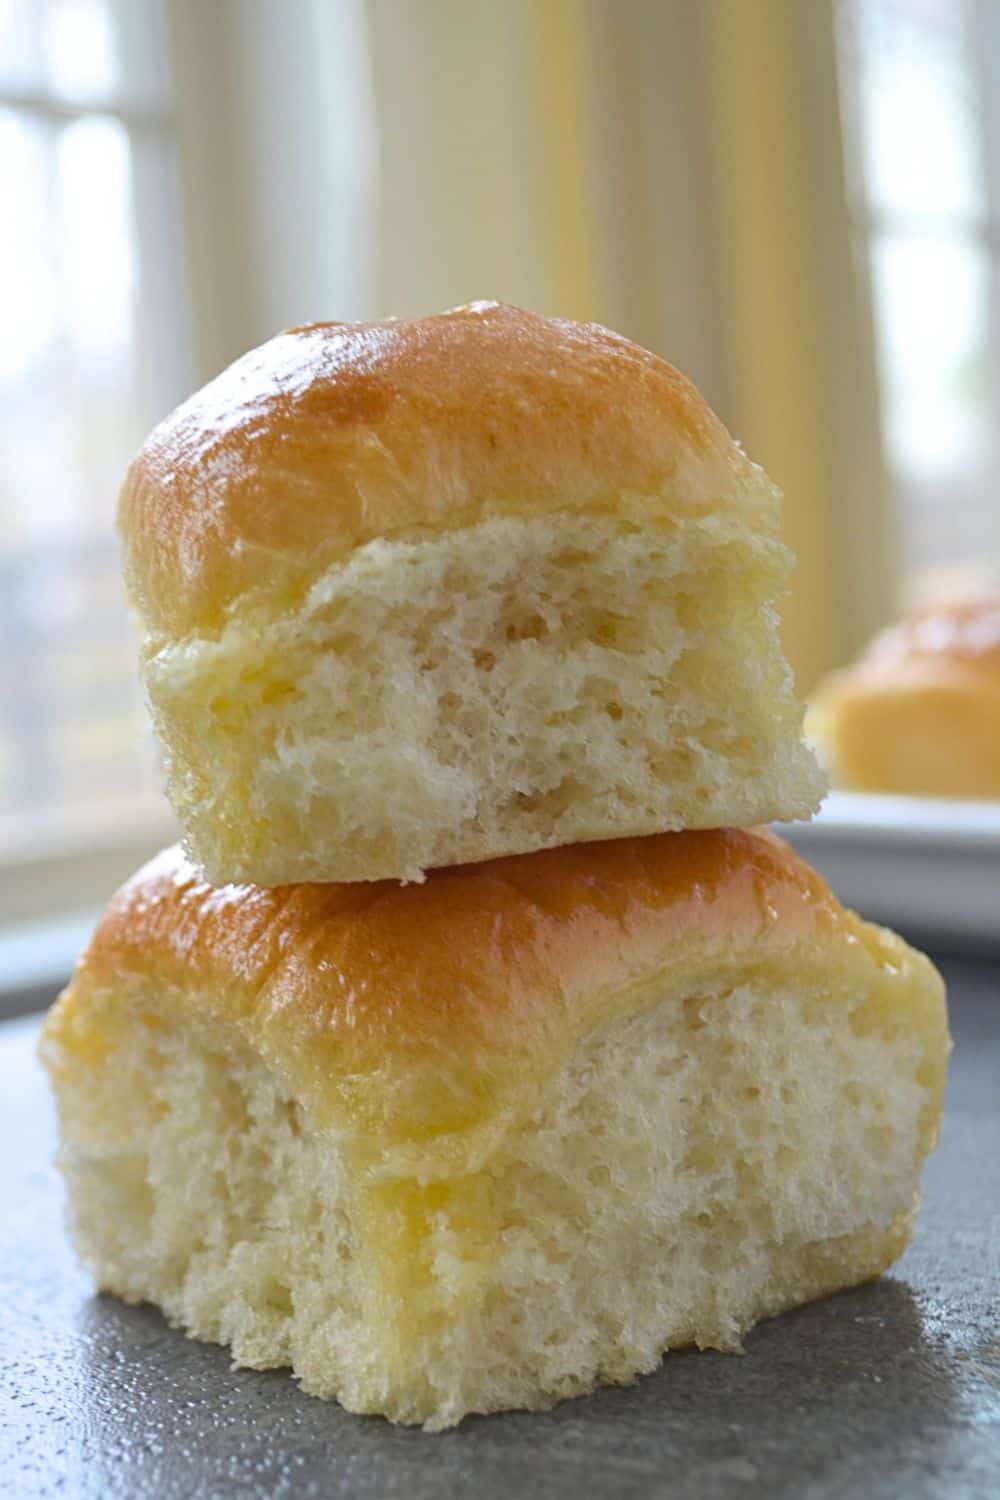
Because it bakes in a ladi, meaning a row or slab. Each roll bakes touching the next one, so they rise together as one connected sheet. Once baked, you gently tear each pav apart just like the classic Mumbai bakery style.
Ingredients
See recipe card for quantities.
Instructions
- Step 1: Activate the Yeast
- Add warm milk, sugar, and rapid active yeast to the stand mixer bowl.
- Mix gently and let it rest for 2 minutes.
- You'll see light foam forming - that means the yeast is active (Blooming).
- Step 2: Make the Dough
- Add flour, salt, and room-temperature butter.
- Knead using a dough hook for 6-7 minutes (or knead by hand for 10-12 minutes).
- The dough should feel soft, smooth, and slightly tacky.
- Step 3: First Rise -
- Instant Pot Method:
- Lightly oil the inner pot.
- Place dough inside → close lid
- Press Yogurt → set timer for 1 hour.
- Dough will double in size.
- Bowl Method:
- Place in an oiled bowl
- Cover and let it rise for around 1-1.5 hours.
- Dough will double in size.
- Instant Pot Method:
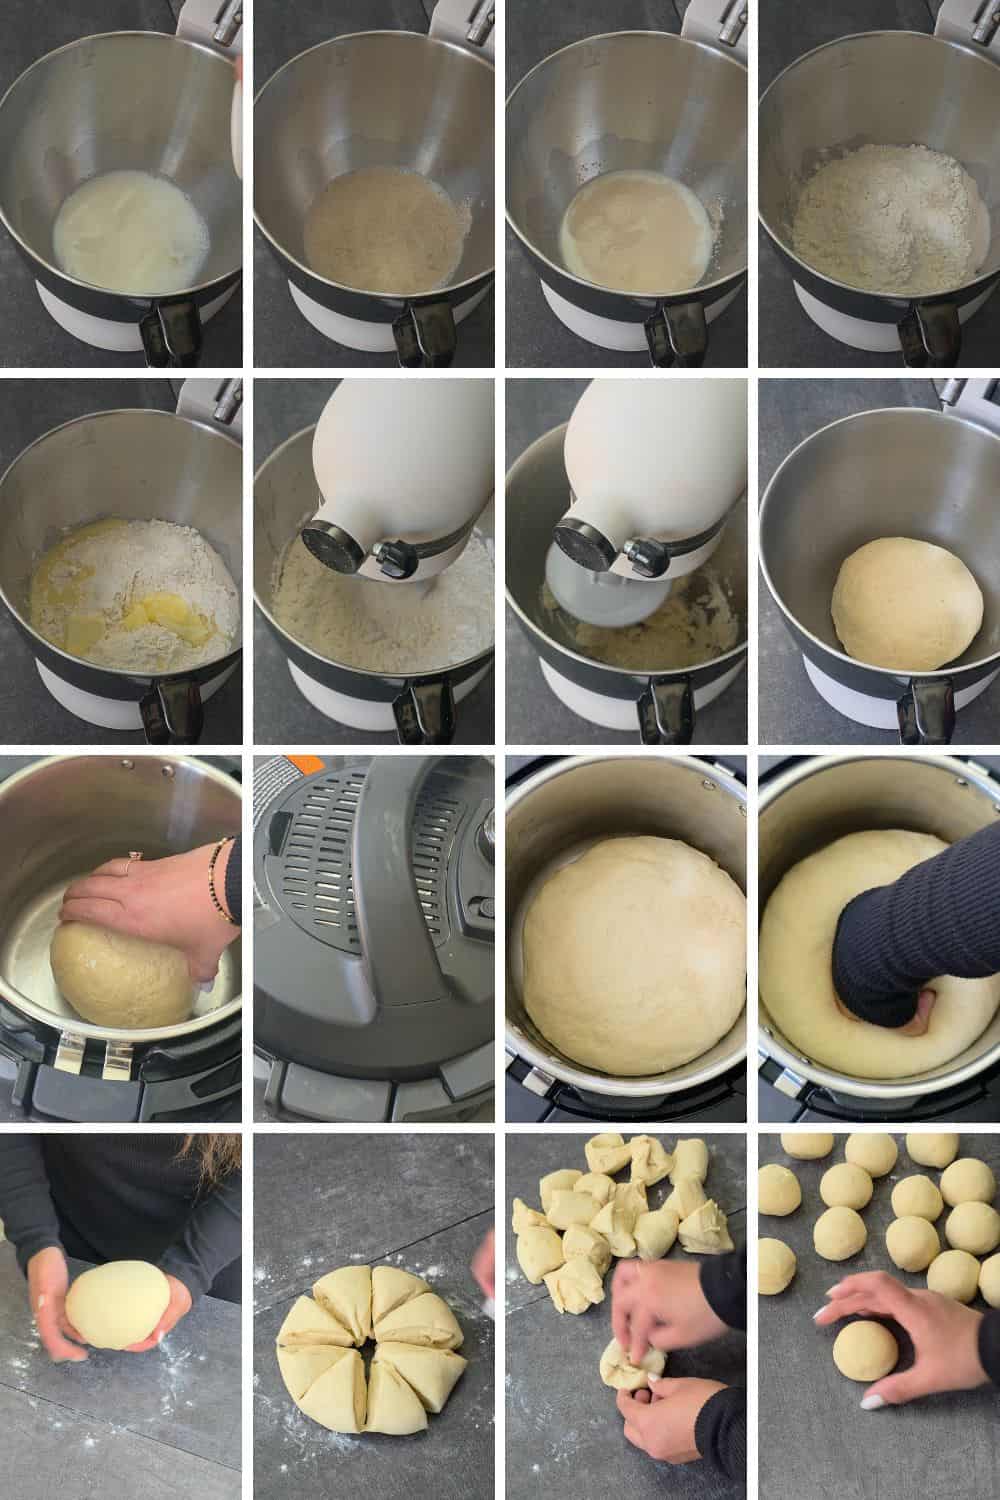
- Step 4: Shape Into Pav Balls
- Divide dough into 15 equal pieces.
- Shape perfect smooth balls:
- Stretch edges of each piece toward the center.
- Pinch seams together.
- Flip seam-side down.
- Cup your hand over the dough and move in small circles. This creates surface tension and gives that smooth bakery top.
- Repeat for all 15.
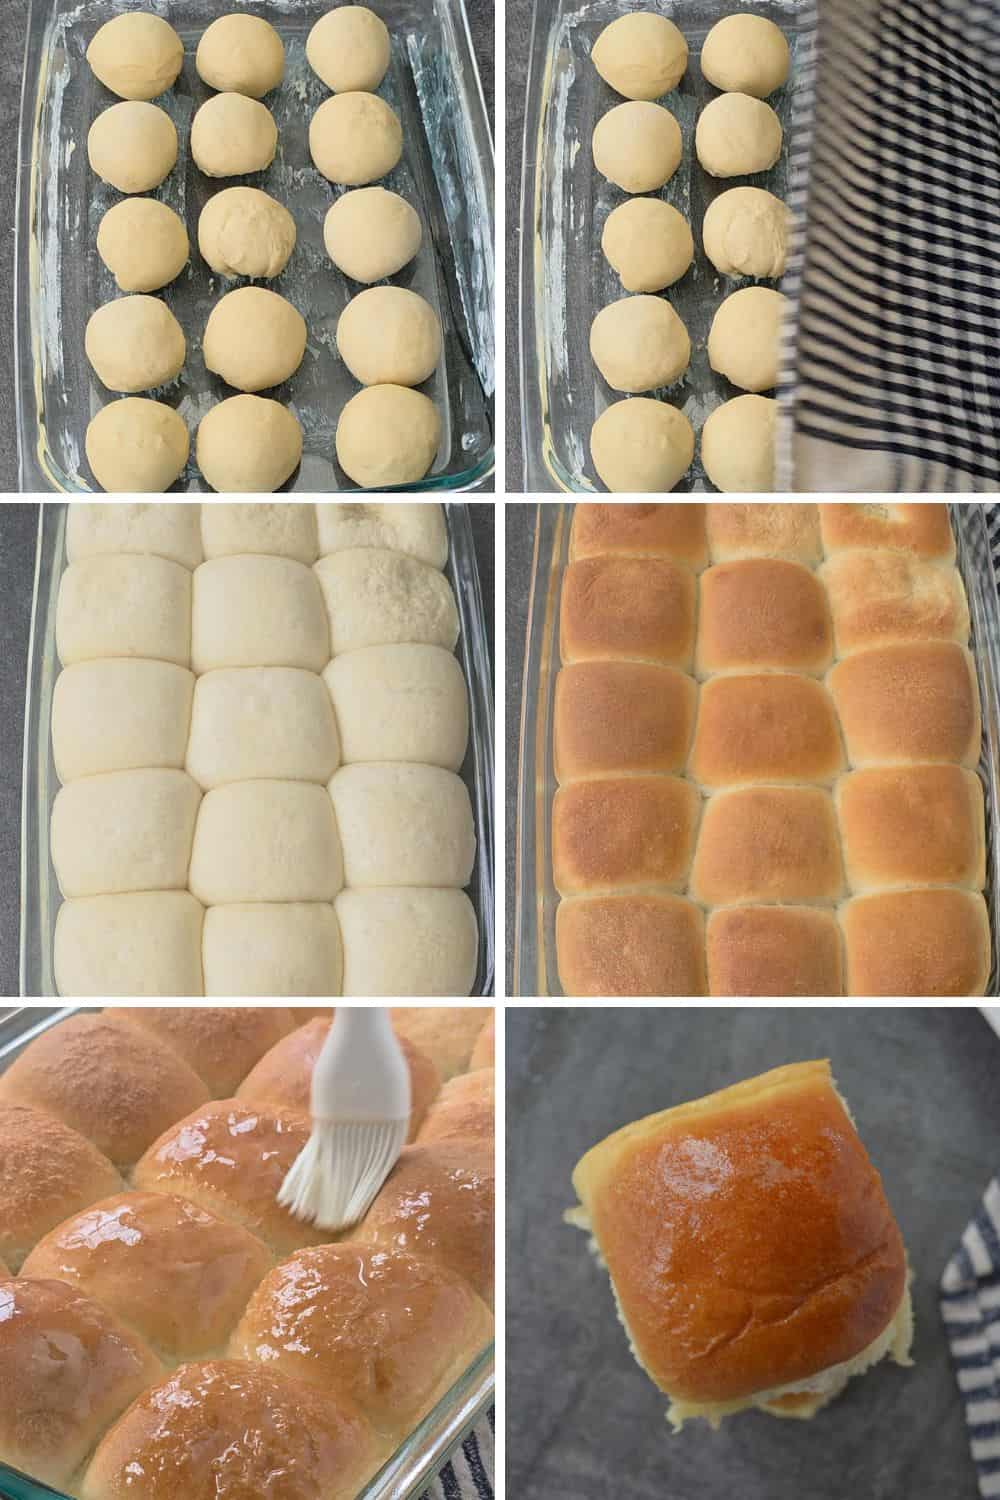
- Step 5: Second Rise
- Grease your baking pan.
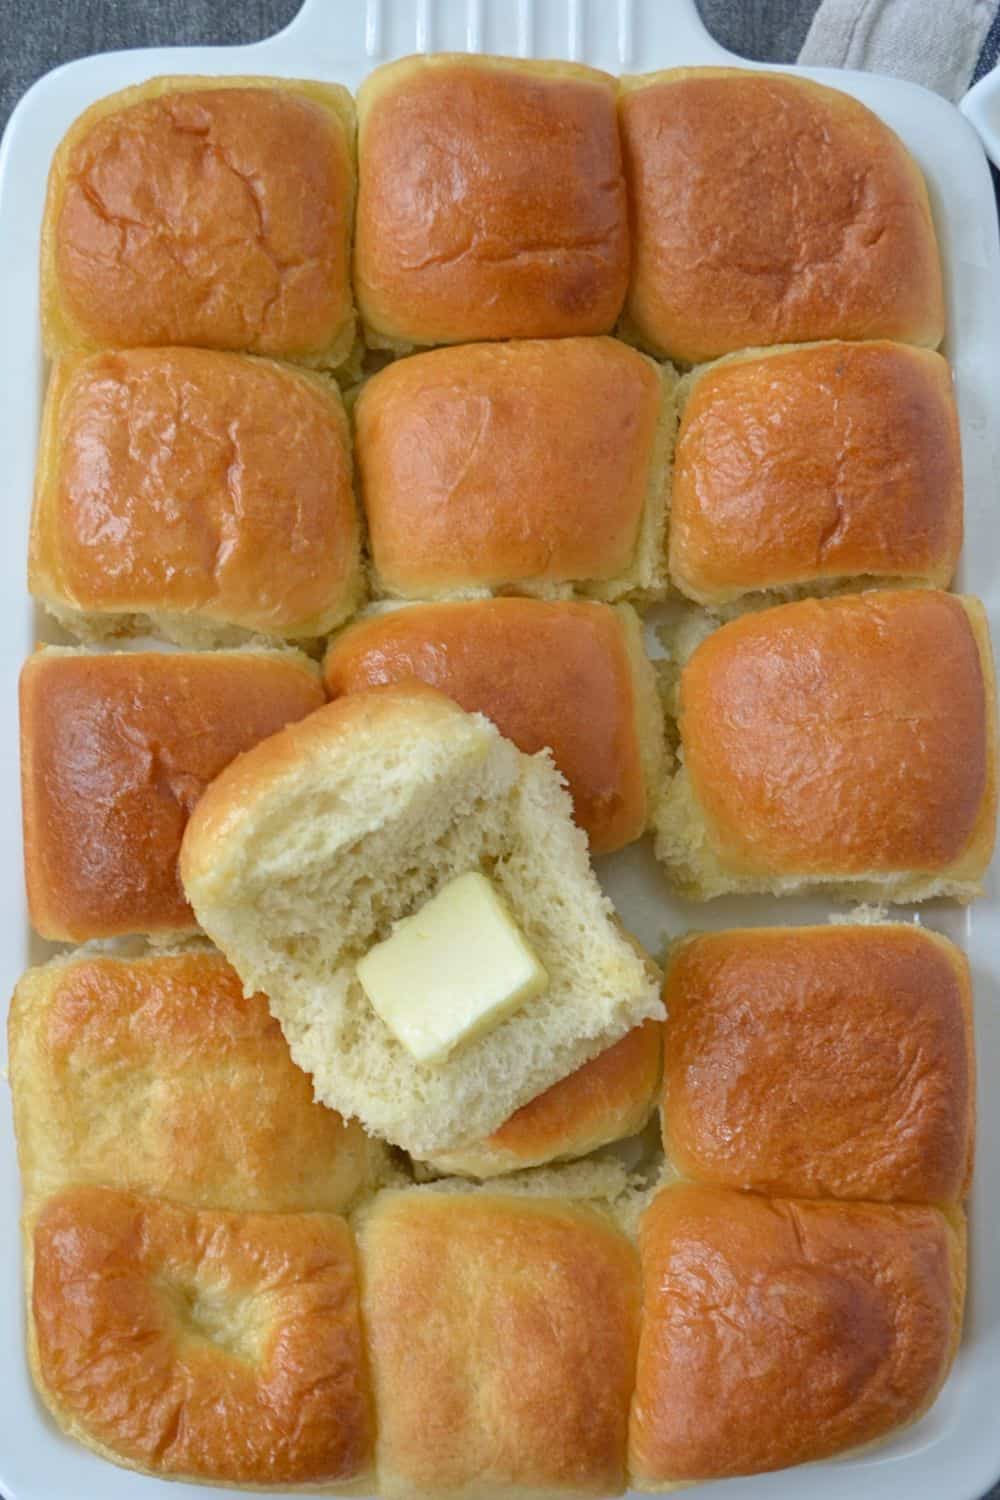
- Arrange dough balls in 3 rows of 5.
- Cover with a kitchen towel and rise for 1 hour. (Winter may need 20-30 extra minutes).
- Step 6: Bake
- Preheat oven to 375°F (190°C).
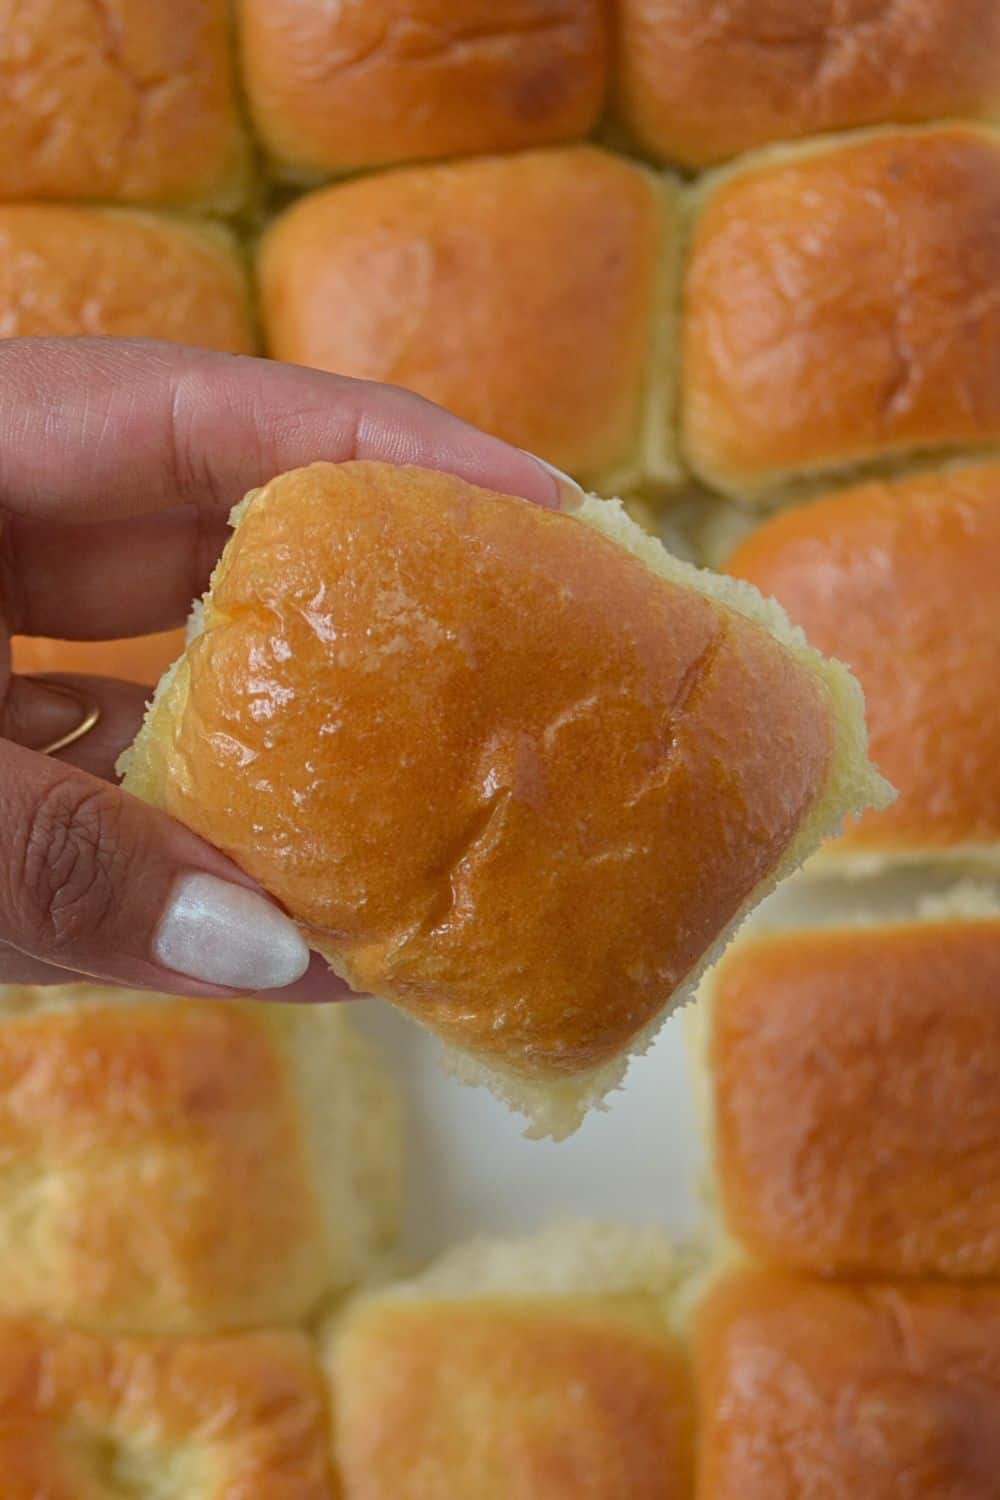
- Brush the proofed dough with milk.
- Bake 15-18 minutes on the middle rack.
- Remove and immediately brush with melted butter.
- Cool slightly, tear apart, and enjoy.
Common Mistakes and How to Avoid Them
| Mistake | Result | Solution |
|---|---|---|
| Under-kneading dough | Pav turns dense | Knead for 8–10 minutes; I noticed softer results only when I stopped rushing this step. |
| Too much flour added | Dry pav | Keep dough slightly sticky; grease hands instead of adding flour. |
| Not letting dough rise fully | Flat pav | Allow full rise based on dough, not time; in colder months, I leave it near a warm stove. |
| Overbaking | Hard top crust | Check at 18 minutes and remove when lightly golden. |
| Yeast not activated properly | Dough doesn't rise | Milk must be warm—not hot; learned this after one “rock-hard pav” disaster. |
Storage
| Can it be saved? | How long? | How to store? |
|---|---|---|
| Yes, leftovers can be saved | 2–3 days | Store in an airtight container at room temperature. |
| Yes, can be frozen | Up to 1 month | See the exact instructions below |
How to Freeze Ladi Pav Dough (So You Can Bake Anytime)
Freezing pav dough is the easiest way to enjoy fresh, bakery-style rolls whenever you want. Here's the simple method:
- Make the dough and knead for about 10 minutes.
- Let it rise for roughly 45 minutes.
- Shape the dough into rolls.
- Place the rolls on a baking sheet, uncovered, and freeze until firm (about 3 hours).
- Transfer the frozen rolls to a freezer-safe bag.
To Bake Later
- Place frozen rolls on a greased baking sheet.
- Let them thaw and rise for about 4 hours, until soft, puffy, and doubled in size.
- Bake as you normally would.
How to serve
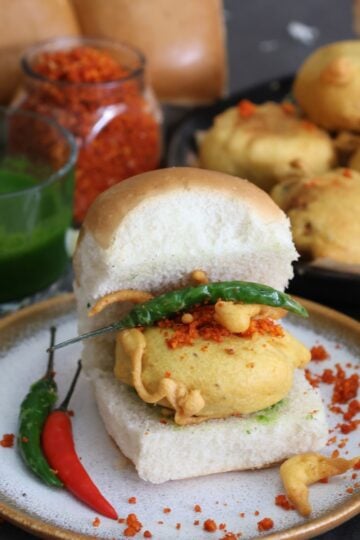
- Serve warm with pav bhaji, misal, dabeli, or aloo sabzi.
- Toasted pav pairs well with garlic chutney, masala chai, or butter-roasted veggies.
- Great for mini sliders with vegetarian fillings.
Top Tip
Don't skip the second rise as this creates the fluffiness. Brush warm pav with butter for a soft top crust.
Related
Looking for other recipes like this? Try these:


Soft & Pillowy Eggless Ladi pav - Dinner Rolls
Servings:
rollsCalories:
Equipment
Ingredients
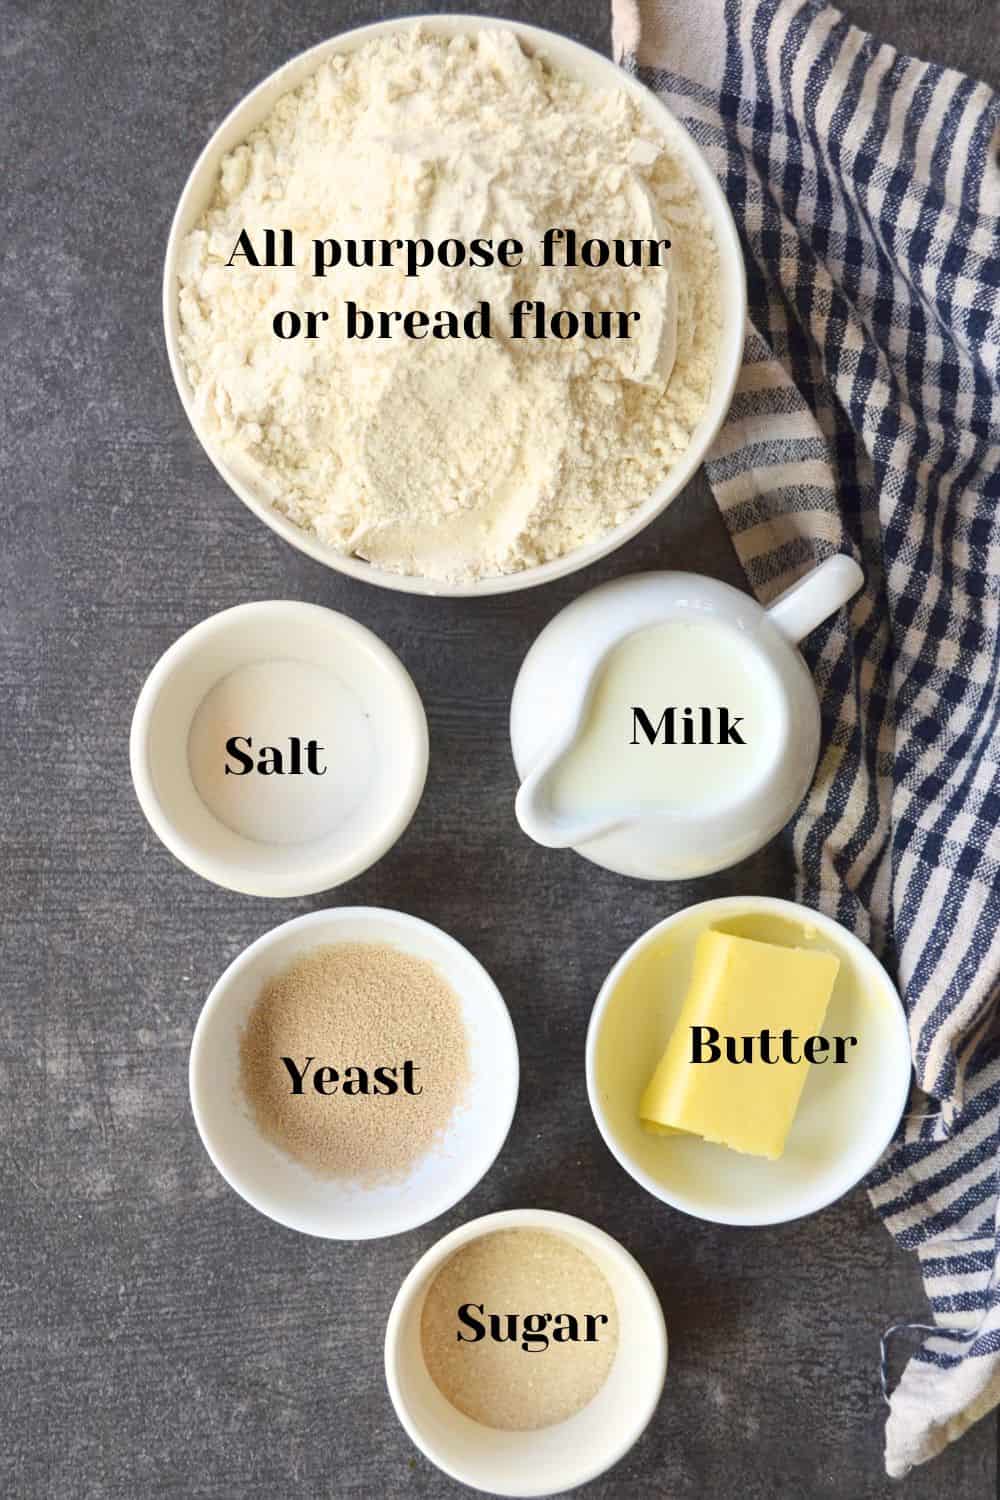
- 4 cups unbleached All-purpose flour / maida
- 1½ cups warm milk add a few tablespoon more if needed
- 6 tablespoon unsalted butter room temperature
- 1 tablespoon rapid rise active yeast
- 1 tablespoon sugar
- ½ tablespoon salt
Instructions
Step 1: Activate the Yeast
- Add warm milk, sugar, and rapid active yeast to the stand mixer bowl.
- Mix gently and let it rest for 2 minutes.
- You'll see light foam forming - that means the yeast is active (Blooming).
Step 2: Make the Dough
- Add flour, salt, and room-temperature butter.
- Knead using a dough hook for 6-7 minutes
- (or knead by hand for 10-12 minutes).
- The dough should feel soft, smooth, and slightly tacky.
Step 3: First Rise
- Instant Pot Method:
- Lightly oil the inner pot.
- Place dough inside → close lid
- Press Yogurt → set timer for 1 hour.
- Dough will double in size.
- Bowl Method:
- Place in an oiled bowl
- Cover and let it rise for around 1-1.5 hours.
- Dough will double in size.
Step 4: Shape Into Pav Balls
- Divide dough into 15 equal pieces.
- Shape perfect smooth balls:
- Stretch edges of each piece toward the center.
- Pinch seams together.
- Flip seam-side down.
- Cup your hand over the dough and move in small circles. This creates surface tension and gives that smooth bakery top.
- Repeat for all 15.
Step 5: Second Rise
- Grease your baking pan.
- Arrange dough balls in 3 rows of 5.
- Cover with a kitchen towel and rise for 1 hour. (Winter may need 20-30 extra minutes).
Step 6: Bake
- Preheat oven to 375°F (190°C).
- Brush the proofed dough with milk.
- Bake 15-18 minutes on the middle rack.
- Remove and immediately brush with melted butter.
- Cool slightly, tear apart, and enjoy.
Notes
-
Make the dough and knead for about 10 minutes.
-
Let it rise for roughly 45 minutes.
-
Shape the dough into rolls.
-
Place the rolls on a baking sheet, uncovered, and freeze until firm (about 3 hours).
-
Transfer the frozen rolls to a freezer-safe bag.
-
Place frozen rolls on a greased baking sheet.
-
Let them thaw and rise for about 4 hours, until soft, puffy, and doubled in size.
-
Bake as you normally would.


The Home Cook's Kitchen says
these look like perfect little bite size pieces of bread!!! I love this, they'd be so perfect for Thanksgiving!
Danielle says
These rolls looks lovely and soft. Perfect with a big bowl of soup!
Shivani Raja says
Ohh these rolls look so fluffy and irresistibly golden. And homemade bread is perfect for this time of year! p.s ‘one sock mystery’ - haha I can definitely relate to that one!
Cookilicious says
omg Pav in Instant Pot! Pinning it for future. Too good.
Soniya Saluja says
Thanks..glad you liked it 🙂 hope you give it a try soon?
Trushna patel says
How I can see quantities for ingredients
kim says
Oh my goodness! These look so buttery and delicious! A must make for the holidays for sure!
Soniya Saluja says
Thanks Kim??
Jessica Formicola says
These rolls are perfect for Thanksgiving and Christmas! And I love how easy these are!
Vicky says
Those look perfect and you have given me yet another reason to use my instant pot! These are so much better than store bought and make the house smell lovely.
Kendall says
Nice to find another use for my instant pot yogurt function! I'm going to try these with olive oil and unsweetened coconut milk - I think my 4-year-old will love their beautiful round shape.
Soniya Saluja says
Sounds good! Do share your experience with us after you make it with olive oil and coconut milk 🙂
Natalie says
These rolls are perfection. I really wish for one or two right now. I'm such a huge fan of bread and rolls. Yum! Love that these rolls are whole grain. I'ms saving this recipe to try.
Natalie Aubele says
I really need to get myself an instant pot! I had no idea you could use those to rise rolls. Very cool
Dianna says
These homemade whole wheat dinner rolls look delight full. Perfect round, fluffy and golden brown.
Kasey Ma says
Wow those look super yummy!
Kasey Ma
TheStyleWright.com
Joanna Clute says
Yes it sure does. I love you homemade rolls though; they look amazing!
Amanda says
Those look so good! I love eating rolls at thanksgiving & Christmas!
Sheri Campbell says
What if your instant pot doesn’t have the yogurt setting?
Soniya Saluja says
Hi Sheri,there is still hope! You can create a warm environment like the instant pot in your oven. Turn your oven on to warm for about 5 minutes, TURN THE OVEN OFF and then place the dough in a greased bowl inside the warm oven instead of in the Instant Pot. I would check the oven periodically and if it feels completely cool, you may have to warm it Instant Pot again.
leahashley85 says
Love that these rolls are no kneed!!! And they look so good!!
Frances Owens says
Why is the vital wheat gluten necessary? I am diabetic and do not need extra gluten.
Soniya Saluja says
Hi Frances, you can Definitely make them without vital gluten..they won't turn out super soft and fluffy but they will be super delicious 🙂
Elisa says
So you preheat the oven at 350 F and then turn off the oven? They suppose to bake with the oven off?
Soniya Saluja says
Hi Elisa, No the is for the second rise,when the weather is cold and it can take 3-4 hours for the dough to rise the second time...This will fasten the process (you can preheat your oven before you start to make the balls)
Josie Dias says
I loved your bread and I would like to make it. As I don't have an Instant Pot what is the alternative.
Soniya Saluja says
HinJosiH, so glad to hear that you want to make these dinner rolls.. well all you need to do is skip the imstant pot and do everthing in a bowl.Keep it to rise which will take 2 hour (due to the cold weather) you can keep it in your oven and follow the instructions given in the receipe 🙂 good luck!
Lakshmi says
The dough didn’t raise in the pre heated oven even after an hour. What to do in such scenario? Since the dough didn’t raise, the bread turned out inedible
Soniya Saluja says
Hi Lakshmi, that means your yeast did not work! If it rise the first time .. it should rise the second time too.
Mary says
Two questions,
One when you bake these is it at 350 or 425?
I also dont see where the vital wheat gluten is added in the recipe is added? I was assuming with the flour. Pointing out for clarification for next time.
I have them in the oven right now. They look Great!
Thanks.
Mary
Soniya Saluja says
Hi Mary, the answer to your first question is you have to bake it at 425* . The 350* is for the second rise(if the weather is cold) you can preheat the oven and then keep it to rise . The answer to your second question..yes the vital gluten is added and mixed in with the flour.. looks like a mistake at my end will add that it in instructions number 6.
Thanks for trying it 🙂
Neha Bansal Goyal says
Hi sonal, thanks for the wonderful recipe!! I tried this one but I ended up with littleblit hard buns,though taste was really good
Can you please guide me what could be the reason
Thanks in advance
Soniya Saluja says
Hi Neha , Thanks for trying and sharing tour experience with us! As mentioned in the post there are lot of things that effect the buns, weather being the important.. I add more or less flour accordingly. Vital gluten also plays a important part in this recipe. Try have Apf and whole wheat next time to see if there is any difference.Hope you get softer pav next time.
Linda says
Hello dinner roll looks amazing, do you have to use wheat flour and the vital gluten
Soniya Saluja says
Hi Linda,you can make it without the vital
gluten but we would recommend adding vital gluten if you like your dinner rolls super soft. Hope this helps.
DeDe Van Riper says
I have an instant pot but it does not have the yogurt setting, can you use the warm setting ?
Danielle says
I love this recipe! The rolls turned out amazing. Would this recipe work as a bread loaf as well?
Soniya Saluja says
Hi Danielle, we are so glad to hear that ❤️ here is the recipe for bread loaf https://thebellyrulesthemind.net/whole-wheat-bread-recipe/
Erin says
Hi! These looks delicious! It is still difficult to find flour in my area. Is it possible to use all purpose flour that I already have for this recipe? Thank you!
Sue Marie says
I"m having the same problems finding flour here. I bought "bread flour" a while ago and assumed this is what I need to make bread,... but every recipe I come across just calls for the usual white all purpose flour. The bread flour is also white. Have you tried either one of these?
Vicky says
@Sue Marie, I use bread flour for all my rolls and bread. You may need a little more liquid than is called for with all purpose but it is fine to switch. I am going to try with this recipe because I don’t have whole wheat. Keeping my fingers crossed
Kristy says
Do you use store bought wheat flour or do you grind your own wheat? I have a mill and grind my wheat and was trying to determine if I needed to add any salt, baking soda/powder.
Raji says
Hi can we make this pav with self rising flour?
Soniya Saluja says
Hi Raji, we do not recommend self rising flour.
Deep says
I am tempted to try these. Thanks for sharing. Just a quick question as I haven’t used vital gluten before. Would this one work? https://www.amazon.com/dp/B089K1BCJS/ref=cm_sw_r_cp_api_glt_i_0V1GCV47GJT5J643YNEE
Soniya Saluja says
Hi Deep, they are very easy to make. The brand you shares would work too.
Devisha says
Hi! Which company whole wheat flour did you use?
Soniya Saluja says
Hi Devisha, used royal atta whole wheat
Joy Panem says
Thank you
Aarthi says
Hi there. What is the best substitute you recommend for vital wheat gluten for this recipe. My family is gluten intolerant. Thank you much in advance.
Soniya Saluja says
Hey Aarthi, this recipe is made with whole wheat flour which has gluten. So substituting vital gluten won't help. Sorry we have not tried it with gf flour so can't suggest.
Barbara says
Can this dough be made in a bread machine on the “dough” setting and then shaped into rolls? I have bad arthritis in my hands and cannot knead.
Soniya Saluja says
Hi Barbara, yes you can 🙂
Ann says
Made this and the results weren't what I expected, but not bad. I used Golden Temple durum whole wheat atta and used a scale to measure ingredients (120g = 1 cup flour). I live in Northern California Bay Area, so not very humid. I ended up adding a whole lot more flour - about 1 cups' worth since the dough was so wet after the first rise that it couldn't be shaped. It was kinda like waffle batter. Even with the extra flour I could barely shape it, and when I did the second rise, it all ran together and rose with one continuous flat top, like a tray of cornbread. Still tasted ok, but just not bun-like. I'll have to try again sometime! Thanks for posting the recipe.
Ann says
Update: Tried again, and used the same weight of flour to weight of liquid ratio (420g of flour+30 g of vital wheat gluten and 450g milk) and it was much better about forming into balls, though the family seemed to enjoy the flavor and texture of the first batch better. For me it was more satisfying to have bun shapes!
Geraldine says
@Ann, I had the same problem as you. I live in Wisconsin and our humidity is almost 0% at this time of year! I had to use at least 1 extra cup of whole wheat flour and the dough was still way too sticky to handle, even with oiled hands. I sprinkled the board with more flour and was then able to somewhat manage the rolls and make them into a ball shape, but almost immediately they lost their shape in the tin. By the time I had finished forming all 15, the first 2 rows had spread so much, almost not enough space for the last row. They rose really well at the 2nd rise, but after baking, they basically look like a 9 x 13 loaf with markings for 15 fat slices!! I purchased the vital wheat gluten at great expense! All this being said, I tried one right out of the oven and it was delicious. I think I'd like a little more salt!
Geraldine says
@Ann, Following your update - did you weigh your milk? What did that convert to in either cups, or ml?
Ann says
A gram of milk is just a little over a mL (1.04 ml) Here's what I did as the 3rd try - I scaled down the recipe so I didn't have to add so much flour:
2 cups milk, 2 T butter, 10-11g yeast, 1 Tbsp sugar, 448 g flour, 30g gluten. 1 tsp salt. Baked at 18-20 minutes. This could form buns, but they spread out again once I put them in the tin to rise.
Dora says
can this be made without vital wheat gluten? Thank You
Dora says
Sad, that they post this for comments, but looks like they don't give a reply 🙁
sam says
can we add water instead milk. will it change taste
sam says
can we use water instead milk
Rima says
atleast write down measurements every ingredient