
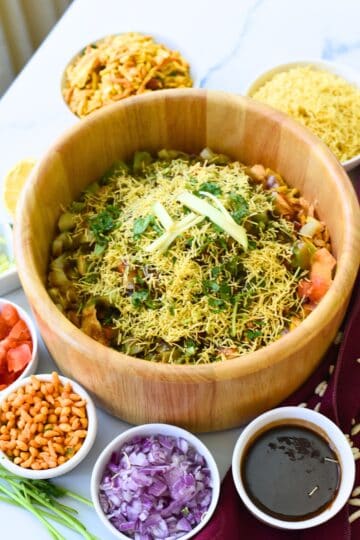
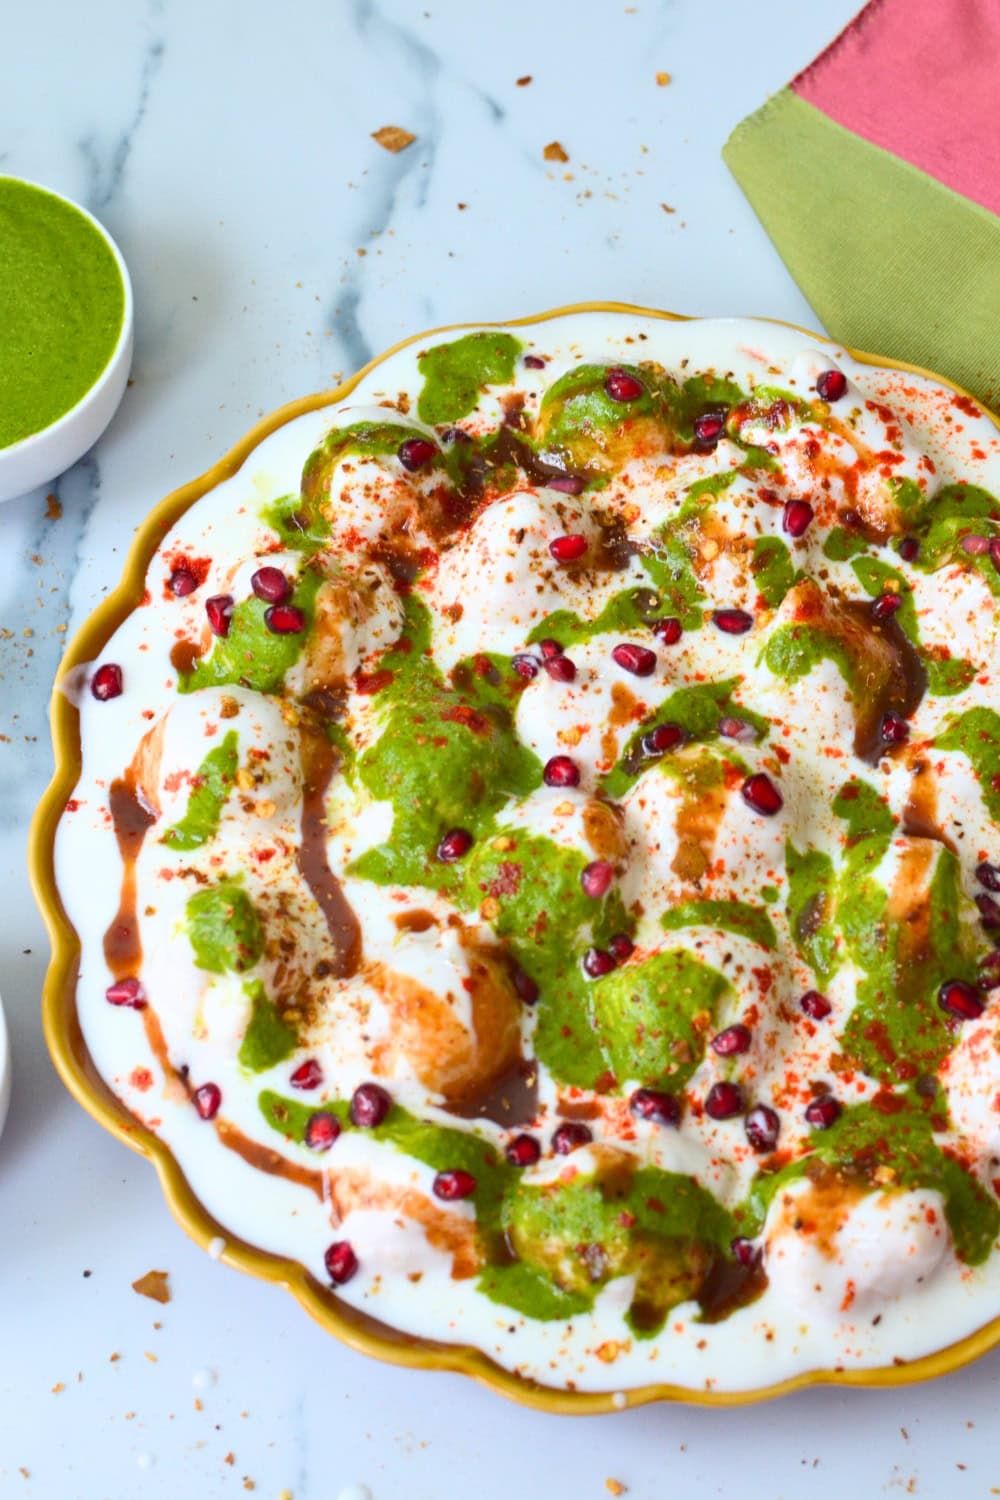
If there's one street food that defines Mumbai, it's pani puri. And let me tell you, in Mumbai, pani puri isn't just a snack. It's an experience that brings back so many memories of my childhood. Every area has its famous vendor, and everyone has their favorite stall. For me, the gold standard was always Chandru's pani puri in Seven Bungalows.
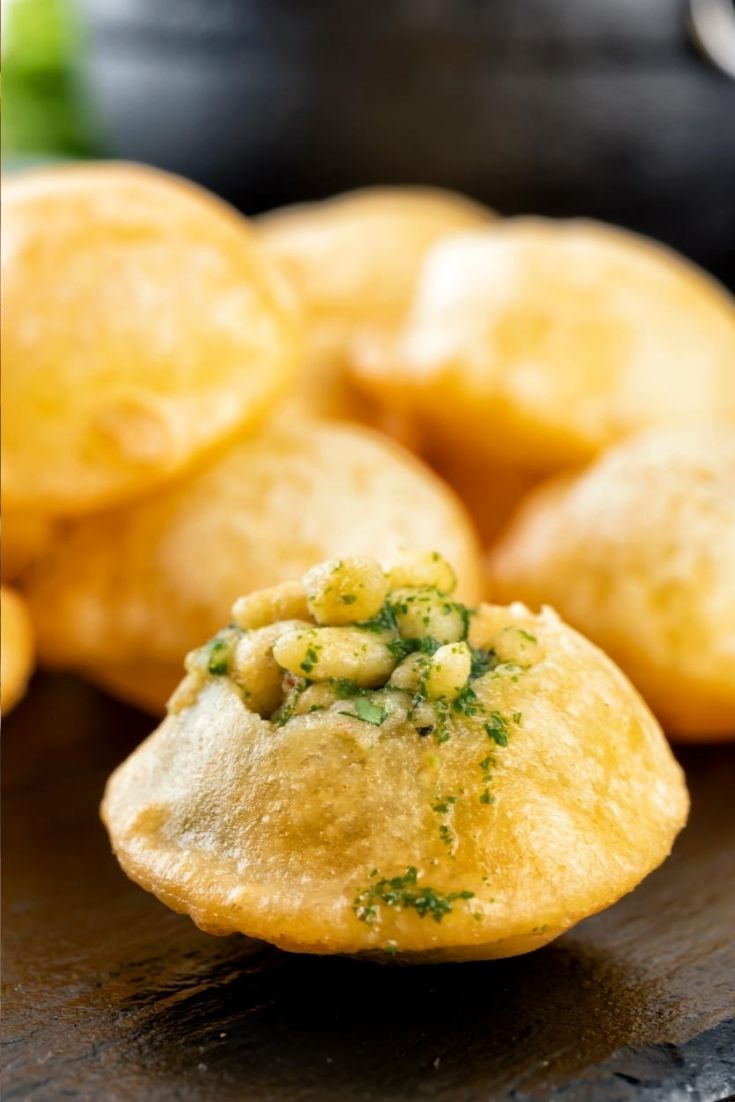
I still remember the long lines of people waiting patiently, the vendor's hands moving like lightning as he assembled each puri. And that first burst of spicy, tangy water that would make your eyes water and leave you craving more. And it wasn't just the pani that made Chandru's special. It was those perfectly crispy sooji puris. Not just any puri - the thin, crisp, airy ones that crack perfectly when you tap them. You know what I'm talking about if you've ever had authentic Mumbai pani puri.
More of our recipes live on Instagram @thebellyrulesthemind.official and Pinterest @Bellyrulesdmind .
That satisfying crack when you bite down, followed by the explosion of flavors. For years after moving to the US, I wondered how those vendors made those perfectly crispy puris. I tried so many recipes, and most of them turned out thick and chewy instead of light and crispy. Eventually, I learned the secret from a halwai who used to work at Chandru's stall in Seven Bungalows during one of my visits back home. He showed me the exact technique used to make crispy sooji puris that stay crunchy and puff perfectly. And that's exactly what I'm sharing with you today.
Jump to:
Ingredients
See recipe card for quantities.
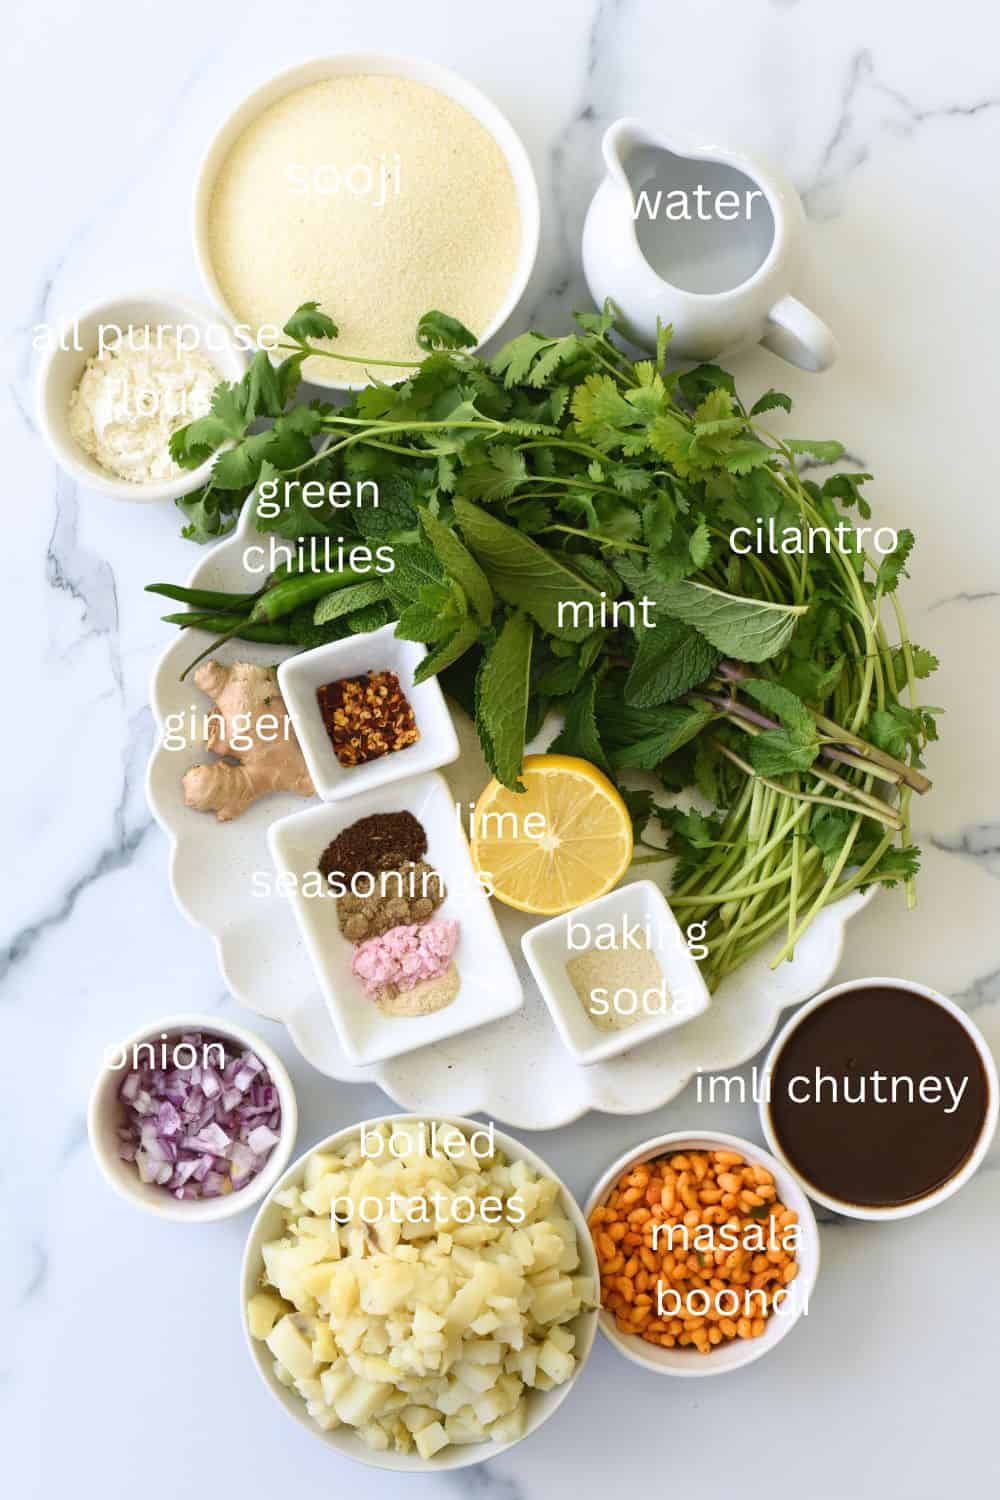
For Homemade Puri:
- Fine semolina (sooji): creates that signature crispy texture and helps the puris puff up perfectly
- All purpose flour: adds structure and helps bind the dough together
- Baking soda: gives the puris that extra lift and makes them light and airy
- Oil (for dough): keeps the puris tender and prevents them from becoming too hard
- Hot water: makes the dough easier to roll thin and creates steam for puffing
- Oil for frying: needs to be at the right temperature for perfect puffing
For Pani (Spiced Water):
- Fresh mint leaves: gives that cooling, refreshing flavor that balances the spice
- Fresh cilantro: adds freshness and that authentic green color to the pani
- Ginger: provides warmth and helps with digestion of the spicy water
- Green chilies: brings the heat that makes pani puri addictive
- Tamarind chutney: adds the tangy sweetness that balances all the flavors
- Chaat masala: the secret spice blend that gives authentic street food flavor
- Black salt (kala namak): creates that distinctive tangy taste you can't get with regular salt
- Roasted cumin powder: adds earthy depth to the pani
- Cold water: keeps the pani refreshing and helps all flavors blend
For Filling:
- Boiled potatoes: mashed for easy stuffing and creamy texture
- Boondi: adds crunch and soaks up the flavors beautifully
- Red chili powder: gives the filling a gentle heat
- Chat Masala : give the salty kick
- Fresh cilantro: brightens up the filling with fresh flavor
How to make Pani Puri
Follow the steps below to make the best golgappe at home every time.
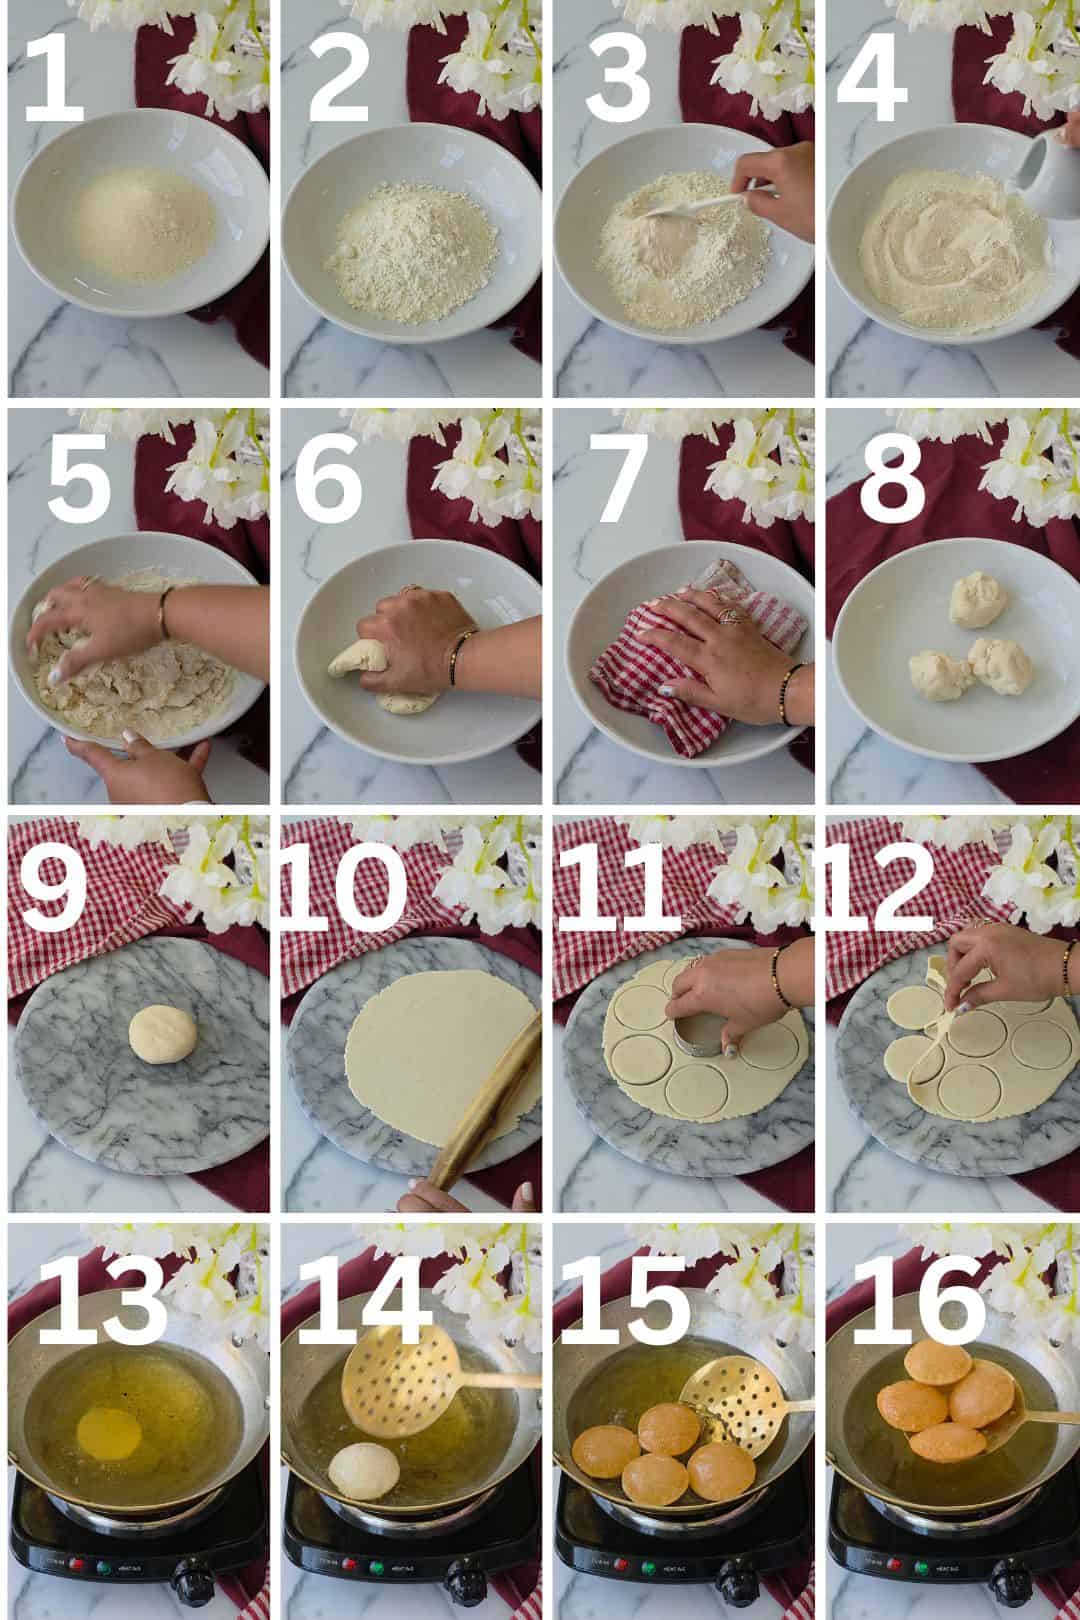
Making the dough
- In a bowl, combine the fine semolina, all purpose flour, and baking soda.
- Mix them well so the baking soda is evenly distributed.
- The dough will seem dry at first, but keep kneading for 5 to 8 minutes until it comes together.
- Add warm water in batches and don't make it too wet. You want a smooth, soft dough that's not sticky.
- Cover the dough with a damp cloth and let it rest for 30 minutes.
- This is crucial so don't skip this step! The rest time allows the gluten to relax and makes rolling much easier.
- After 30 minutes, knead the dough for 2 more minutes until it's completely smooth.
Rolling the dough
- Divide the dough into 3 equal portions.
- Here's my trick - lightly oil your rolling surface and rolling pin to prevent sticking.
- Roll each portion into a circle about 7 to 8 inches in diameter.
- The key here is rolling them thin to about 2mm thick.
- They should be almost translucent when you hold them up to the light.
- Use a round cutter or small bowl to cut perfect circles.
- Place the cut puris on a damp cloth and cover with another damp cloth to prevent drying out.
Frying the Puri
- Heat oil in a heavy bottomed wok or kadai over medium heat.
- The oil temperature is critical - test with one puri first.
- It should sizzle immediately, float to the surface, and start puffing within seconds.
- If it sinks or doesn't puff, the oil isn't hot enough.
- Gently slide 3 to 4 puris into the hot oil.
- They should puff up like little balloons within seconds.
- Use a spoon to gently nudge them if needed.
- Fry until both sides are light golden brown and crispy.
- This happens quickly, so don't walk away! Remove and drain on paper towels.
- The ones that don't puff are still delicious for other chaat or just eating with tea.
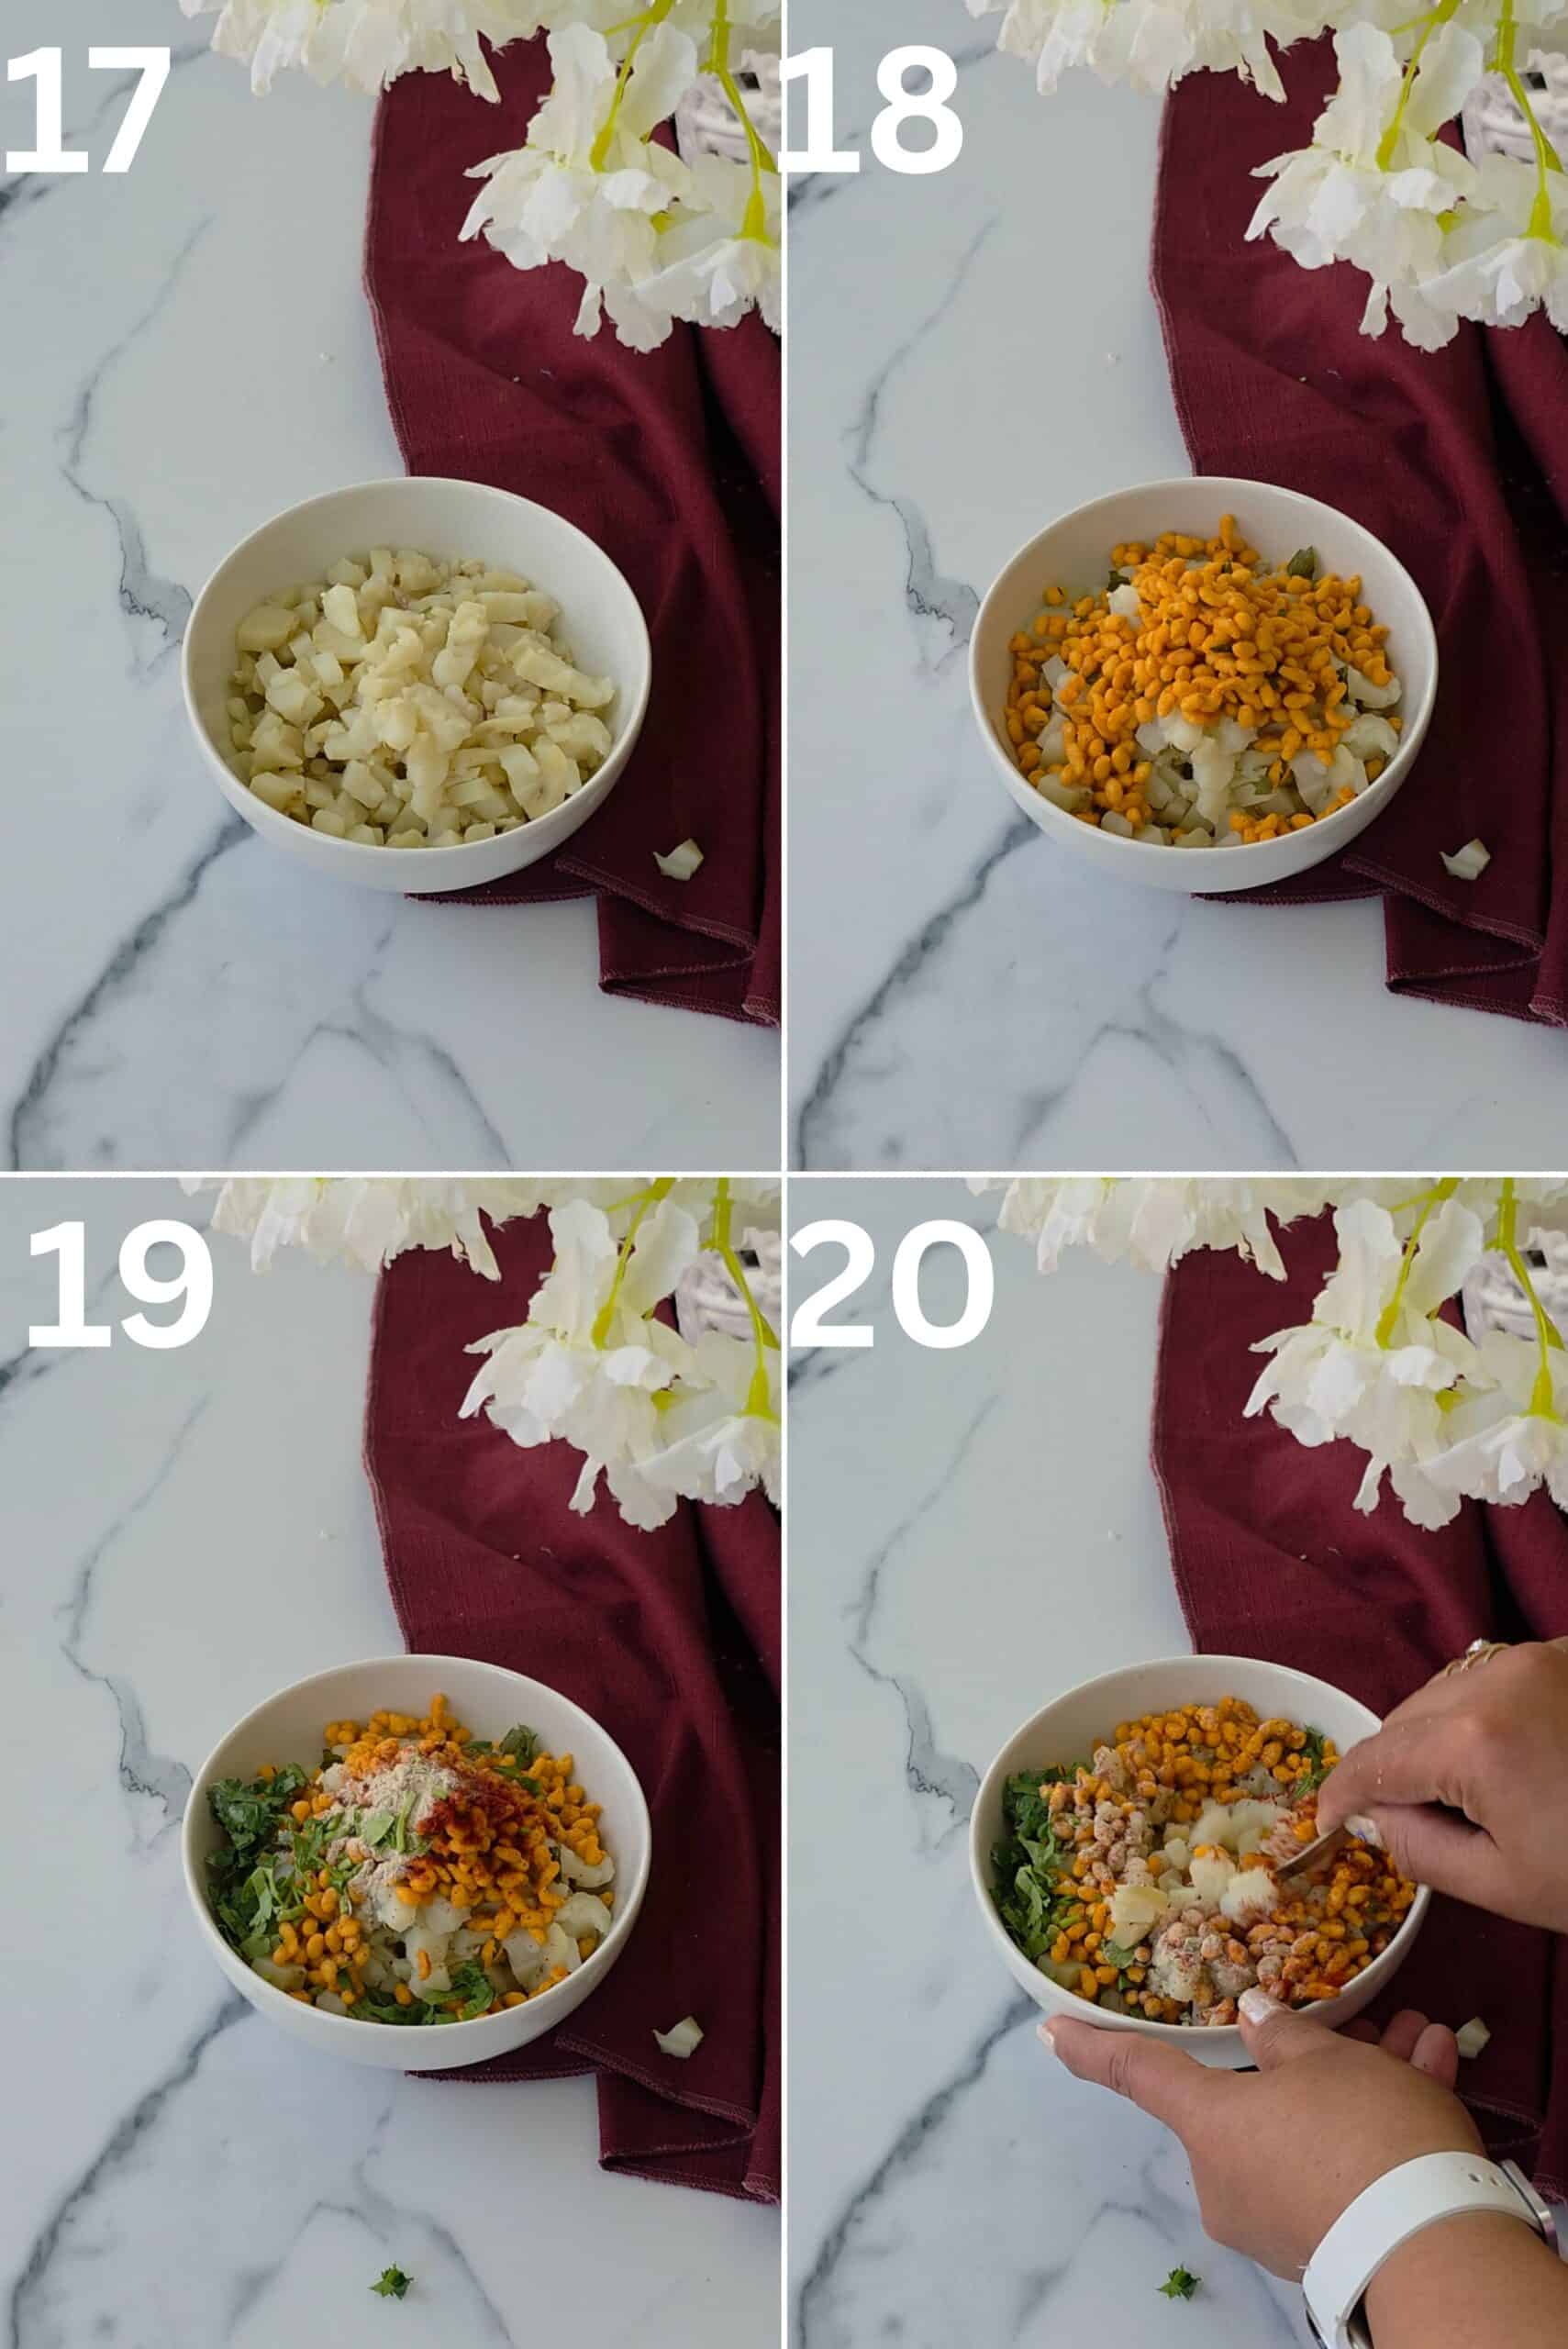
Filling for the puri
- Mash the boiled potatoes until smooth.
- Add boondi, salt, red chili powder, and chopped cilantro.
- Mix well and set aside.
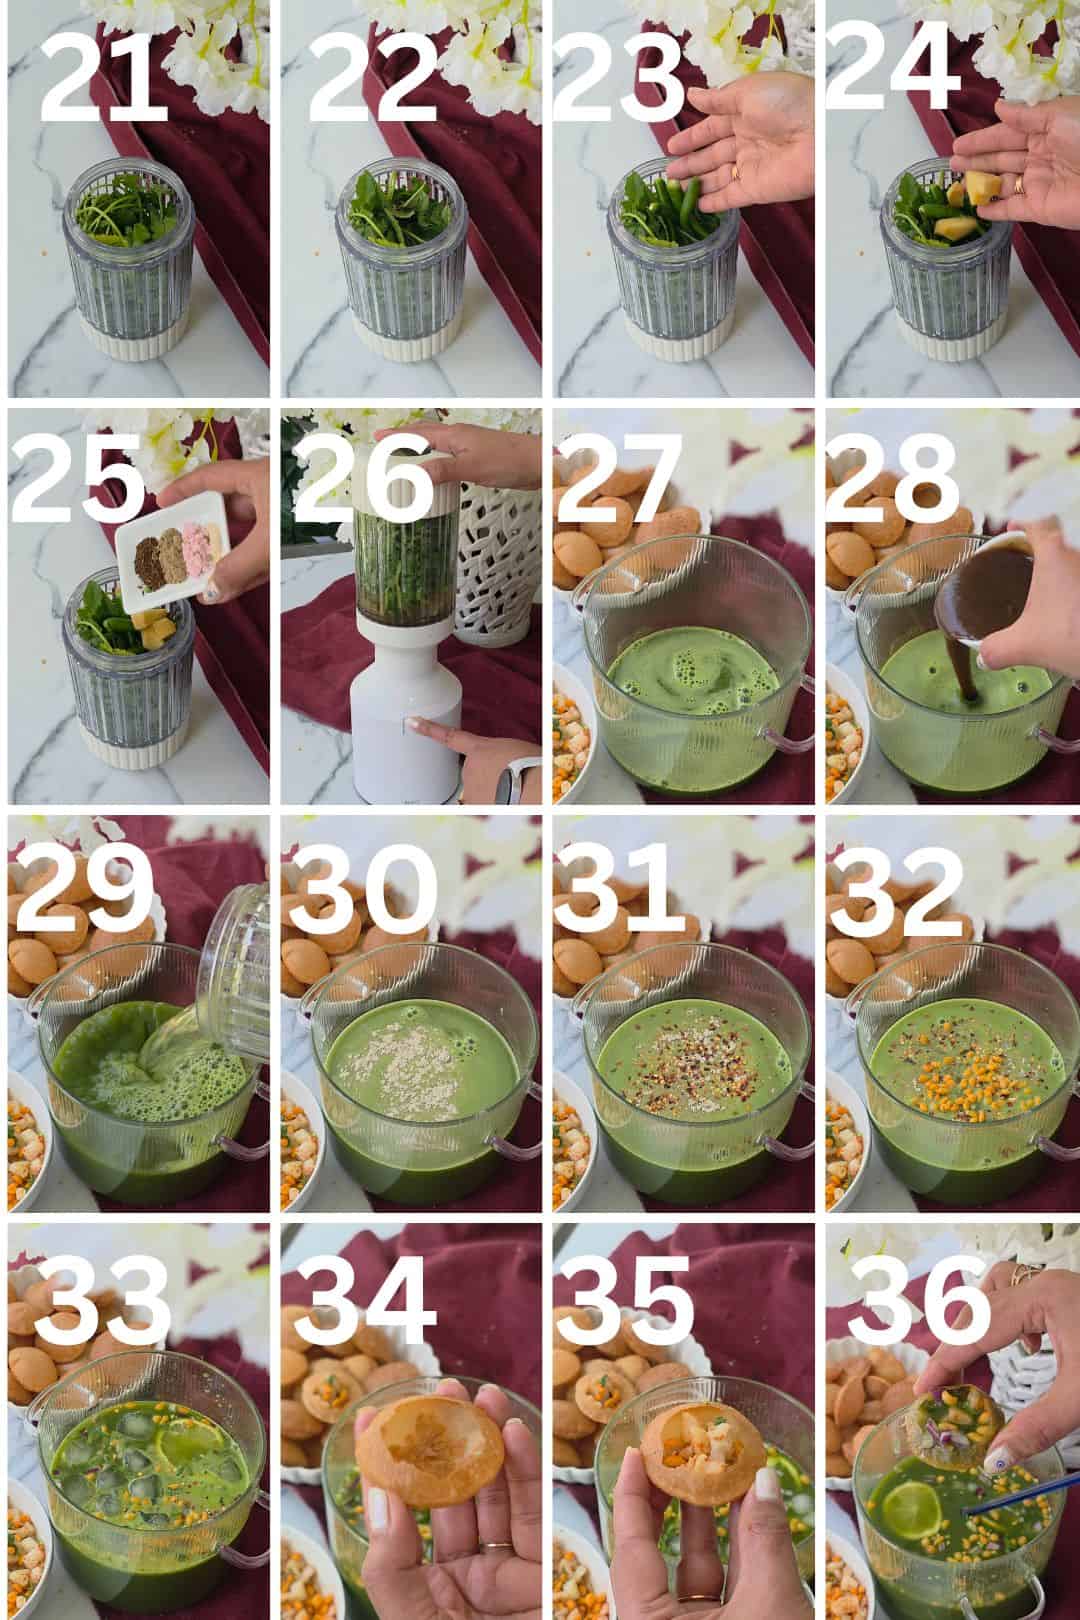
How to make Pani Puri water / Golgappa pani
For the pani puri water, follow these easy steps.
- Blend all the pani ingredients except water until you get a smooth paste.
- You might need to add a tablespoon of water or ice to help it blend.
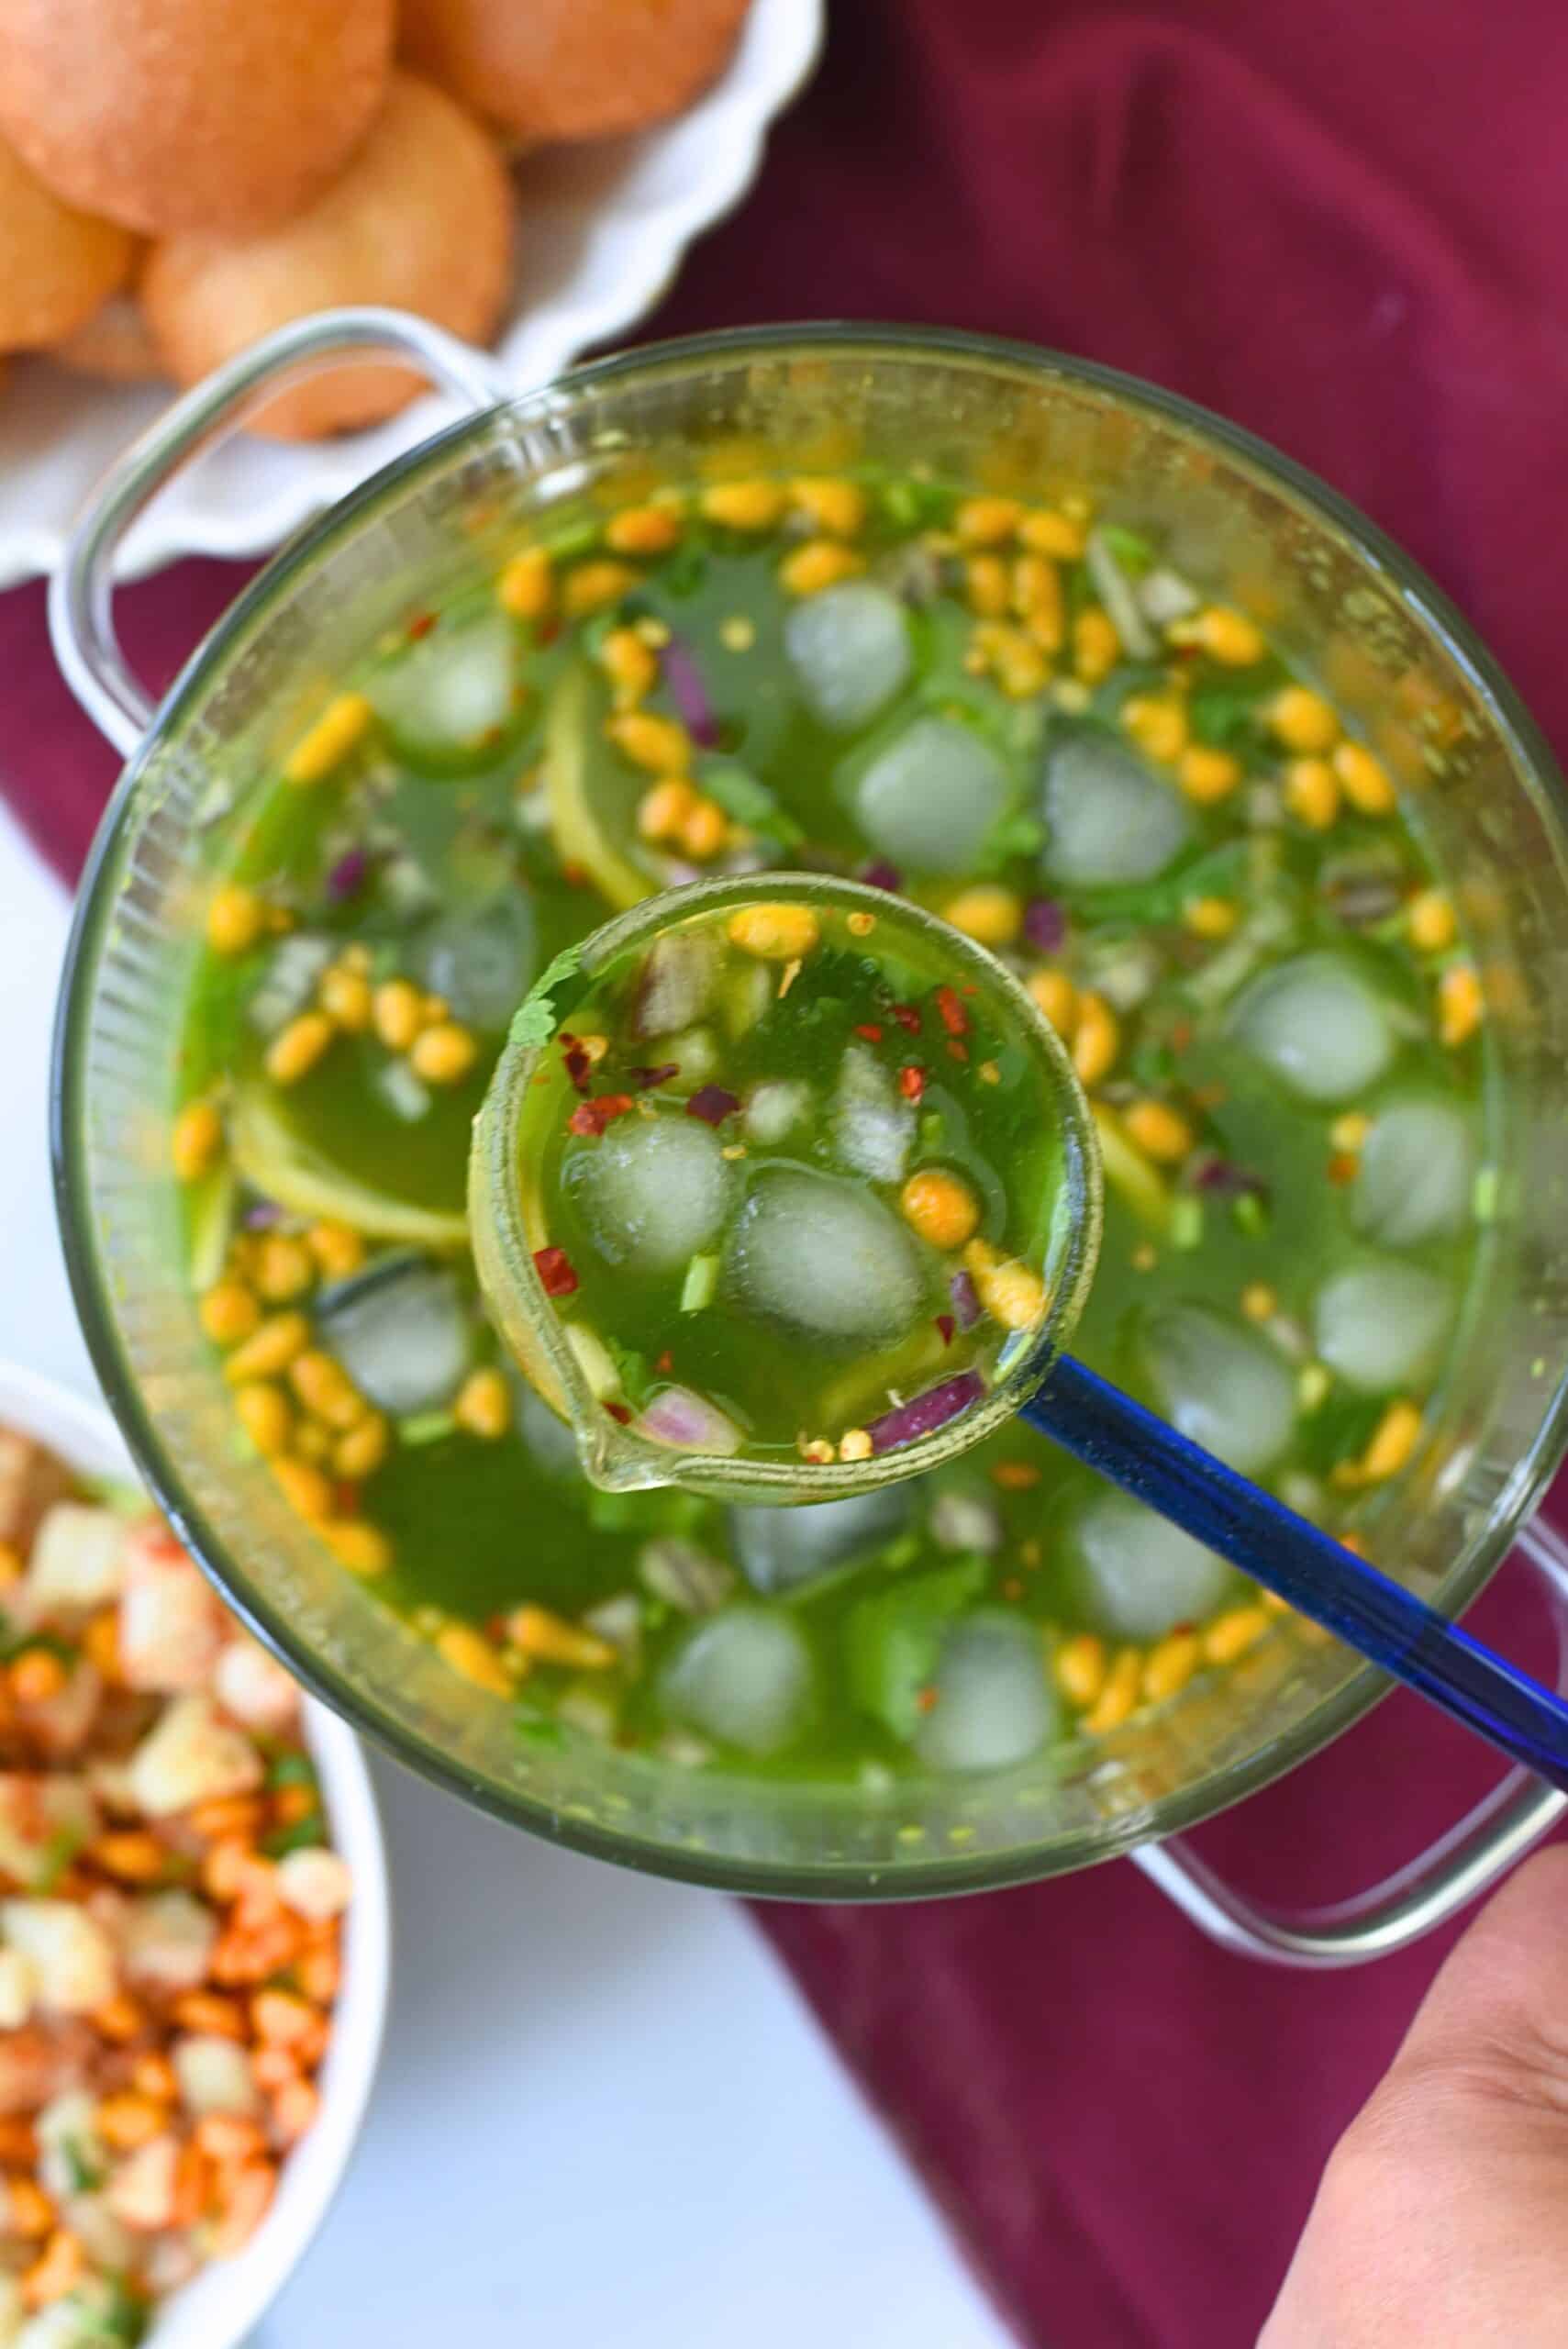
- Now add this paste in a bowl. Add imli chutney and 4 cups of cold water and mix well.
- Taste and Add the chaat masala , chili flakes , chopped onions , lemon slices and ice cubes., and tamarind as needed.
- Finally, add boondi to the pani if you wish to while serving.
- Chill in the fridge for at least 1 hour before serving.
Assembly Ingredients
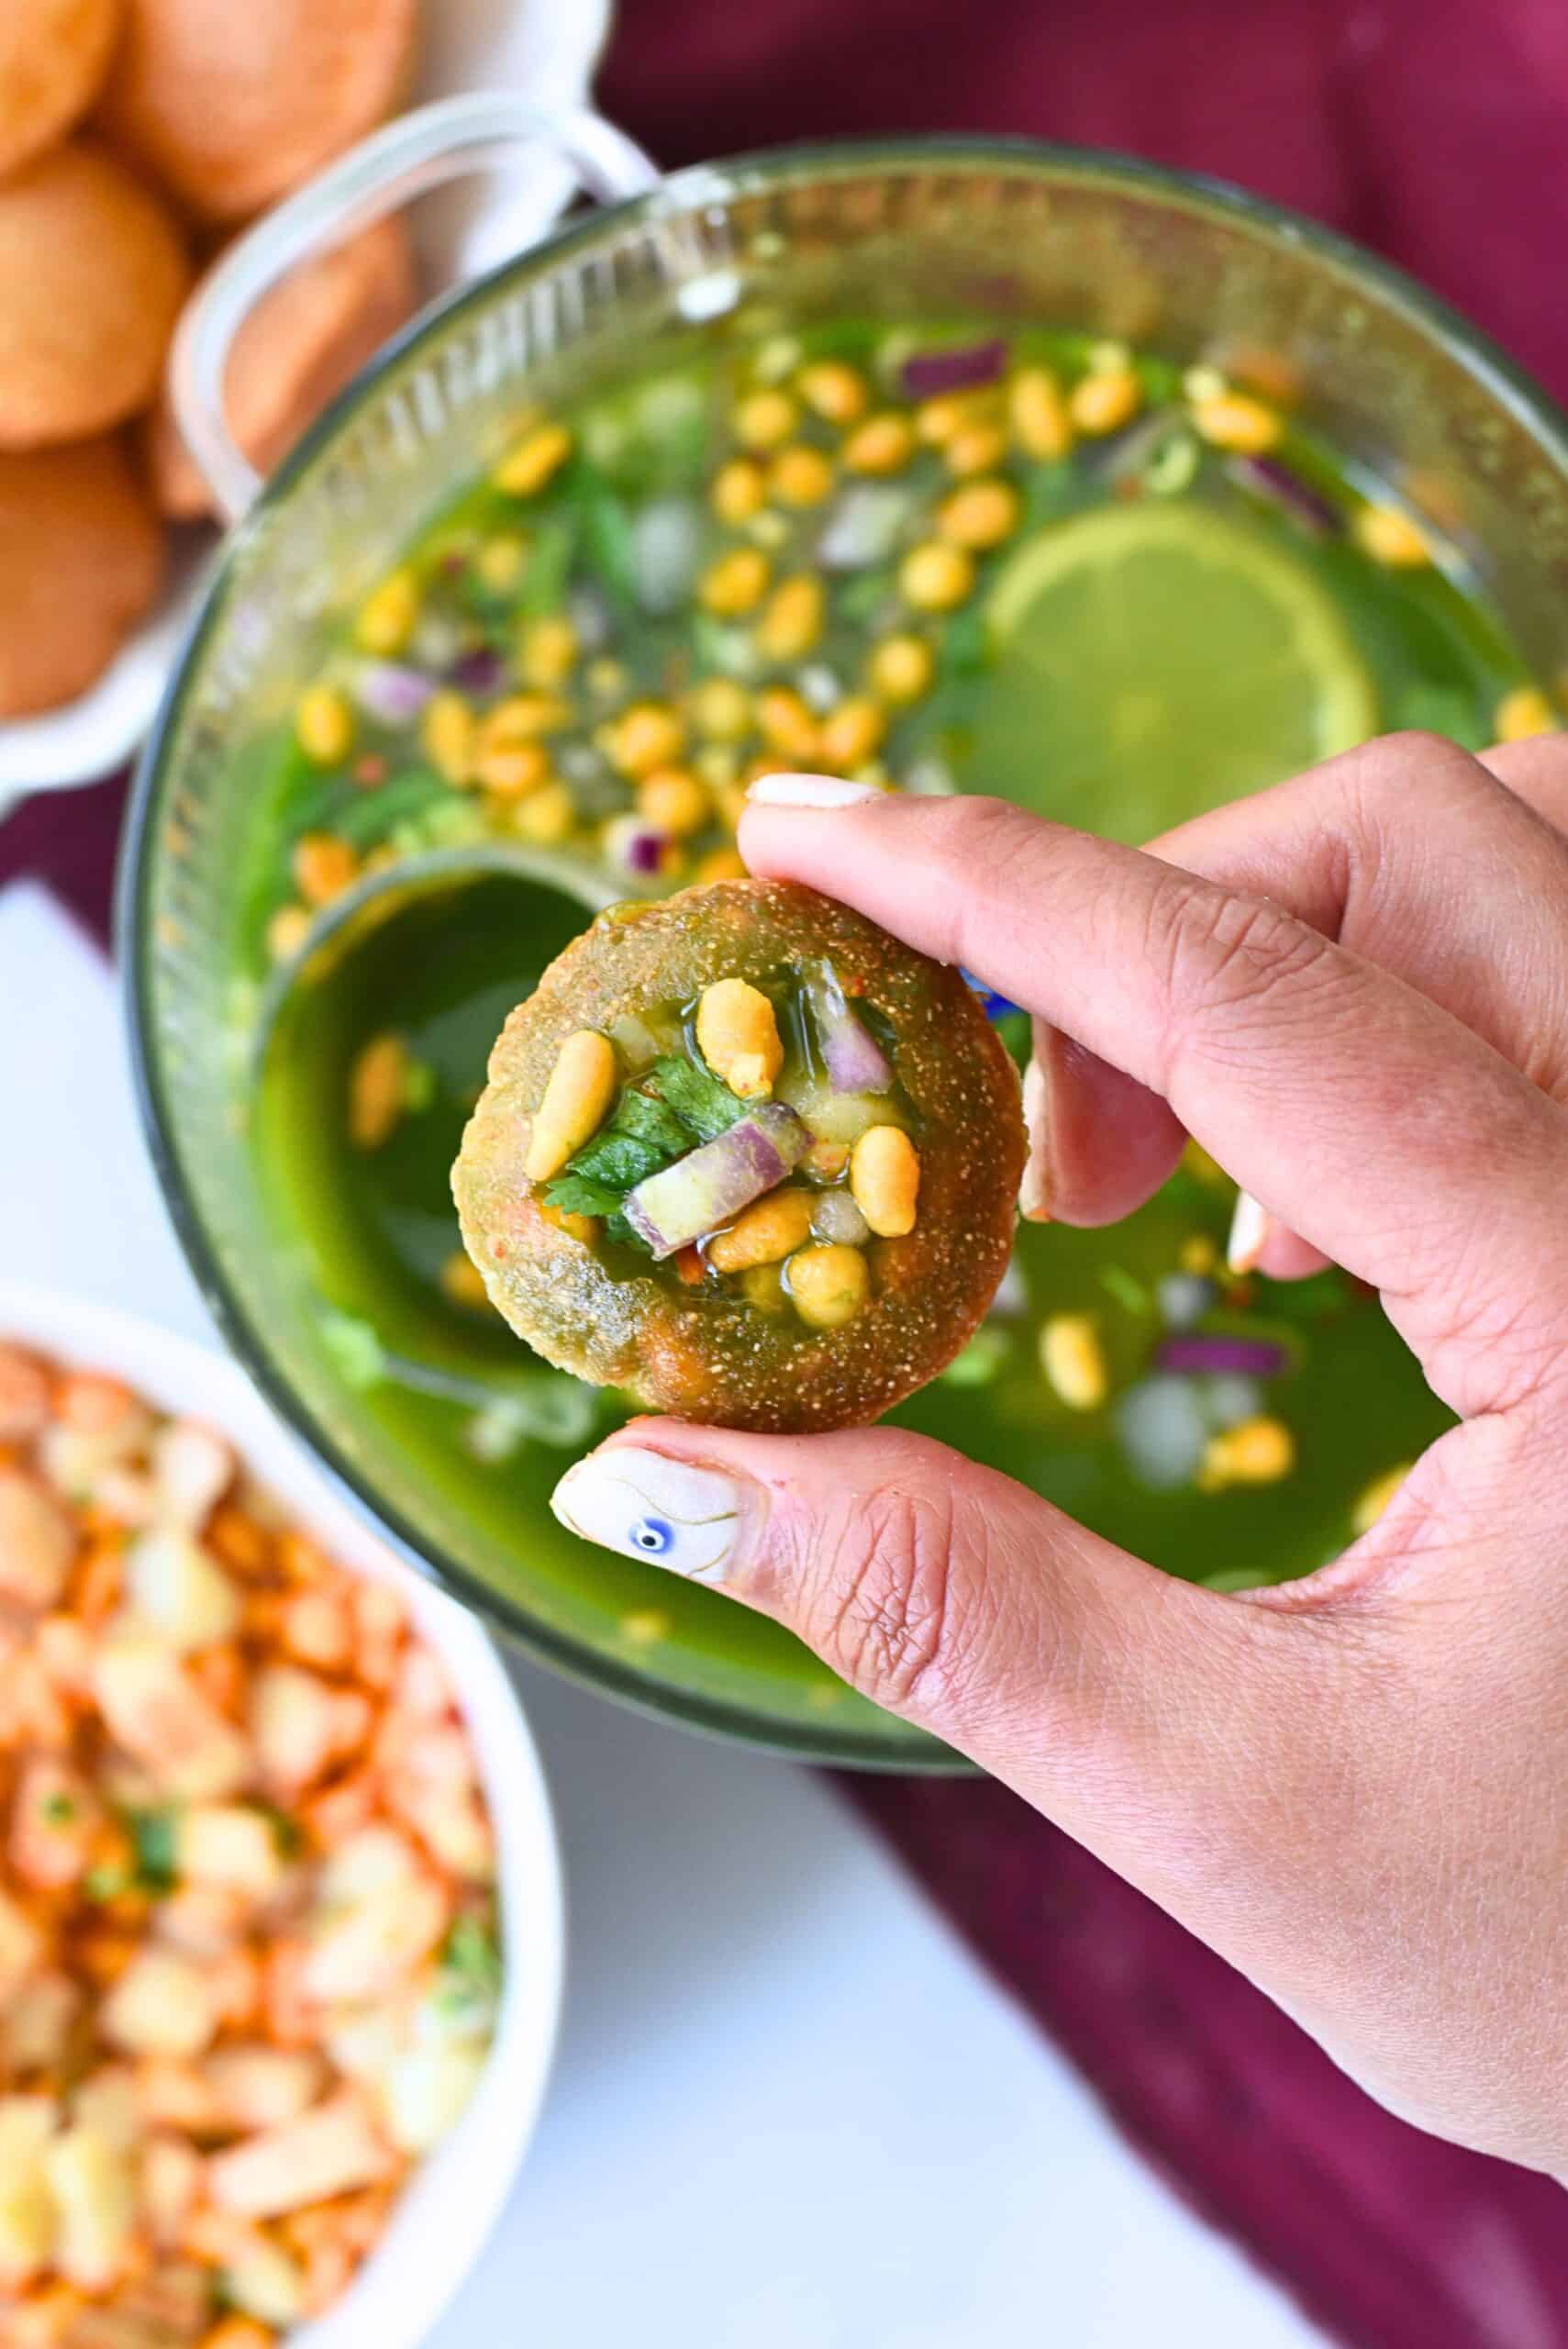
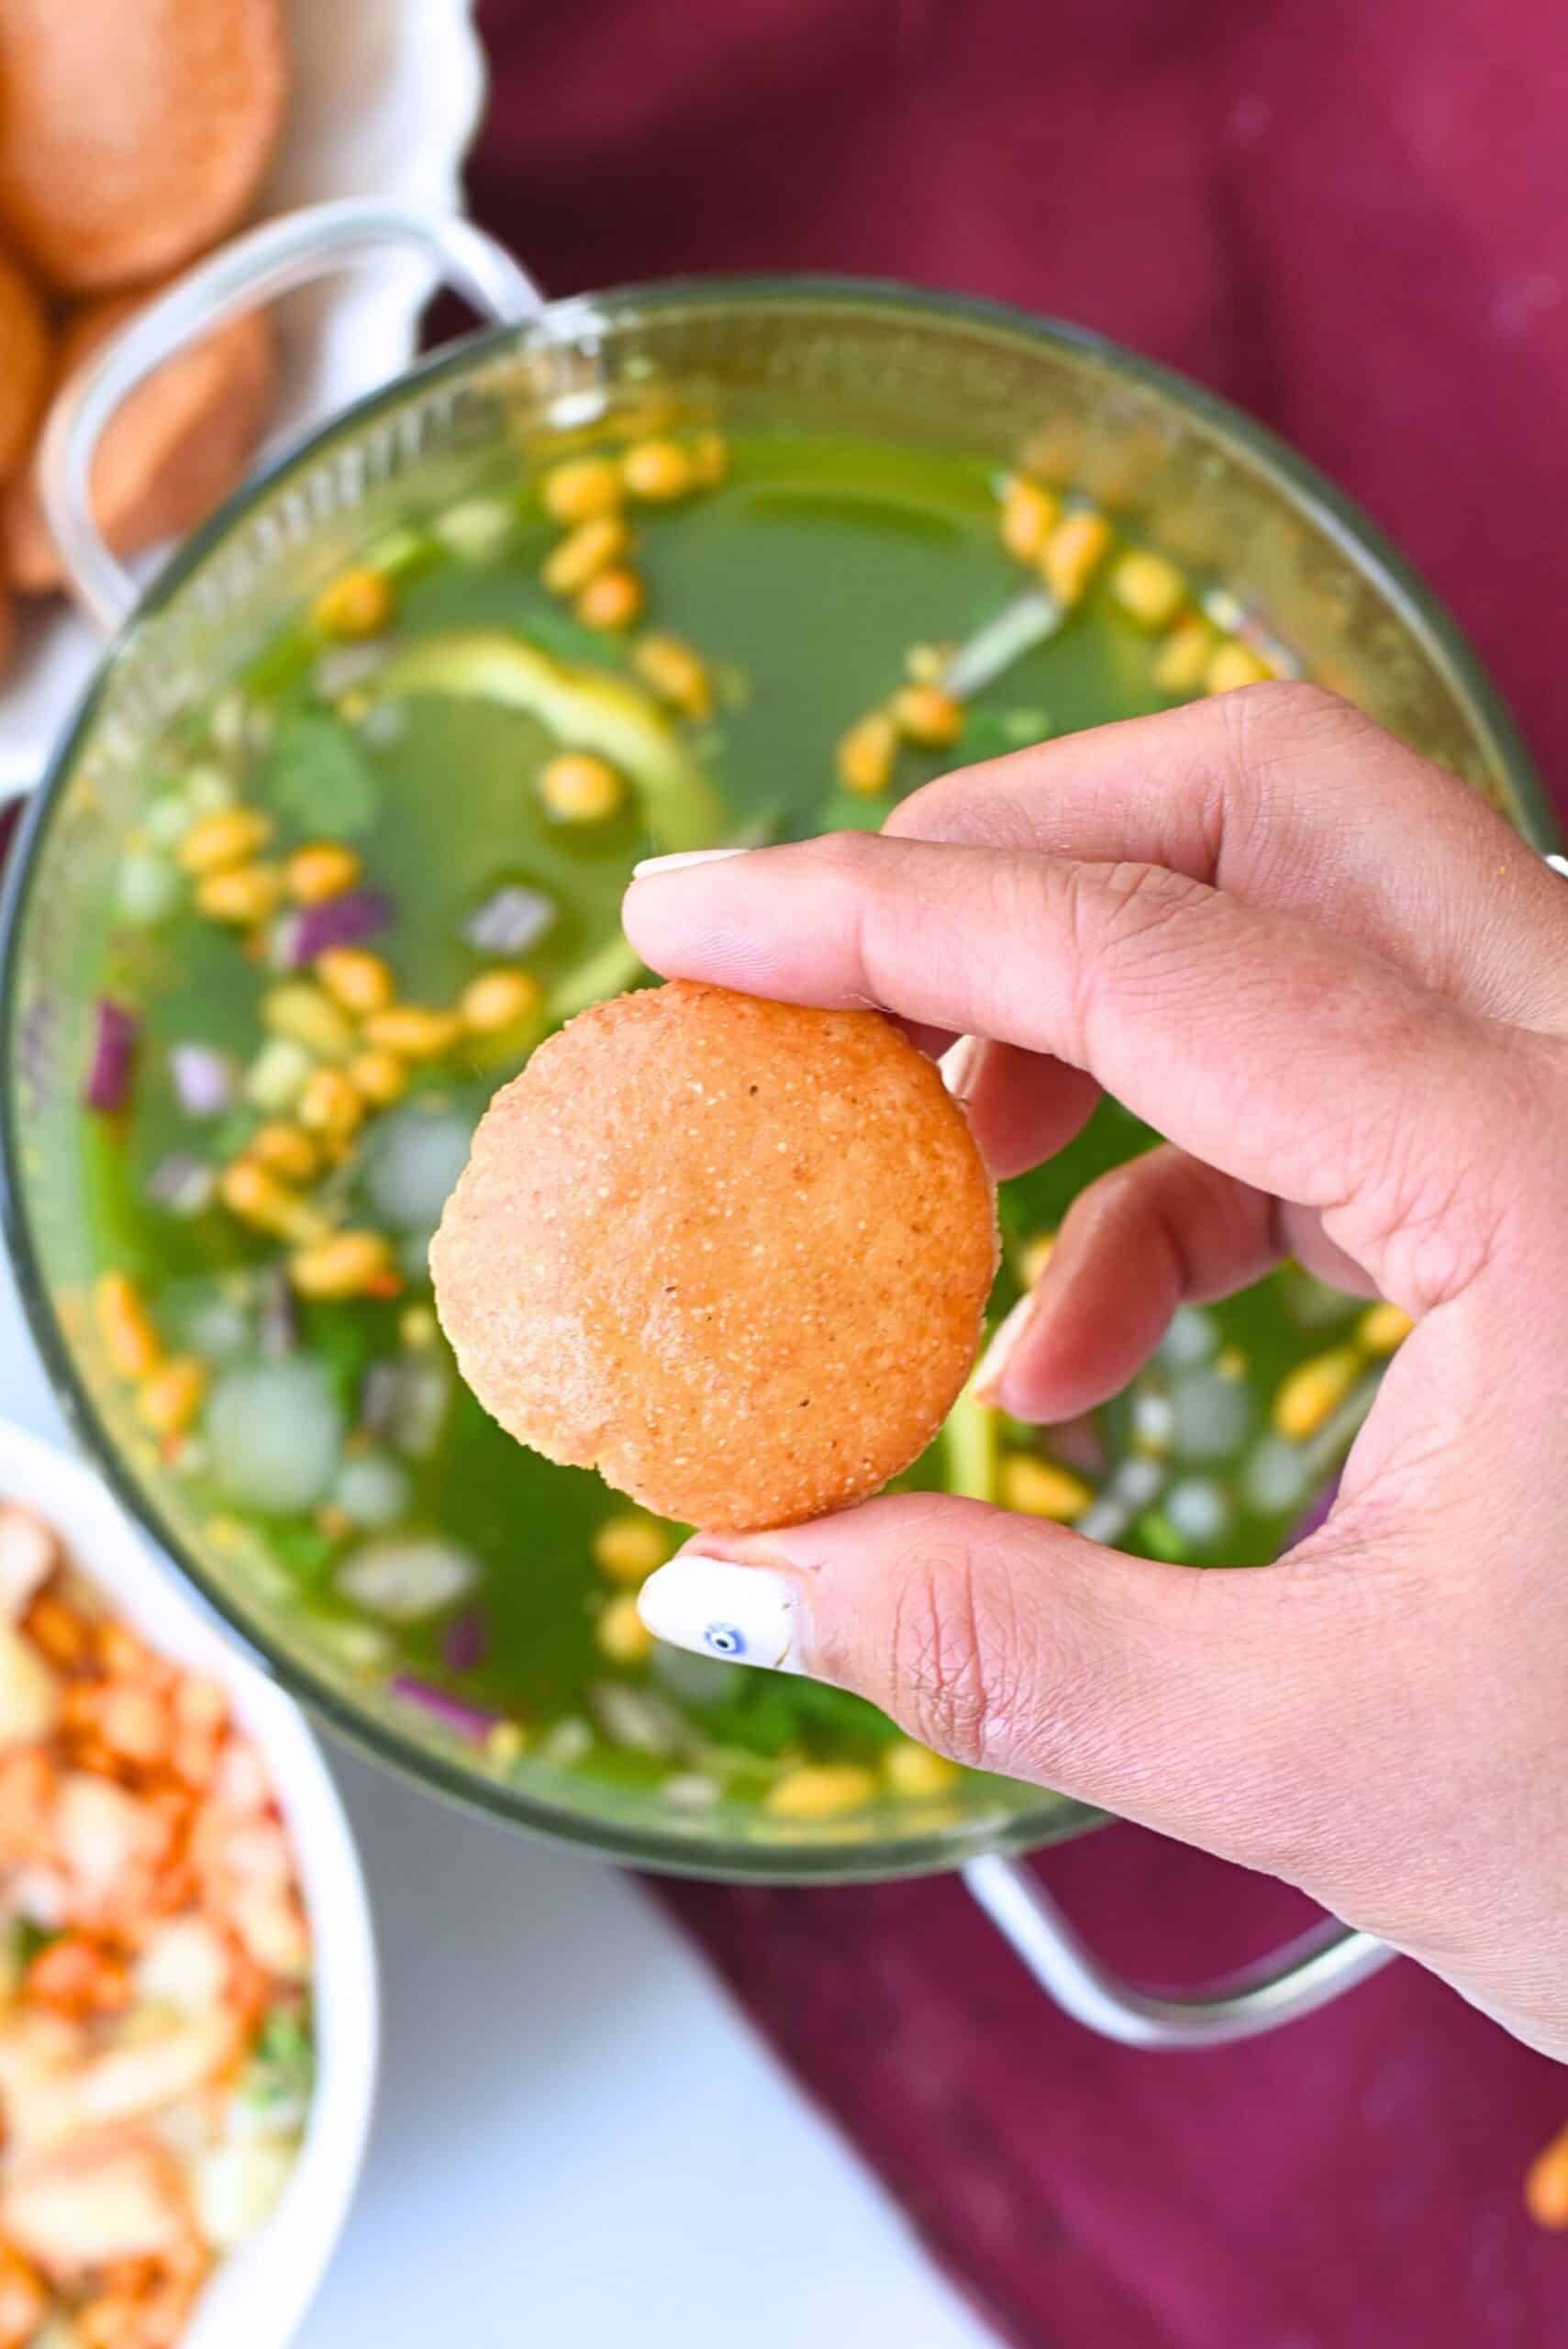
- Gently crack the top of each puri with your thumb to make a small hole.
- Stuff with a teaspoon of the potato filling, add a small spoonful of tamarind chutney if using, then fill with the chilled pani.
- Pop the whole thing in your mouth immediately - don't wait or it'll get soggy!
Soniya's Top Tip
The secret to perfectly puffed puris is rolling them paper thin and maintaining the right oil temperature. Test the first puri. If it doesn't puff within 10 seconds, your oil isn't hot enough.
Pro tips and tricks
If you have never made these delicious morsels at home, check out these pro tips and tricks to help you out:
- Let the dough rest for the full 30 minutes as this makes rolling so much easier
- Keep rolled puris covered with damp cloth to prevent cracking
- Chill the pani for at least an hour before serving for the best flavor
- Don't overstuff the puris or they'll break when you add the pani
- Assemble and eat immediately. Soggy pani puri is sad pani puri
Common Mistakes
| Mistake | What Happens | How I Fix It |
|---|---|---|
| Oil temperature too low | Puris don't puff and turn chewy | I test with one puri first - should sizzle and puff immediately |
| Rolling puris too thick | They won't puff properly | I roll them paper thin, almost translucent |
| Not resting dough | Difficult to roll, puris are tough | I always rest for full 30 minutes, makes huge difference |
| Adding too much water to dough | Sticky, hard to handle | I add hot water gradually and knead well |
Why are my puris not crispy?
When frying, the oil has to be the right temperature. If it is too cold, the puris won't puff up or become crispy, and when the oil is too hot, it can burn the puri before it has a chance to cook.
To test the oil, we recommend placing only one puri in at first to see if it sizzles and starts to puff up quickly. If it does, then the oil is the right temperature for the puri. You can then add 3 to 4 at a time to cook, just make sure you don't overcrowd the wok or pan.
Also, make sure to knead them well since this will help activate the gluten and help them get crispier in the oil.
How to Store
| Can It Be Saved? | How Long? | How to Store |
|---|---|---|
| Fried puris | 2-3 days | Airtight container at room temperature |
| Pani | 1 day | Refrigerated in covered container |
| Filling | 2 days | Refrigerated in airtight container |
Stuffing variations
In addition to to our stuffing, you can try a few different stuffings for the golgappes for added variety. Some of our other favorites include:
- Sprouted mung beans
- Ragda : This variant is what you would get a Juhu Beach in Mumbai. Check the Ragda recipe here
- Kala chana : Since these are expensive, these are usually served at high end chaat corners
Of course, you can other flavors that you love too. As long as they are cut small enough to fit in the puri, you can use your imagination.
Other recipes you will love
If you love foods that you can serve at your next chaat party, family get together, or anytime you are serving a large crowd, check out these other crowd pleasers:

HOMEMADE PANI PURI
Servings:
servingsCalories:
Ingredients
For homemade puri
- 1 cup fine rava / semolina / suji,
- ½ cup all-purpose flour
- ¼ teaspoon baking soda
- ½ cup hot water few more tablespoon if needed
- 2 teaspoon oil, for greasing the board and rolling pin.
- oil, for frying
For Store bought Paani Puri
- 1 packet READY-TO-COOK PURI
- 1 teaspoon oil optional
For Pani recipe
- 1 cup mint / pudina
- ½ cup coriander
- 1 inch ginger
- 2 green chilies
- ½ cup tamarind chutney
- 1 teaspoon chaat masala
- pinch hing / asafetida
- 1 teaspoon roasted cumin powder
- ½ lime juice
- 1 teaspoon black salt/ kala namak
- 4 cup cold water
For Filling recipe
- 2 Boiled and mashed potatoes
- ½ cup boondi
- salt to taste
- ¼ teaspoon red chili powder
- 1 tablespoon chopped cilantro
Instructions
Home made Pani Puri
- Making the dough
- First, add the fine semolina/sooji, all-purpose flour, and baking soda in a bowl and mix well.
- Add the hot water and knead it for 5 to 8 minutes or until the dough is formed.
- Then, sprinkle water as needed and knead until it forms a smooth and soft dough.
- Finally, cover the dough and rest for 30 minutes before kneading for 2 more minutes before rolling the dough out.
Rolling the dough
- First, divide the dough into 6 roughly equal parts. Next, grease the rolling pin and the work surface with oil. Once they are ready, roll the dough evenly to a diameter of about 7 to 8 inches.
- It should not be too thick or thin. About .5 to 2 mm in thickness is fine.
- Next, use a round cutter to cut out circles from the dough.
- Once the rounds are removed, transfer them on to a damp cloth and cover them with another damp cloth.
- Repeat the same with the other parts of the dough by collecting the scraps, kneading again, and rolling it out. Use the same process until all the puri are rolled out.
Frying the Puri
- First, heat the oil over medium heat in a heavy bottomed wok or kadai. To check the right temperature and thickness, test one puri, it should sizzle, float, and puff up immediately.
- Next, gently add 3 to 4 puris to the oil. You can nudge the puris with a spoon to help them puff up a bit.
- Fry all the puris over medium heat. You can use the ones that don't puff up for other chaat snacks like sev puri or eat them with chai or other favorites.
- As they fry, flip them periodically so that both sides reach a light golden-brown color and puris are crisp.
- Finally, remove from the oil and place on an absorbent paper towel to soak up extra liquid.
Filling for the Puri
- For the filling, first peel and mash the boiled potatoes. Next, add in the boondi, salt, and chili powder.
- Finally, mix well and set aside.
Pani Puri Water
- Blend all the pani ingredients except water until you get a smooth paste. You might need to add a tablespoon of water or ice to help it blend.
- Now add this paste in a bowl. Add imli chutney and 4 cups of cold water and mix well.Taste
- Add the chaat masala, chili flakes , chopped onions, lemon slices and ice cubes and tamarind as needed.
- Finally, add boondi to the pani if you wish to while serving.
- Once the ingredients are in the water, place in the fridge for at least 1 hour to chill.
- After an hour, the pani puri ka pani is ready. Finally, add boondi to the pani if you wish to while serving.
Assembling the Pani Puri
- When you are ready to assemble, crack the top of the puris with your thumb and stuff the cavity with soaked boondi and boiled mashed potatoes.
- Next, add a dash of sweet chutney and a spoonful of pani. You will want to serve it immediately.
- If you prefer, you can skip the sweet chutney.
- Either way, they will turn soggy if you wait too long to eat them.
Video
Notes
Store Bought Puri
You can use this ready to cook puri from Amazon to skip the preparation of Puri. Use the Air Fryer to avoid the deep frying of Puri- Pre-heat the air fryer for 5 minutes at 360 degree Fahrenheit.
- Arrange the puri in a single layer. Brush or spray some oil on to the puri.
- Air fry the puri for 2 minutes.
- Remove the puri and set it aside. Continue with the next batch of puri.


Sangeetha says
What did you use for cut pani puri
Soniya Saluja says
Hi Sangeetha, you can use a small cookie cutter or a lid/ cap of a spice/ herb container ?♀️ hope it helps
madhavi says
can you please let me know what is the brand osf the airfryer that you used to make the pooris.
Soniya Saluja says
Hi Madhavi, for the ready-made dried puri we use instant pot air fryer